Download
1 / 10
140 likes | 474 Vues
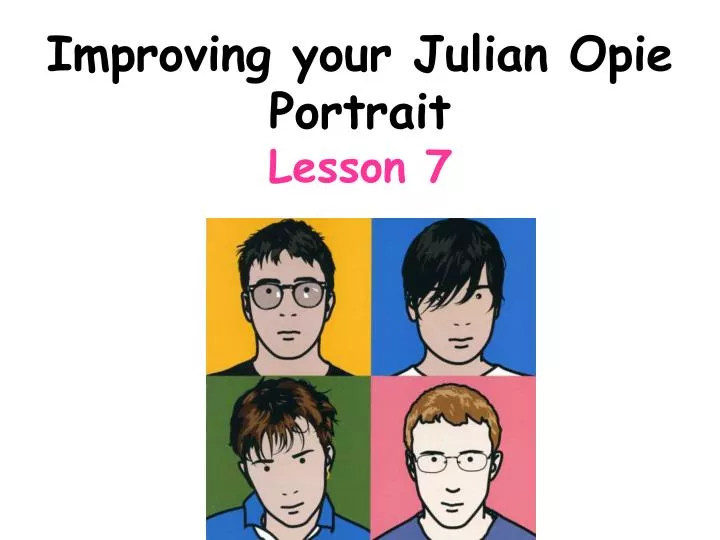
Improving your Julian Opie Portrait Lesson 7. C o n n e c t o r: Discuss how do you make a Julian Opie portrait? –Share in class discussion. Activity: Peer Assess. Review: Part Target 1. Give your partner a target from the below list. Think about where they lost marks in your opinion.

E N D
Connector: Discuss how do you make a Julian Opie portrait? –Share in class discussion.
Review: Part Target 1 Give your partner a target from the below list. Think about where they lost marks in your opinion. Explain the reason for this target to your partner. 1) Make sure drawing fills the page. 2) Don’t press down too hard on the pencil- it leaves dark untidy marks. 3) Make sure all drawing is the correct size and shape. 4) Make sure all shapes are in the correct place in the drawing. 5) Make sure all details and textures are accurate using markmaking. 6) I need to use dots and lines to make my portrait look like Julian Opie’s work.
BIG Picture • Connector • Demonstration • Drawing time • Review: Colour selection.
Learning Outcomes • All will improve their drawing in the style of Julian Opie so it is accurate. • Mostwill have drawn in a second tone in the hair and highlight in the eye. • Some will start to paint the background of the portrait.
Demonstration: Does your work reflect Julian Opie’s style? • 1) IS YOUR PORTRAIT ACCURATE? • Have you simplified... • 2) The eyes to dots? • 3) The nose to either dots or a curve? • 4) The mouth to a wavey line? • 5) Have you used wavey or zigzag marks to show the texture of the hair? • 6) Have you drawn in a second tone in the hair?
Fill in the gaps below on how to mix colours… Review: Colour Selection • Purple, greenandorangeare types of _______ colours. • Red,blue and yelloware types of ________ colours. • Colours opposite on the colour wheel are called ___________. • Opposite colours are used together because ___________ ________________________. • Colours next to each other are called _________________. • Colours next to each other are used together because _______ ________________________.
Write softly on your portrait (background, clothing etc) what colours you will use. Does the colour reflect the person in the portrait e.g. the team they play for? Review: Colour Selection Secondary • Purple, greenandorangeare types of _________ colours. • Red,blue and yelloware types of ________ colours. • Colours opposite on the colour wheel are called __________________. • Opposite colours are used together because _______________________________________________________________. • Colours next to each other are called ____________. • Colours next to each other are used together because ____________________________________________________________. Primary Complimentary Colours they look opposite, one colour is hot and one is cold making them stand out Harmonious Colours are similar as they are made from each other and so blend into one another