Download
1 / 40
430 likes | 464 Vues
Microsoft OneNote. What is Onenote ?. OneNote is a note-taking and information gathering management program that allows ideas and information in electronic form to be easily managed. You can insert files or web content, create links to web sites or to locally/network stored files.

E N D
What is Onenote? • OneNote is a note-taking and information gathering management program that allows ideas and information in electronic form to be easily managed. • You can insert files or web content, create links to web sites or to locally/network stored files. • All the information is in a searchable format. • Notebooks are made up of Sections. Sections can be further organized into Pages.
What is onenote? • OneNote Notebooks are like file cabinets. Sections are file folders and Pages are the individual documents within the folders.
Why should I use onenote? • Because when you’re working on a project, you have information stored everywhere! OneNote lets you get to all of it from one convenient location.
Getting started • For an overview of OneNote’s benefits and features, view the OneNote Guide:1. Start Microsoft Office OneNote2. In the Notebooks navigation pane, click OneNote Guide,3. Click the Getting Started with OneNote section tab at the top of the note page.4. In the side margin, click the tabs of the pages that you want to read. • Search “OneNote” on the internet to find tutorials.
Navigating onenote • OneNote uses a “ribbon” menu made up of File, Home, Insert, Share, Draw, Review and View. This menu appears at the top of the OneNote screen:
Create a Notebook • Click on the File tab to open “Notebook Information”. • Click New to open “New Notebook”. Here, you decide where the Notebook will be stored and what it will be named. In this example, we’ll create a notebook for “History of Chocolate”. The file will be stored on “My Computer” in the specified location. Click on the “Create Notebook” button to complete.
Adding Sections • Once the notebook is created, it’s time to add sections to the notebook. For the “History of Chocolate” notebook, a section is created for “Early History”. Remember that a Section is like a file folder. • A few section tabs are created by default. They can be renamed by double clicking on the tab and typing in the new name. For our example, we’ve created a section called “Early History”.
Section • New section called “Early History”.
Adding pages • Sections are made up of pages and the pages can have different topics. • The page names are entered in this area of the Section: • For the “History of Chocolate”, in the “Early History” section, we’ll create a Page for “Mesoamerica”.
Adding pages • As pages are created, they can be seen in the “New Page” section of the screen. • Additional pages for a section are created by right clicking in the “New Page” , and selecting “New Page”. • The next slide, shows that the “Early History” section contains pages for “Mesoamerica”, “Europeans” and “Industrial Revolution”.
Early History • List of notebooks Page name “New Page” section
Adding info the page • Text is added to the page by clicking anywhere on the page and typing inside the resulting box:
Links to web pages • To create a link to a web page, select the Insert tab from the menu ribbon. • Highlight the text that will be the hyperlink. • Click the Link icon, , to open the “Link” dialog box. • Put the url “Address” box. • In this example, we’re going to learn more about the Aztecs by visiting a web site. To do this, highlight the word “Aztecs”, click Link, and then insert the url into the “Address” box.
Linking to Aztec Info • This page shows that “Aztecs” is now a link.
Linking to aztec info • Now, by clicking on the “Aztecs” link, we can visit the “Aztec” website:
Linking to files • Links to files are handled the same was as links to web pages. Except instead of the “Address” being a url, it will contain the path to the file. • By clicking on the open file folder icon, you can easily navigate to where the file is stored: Navigate to files
Linking to other sections • You can easily create links to information on other sections/pages within a notebook and within other notebooks. • Lets view the recipe for a traditional Aztec drink, Xocolatl, by creating a link on the “Mesoamerican” section that will link to the “Chocolate Recipes” section.
Linking to other sections • Highlight the word “Xocolatl”. • Click on Insert in the ribbon menu. • Click on the Link icon to open the “Link” box. Notice the box for “Or pick a location on OneNote:” Beneath this box is a window showing all of my Notebooks.
Linking to other sections • By clicking on the nodes of the notebook “History of Chocolate” we can drill down to the “Aztec Chocolate” page on the “Chocolate Recipes” section. • After clicking on “Aztec Chocolate”, notice that the Address box is populated. Click OK.
Linking to other sections • Now “Xocolatl” is appears as a link: • Clicking on the link retrieves the recipe on the “Aztec Chocolate” page of the “Chocolate Recipes” section.
Emails • Add emails to notebooks. • Open the email. • Click the ‘OneNote” icon. • Pick where you want to store the email, and click “OK’. • In this example, we will add an email to the “Early History” section of the “History of Chocolate” notebook. It could also be added to a page inside the section. See the next slide for the dialog box.
EMAILS • After clicking “OK”, a new page called “Chocolate use by Aztec Priests” has been added to the “Early History”. • I usually create a section just for emails. • Notice that the page takes it’s name from the email’s “Subject”.
Adding tags • OneNote comes with a variety of pre-defined tags that can be used to highlight information. • Tags are found on the Home tab of the menu ribbon. Here’s a few examples of the available tags:
Adding Tags • Outlook tasks can be added to section or page by clicking the Outlook Tasks icon on the Home menu ribbon. Here, an Outlook Task has been added to the “Industrial Revolution” page of the “Early History” section. This task will show up in Outlook.
Adding tasks • The Outlook Task • Here it is in Outlook:
Searching tags • Use the Find Tags icon on the Home tab of the menu ribbon to view all of your tags in the “Tags Summary”. Here, we can see all of the tags for the “Early History” section. I have a “To Do” option to “Call Dr. Jones”, a critical message, and a question.
Inserting pictures • Click on Insert on the OneNote menu ribbon. • Click on the Picture icon. • Find your picture. • Click Open. • Here, a picture of a European Coffee house has been inserted on the “Europeans” page of the “Early History” section:
Sharing notebooks on the network • In this example, we’ll share the “History of Chocolate” notebook on the network. • Display “Notebook Information” by clicking on File located on the ribbon menu. This information is a list of all of the notebooks that you have created. • Scroll down to the “History of Chocolate” notebook.
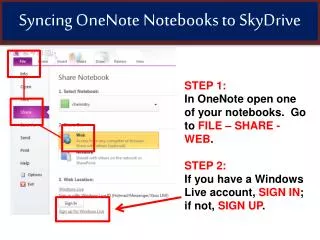
Sharing notebooks on the network • Open the “Share Notebook” window by clicking on the link “Share on web or network”. • “Share Notebook” window: Click here!
Sharing notebooks on the network • Click on “Network” located in the “2. Share On” section. • Browse to locate the desired network location in the “3. Network Location” section, then click the “Share Notebook” button.
Sharing notebooks on the WEB • In this example, we’ll share the “History of Chocolate” notebook on the web. • Display “Notebook Information” by clicking on File located on the ribbon menu. This information is a list of all of the notebooks that you have created. • Scroll down to the “History of Chocolate” notebook.
Sharing notebooks on the WEB • Open the “Share Notebook” window by clicking on the link “Share on web or network”. • “Share Notebook” window: Click here!
Sharing notebooks on the WEB • Click on “Web” located in the “2. Share On” section. • Click on “Windows Live” in the “3. Web Location” section to access the SkyDrive.
Sharing notebooks on the WEB • A Microsoft account is required to use the SkyDrive. Anyone can set one up. • Once the account is set-up, it’s time to share the “History of Chocolate” notebook. • Click on Upload. • Find the “History of Chocolate” notebook. That’s it! Now an orange rectangle, “OneNote Presentation” appears.
Sharing notebooks on the WEB • “OneNote Presentation” isn’t very descriptive. • Rename it to “OneNote History of Chocolate”. • Right click on the orange “OneNote Presentation”. • Select “Rename”. • Type the new name. • Much better!
Sharing notebooks on the WEB • Now that the file has been uploaded to SkyDrive, it’s ready to share. • To share • Right click on the file • Click on “Sharing” and fill out the form and click “Share”:
Onenote resources • Getting Started with OneNote • The Story of Chocolate