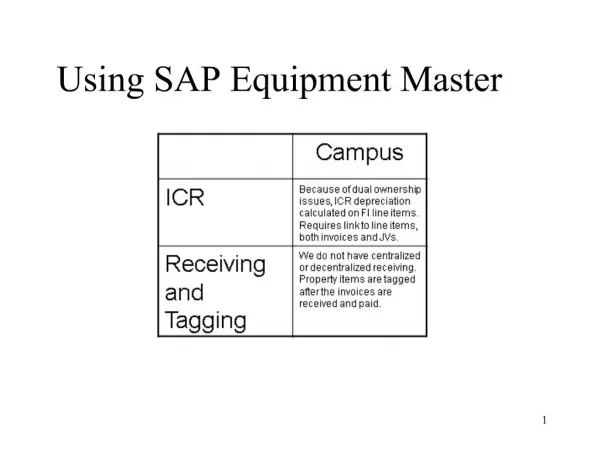
Download

1 / 41
430 likes | 665 Vues
USING SLIDE MASTER. Slide Master. A slide master is the top slide in a hierarchy of slides that stores information about the theme and slide layouts of a presentation, including the background, color, fonts, effects, placeholder sizes, and positioning.

E N D
Slide Master • A slide master is the top slide in a hierarchy of slides that stores information about the theme and slide layouts of a presentation, including the background, color, fonts, effects, placeholder sizes, and positioning. • Every presentation contains at least one slide master.
ADVANTAGES • The key benefit to modifying and using slide masters is that you can make universal style changes to every slide in your presentation, including ones added later to the presentation. • When you use a slide master, you save time because you don't have to type the same information on more than one slide. • The slide master especially comes in handy when you have extremely long presentations with lots of slides.
Because slide masters affect the look of your entire presentation, when you create and edit a slide master or corresponding layouts, you work in Slide Master View. 1. A slide master in Slide Master View
2. Slide layouts associated with the slide master When you modify one or more of the layouts beneath a slide master, you are essentially modifying the slide master. Each slide layout, is set up differently, yet all layouts that are associated with a given slide master contain the same theme (color scheme, fonts, and effects).
The following image on the previous slide shows a single slide master with the Flow theme applied, and two (different) supporting layouts. Notice how each of the two layouts shown portray a different version of the Flow theme — using the same color scheme, but in a different arrangement. Also, each layout provides text boxes and footers in different locations on the slide, and different font sizes in the various text boxes.
When you want your presentation to contain two or more different styles or themes (such as backgrounds, color schemes, fonts, and effects), you need to insert a slide master for each different theme. • In the image that follows, there are two slide masters as you would see them in Slide Master view. Each slide master has a different theme applied to it.
Best practice for creating and working with slide masters It is a good idea to create a slide master before you start to build individual slides, rather than after. When you create the slide master first, all of the slides that you add to your presentation are based on that slide master and the associated layouts. When you start making changes, make them on the slide master.
Also, if you create a slide master after you build individual slides, some of the items on the slides may not conform to the slide master design. You can override some of the slide master customizations on individual slides by using the background and text formatting features, but others (such as footers and logos) can be modified only in Slide Master view.
Create or customize a slide master 1. Open a blank presentation, and then, on the View tab, in the Master Views group, click Slide Master.
2. When you open Slide Master view, a blank slide master with the default, associated layouts appears. NOTE: In the slide thumbnail pane, the slide master is the larger slide image, and the associated layouts are positioned beneath the slide master.
3. To create a layout, or to customize an existing layout, see Create a slide layout that meets your needs. • On the View tab, in the Master Views group, click Slide Master. • In the pane that contains the slide masters and layouts, locate and click the layout that resembles the closest match to what you want in your custom layout.
Add one or more content placeholders to a layout 1. On the View tab, in the Presentation Views group, click Slide Master. 2. In the pane that contains the slide masters and layouts, click the layout that you want to add one or more placeholders to. 3. On the Slide Master tab, in the Master Layout group, click Insert Placeholder, and then click the type of placeholder that you want. 4. To add or modify placeholders in your layouts:
4. Click a location on the layout, and then drag to draw the placeholder. 5. To add more placeholders to a layout, repeat steps 2 through 4. NOTE : When you add placeholders to a layout, if the content in those placeholders changes the layout's purpose, you will want to rename the layout. To do so, right-click the slide layout thumbnail, click Rename Layout, type a new name, and then click Rename. 6. On the Slide Mastertab, in the Close group, click Close Master View to return to Normal view.
7. Do one of the following: • To reapply the newly-edited layout to an existing slide, in the slide thumbnail list, select the slide, and then on the Home tab, in the Slides group, click Layout, and then select the revised layout. • To add a new slide that contains the layout (with the newly-added placeholders), on the Home tab, in the Slides group, click New Slide, and then select the slide revised layout.
5. To remove any of the built-in slide layouts that accompany the default slide master, in the slide thumbnail pane, right-click each slide layout that you want to delete, and then click Delete Layout on the shortcut menu. 6. Apply a design or theme-based colors, fonts, effects and backgrounds.
7. To set the page orientation for all of the slides in your presentation, on the Slide Master tab, in the Page Setup group, click Slide Orientation, and then click either Portrait or Landscape. 8. On the File tab, click Save As. 9. In the File name box, type a file name. 10. In the Save as type list, click PowerPoint Template, and then click Save. 11. On the Slide Master tab, in the Close group, click Close Master View.
Add transitions between slides Slide transitions are the animation-like effects that occur in Slide Show view when you move from one slide to the next during an on-screen presentation. You can control the speed of each slide transition effect, and you can also add sound. SLIDE TRANSITIONS
Add Transitions STEP1. Select the slide to which you want to apply a transition.
STEP2. On the Transitions tab, select the More button to reveal the all transition options in the gallery.
STEP3. Select the transition you’d like to apply to your slide. The transitions are divided into three types…Subtle, Exciting, and Dynamic Content. You can hover your mouse over each item in the gallery to preview the transition with Live Preview.
STEP4. You can adjust many of the transitions using Effect Options. The options will vary depending on which transition you’ve selected.
STEP5. You can add additional customizations in the Timing Group. You can add sound by selecting one of the options in the Sound dropdown list
STEP7. Or choose to advance the slide On Mouse Click (default) or automatically after a certain period of time.
STEP8. If you’d like to apply one transition to every slide in your presentation, select the Apply To All button.
STEP9. You can preview your transition by clicking the Preview button on the Transitions tab. A few clicks is all it takes to add a little energy and excitement to an otherwise dry presentation.
Design Theme Color Schemes Design Theme Color Schemes • Once you have selected a style of design theme that you like for your PowerPoint presentation, you are not limited to the color of the theme as it is currently applied. • Click on the Colorsbutton at the right end of the design themes on the Design tab of the ribbon.
Hover your mouse over the various color schemes shown in the drop down list. The current choice will be reflected on the slide. • Click the mouse when you find the right color scheme.
Font Families are Part of the Design Themes Select a Font Family • Each design theme is assigned a font family. Once you have selected the design theme for your PowerPoint presentation, you can change the font family to one of the many groupings within PowerPoint 2010. • Click the Fonts button at the right end of the design themes shown on the Design tab of the ribbon.
Hover your mouse over any of the font families to see how this group of fonts will look in your presentation. • Click the mouse when you have made your selection. This font family will be applied to your presentation.
PowerPoint Background Styles of Design Themes Change the PowerPoint Background Style • Just as you were able to change the background on a plain PowerPoint slide, you can do the same while using one of the many design themes. • Click theBackground Styles button on the Design tab of the ribbon.
Hover your mouse over any of the background styles. • The background style will be reflected on the slide for you to evaluate. • Click the mouse when you find a background style that you like.
Hide Background Graphics on the Design Theme Background Graphics Can Be Hidden • Sometimes you want to show your slides with no background graphics. This is often the case for printing purposes. The background graphics will remain with the design theme, but can be hidden from view.
Check the Hide Background Graphics box on the Design tab of the ribbon. • The background graphics will disappear from your slides, but can be turned back on at any later time, by simply removing the check mark in the box.