Download

1 / 29
340 likes | 1.01k Vues
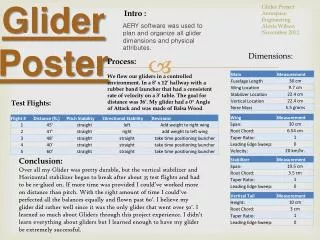
Balsa Glider Construction. Balsa Glider Construction. Balsa Wood. Very high strength to weight ratio. Easy to cut and sand Grainy Available in strips, sheets, or blocks Not very durable for a fuselage… spruce is better . Glider Components. Fuselage Wings Horizontal Stabilizer

E N D
Balsa Wood • Very high strength to weight ratio. • Easy to cut and sand • Grainy • Available in strips, sheets, or blocks • Not very durable for a fuselage… spruce is better.
Glider Components • Fuselage • Wings • Horizontal Stabilizer • Vertical Tail (or Stabilizer) • Nose Weight
Familiarize yourself with the plan • Components • Dimensions • Materials • Outlines vs. Cuts
Wing Vertical Tail Horizontal Stabilizer Leave extra space at these locations if material allows. Building on a single sheet Notice the grain direction: Always spanwise!
Cut for Length Wing Location Center of Gravity Horizontal Stabilizer Vertical Tail Neutral Point Marking the fuselage
Choosing a Wing Planform • Elliptical wings might be great for full size aircraft, but are challenging for small gliders • Straight leading edges tend to work well for small gliders
Cut Out Pieces • Cut the wing with extra span if material allows. (See later note for reason) • Cut out stabilizers and sand leading and trailing edges with minimal rounding.
Trailing Edge First then Cut • Trailing edge imperfections most often occur at wingtips • If material allows, finish trailing edge then make final cuts for span and/or leading edge curvature
Shaping the Wing Profile • Leading edge should have minimal rounding • Trailing edge needs taper on top only • Use sanding block and edge of a solid surface for uniform sanding
Adding the wing • Center the wing on the fuselage. • Glue it on straight and square to the fuselage… this is critical.
Making a Strong Bond • Typical novice method of lots of glue on an edge then stick it together is weak • Light bond with reinforcing fillets increases the glue surface area and bond strength
Add the Horizontal Stabilizer • One piece stabilizer • Stronger • Only possible if mounted somewhere away from vertical stabilizer • Two piece stabilizer • Weaker • Mount anywhere else
Front Back Side of Fuselage HS Stabilizer Wedge Canard Position HS Front back Tail Position HS One Piece Stabilizer • Cut out wedge from glider plan • Trace on to fuselage wood scrap then cut out wedge • Glue wedge (not stabilizer) to top of fuselage (direction depends on tail or canard mount)
Check alignment • Hold stabilizer on wedge and check from front or back that it is parallel to wing • If not, sand wedge slightly and recheck
Glue the Stabilizer • Cut out wedge from the glider plan • Trace angled line onto side of fuselage • Direction depends on tail or canard mount
Front Back Side of Fuselage HS Wedge HS Canard Position HS Tail Position Two Piece Stabilizer • Cut out wedge from glider plan • Trace angled line onto side of fuselage • Direction depends on tail or canard mount
HS Canard Position HS Tail Position Check alignment • Cut stabilizer in two • Glue one side at a time to each side
Glue Stabilizer • Glue to SIDEof fuselage • Make certain that each half is straight and square to fuselage
Front Back Side of Fuselage VT VT VT Top View Vertical Stabilizer Side Mount • Requires tail at a completely different location on fuselage from horiz. stab. • Glue onto side of fuselage flush with bottom edge and front edge even with vertical tail mark
Front Back Side of Fuselage VT VT Top View VT VT Vertical Stabilizer Top Mount • Can be used no matter where tail is located • Draw line down center of fuselage top starting at vertical tail mark • Glue on vertical tail straight and square
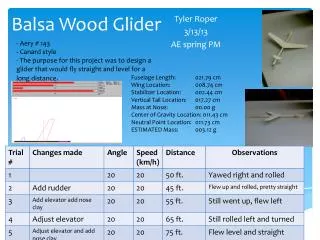
Balance the Glider • Place pencil on table top and put glider on top of it with C.G. directly over pencil • Add clay to nose until glider balances at the C.G.
Balance the Glider • Hold glider on fingertips placed at nose and tail • Add clay to wingtips until glider balances at fuselage
Wings with Dihedral? • Prior to gluing to fuselage • Completely finish and sand wing • Put wing vertical with its trailing edge flat on a smooth, level surface such as glass
Making Cuts • Put triangle at dihedral cut locations • Use sharp blade • Hold triangle firmly to the wing and cut partially through wing • Do this at each location (must be parallel cuts)
Assemble Wing • Put wax paper on glass surface • Hold wing panels together • Wick glue into wing joint e.g. CA adhesive • Complete polyhedral then central joint
Making Cuts • Put triangle at dihedral cut locations • Use sharp blade • Hold triangle firmly to the wing and cut partially through wing • Do this at each location (must be parallel cuts)
Final Assembly • Dihedral may require cutting a shallow v-shaped trough into top of fuselage