1 / 68

Personalizing Google Earth With Maps And Points Of Interest

Personalizing Google Earth With Maps And Points Of Interest. Lecturer - Jeff Neely jcneely2@cox.net. Topics How to download Google Earth Navigating Google Earth How to add a map overlay How to add a placemark. Why Use Google Earth?.

jacie
Télécharger la présentation

Personalizing Google Earth With Maps And Points Of Interest

An Image/Link below is provided (as is) to download presentation Download Policy: Content on the Website is provided to you AS IS for your information and personal use and may not be sold / licensed / shared on other websites without getting consent from its author. Content is provided to you AS IS for your information and personal use only. Download presentation by click this link. While downloading, if for some reason you are not able to download a presentation, the publisher may have deleted the file from their server. During download, if you can't get a presentation, the file might be deleted by the publisher.

E N D

Presentation Transcript


  1. Personalizing Google Earth With Maps And Points Of Interest Lecturer - Jeff Neely jcneely2@cox.net

  2. Topics • How to download Google Earth • Navigating Google Earth • How to add a map overlay • How to add a placemark

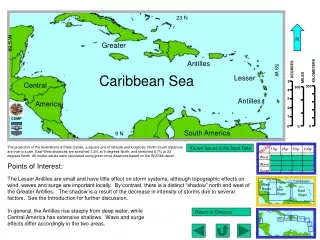
  3. Why Use Google Earth? Pair historical maps with a modern map to locate features Provide a visual reference of locations

  4. Google Earth download site: http://www.google.com/intl/en/earth/index.html

  5. Uncheck “Include Google Chrome …” if you do not want to install the Google Chrome browser, then click on “Agree and Download” button

  6. Open Google Earth

  7. Menu Bar

  8. Search Panel

  9. Toolbar Buttons

  10. 3D Viewer

  11. Navigation Controls

  12. Places Panel

  13. Layers Panel

  14. Expand “My Places”

  15. Check placemark to view. Uncheck to hide placemark.

  16. To adjust a placemark’s properties, right click on placemark name

  17. Left click on “Properties”

  18. Placemark popup properties window

  19. Use the “File” dialog box to save the placemark or folder to your computer. Enter the name for the new file, and click Save in the dialog box. The placemark or the folder is saved to that location with an extension of “.kmz”

  20. Double click on placemark name to zoom in

  21. Uncheck placemark name to hide the map layer

  22. Double click on location to zoom in on map

  23. Or use the navigation control to zoom in or out on map

  24. For 3D view, left click and drag Streetview icon to desired location

  25. Release left mouse button to enter street view

  26. Streetview

  27. Left click on 3D Viewer and drag the mouse for another angle of the same street

  28. Left click to exit street view

  29. Reset tilt and orientation of 3D Viewer pane

  30. For help on using Google Earth

  31. Left click on “Getting started and basics”

  32. Left click on “Basic features user guide” or “Google Earth tutorials”

  33. Working With Map Overlays • Maximum resolution • Map sources • Historical maps • Topo maps • Acceptable file formats for overlay files

  34. For maximum map resolution, left click on About Google Earth

  35. About Google Earth popup window, Max Texture Size 4096x4096

  36. Working With Map Overlays • The Max Texture Size is in pixels • Example: 4096 px X 4096 px • Images that are larger than the Max Texture Size will be truncated • Resize the map image using an image editing program such as: • Adobe Photoshop • Corel PaintShop Pro • Ulead PhotoImpact • Pixir Editor (Free online program) - http://pixlr.com/editor/

  37. David Ramsey Map Collection

  38. University of Texas Perry-Castaneda Library Map Collection

  39. To add a map overlay, left click on the Overlay button on the Toolbar

  40. New Image Overlay popup window

  41. Name the overlay image

  42. To add the map image, left click on the Browse button

  43. Select the map image file from the file manager popup window

  44. Left click on the Open button

  45. The map overlay will appear

  46. Provide a description of the map

  47. Drag the overlay window out of the way

  48. Adjust the overlay opacity using the opacity slider

  49. Adjust the overlay opacity using the opacity slider

More Related