Download
1 / 4
40 likes | 152 Vues
Precautions During Use. The flash unit is a precision instrument. Be careful not to bump or drop it. Avoid exposure to extremely high or low temperatures or to humidity. Especially, do not leave the flash in the car.

E N D
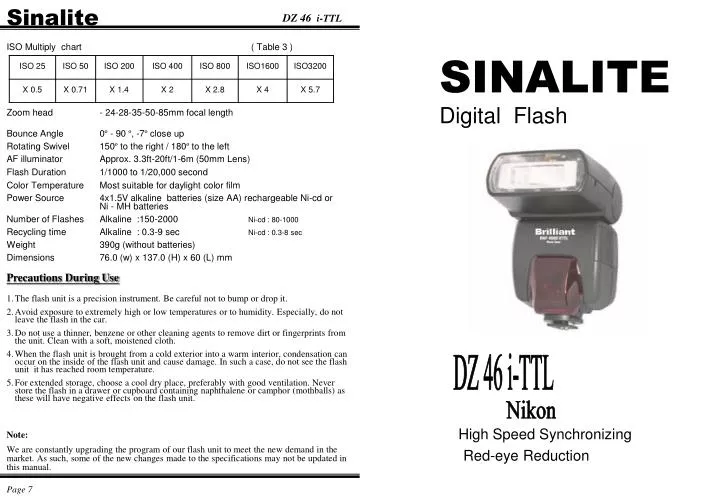
Precautions During Use • The flash unit is a precision instrument. Be careful not to bump or drop it. • Avoid exposure to extremely high or low temperatures or to humidity. Especially, do not leave the flash in the car. • Do not use a thinner, benzene or other cleaning agents to remove dirt or fingerprints from the unit. Clean with a soft, moistened cloth. • When the flash unit is brought from a cold exterior into a warm interior, condensation can occur on the inside of the flash unit and cause damage. In such a case, do not see the flash unit it has reached room temperature. • For extended storage, choose a cool dry place, preferably with good ventilation. Never store the flash in a drawer or cupboard containing naphthalene or camphor (mothballs) as these will have negative effects on the flash unit. Note: We are constantly upgrading the program of our flash unit to meet the new demand in the market. As such, some of the new changes made to the specifications may not be updated in this manual. DZ 46 i-TTL ISO Multiply chart( Table 3 ) DZ 46 i-TTL Nikon High Speed Synchronizing Red-eye Reduction Page 7
DZ 46 i-TTL DZ 46 i-TTL Bounce Flash When you take a flash photograph in a room, sometimes a strong shadow will appear behind the subject. If you point the flash head upward to reflect the light off the ceiling, wall, etc., the subject will illuminated softly. When you use the i-TTL/TTL BL mode, the camera will calculate the appropriate flash lighting. The Flash head is adjustable from up : 0º , 60º, 75º, 90º and Down: 0º, 7º. It also rotates 150º to the right and 180º to the left horizontally. Specifications Guide Number ( Table 1 ) Working range for apertures at ISO 100 ( Full ) Power: ( Table 2 ) Page 1 Page 6
DZ 46 i-TTL DZ 46 i-TTL Description of Parts 1. Set the exposure mode of the camera. to full auto program ( However, depending on the camera exposure setting may vary ). Please refer to Camera’s Instruction manual. 2. Slide the flash mode to i-TTL or TTL BL 3. Focus onto the subject. 4. Press the shutter button after the flash is charged, the Auto check ( ok ) will light up. If Auto check ( ok ) no light up, the flash power is not sufficient for that situation. Please retake the picture at a distance closer to the subject. ▆ If you use the AF camera with AF lens, the AF illuminator will turn on automatically as you focus on a subject in a dark area. However the AF illuminator will not light up if central focus area is not selected. Note: Effective distance is up to about 0.7 to 6 meter . ▆ When the flash is fully charged, the flash mark will appear in the finder. If the shutter is released before the flash is fully charged, the camera will take the picture at a slow shutter speed, with no flash. 8. Power Switch 9. TEST Button 10. Auto Check ( OK ) Indicator 11. Flash mode selector ( manual / TTL-3D/ i-TTL ) 12. Battery Cover 13. Locking Ring 14. Mounting Foot • Flash window • Zoom setting Knob • AF Illuminator • Zoom position window • Tilting Angle Scale • Ready Light • Power on Indicator Caution – Read this section before use This flash unit can be used for Nikon digital cameras only. . Depending on the camera, the operation and usable features may differ. Manual Flash Operation • This flash unit contains high voltage circuitry. To avoid electric shock or burns, do not attempt to disassemble the flash. If the outside shell of the unit is broken or cracked, do not touch the mechanism inside. This flash unit can be used in 4 steps of manual power , ie FULL, 1/2 , 1/4 , and 1/8. 1. Slide the Flash mode selector to FULL, 1/2, 1/4,or 1/8. 2. Focus on the subject and set the camera’s F-stop, using the exposure calculated by the formula shown below: F-stop = Guide Number ( G.N.) ÷ Flash to Subject Distance ( m ) 3. After the flash is fully charged , press he Shutter Release button to take the picture. Guide Number will change according to the Zoom Head position, ( see «Table 1» ). Guide Number will also change according to film speed ( ISO ),(see «Table 3 » ). In the case of non- ISO 100 speed films, multiply the « Table 3 » number by the « Table 2 » number. For example, using ISO400 film, Zoom Head position for 50mm and the FULL mode ; multiply the « Table 3 » number “2”by the « Table 1» number “38” : 38x 2 = 72. This will be the new effective Guide Number ( G.N.) in meters. To determine the G.N. in feet, multiply the G.N. in meters by 3.3. EX. IF flash to subject distance is 10 meters: F-stop = 76 ÷ 10 = 7.6 ( 8 is the F-stop to set on the camera. ) • Do not use this flash unit flash on any camera other than the Nikon digital i- TTL models, which have special contact pins in the hot shoe for this dedicated flash unit. The flash unit may damage the circuitry of other cameras or may not function properly. • This flash unit is not waterproof. When using the flash and camera in the rain or near water, keep it from getting wet. It is often impractical to repair internal electrical components damaged by water. • When flash mount onto the camera with the power turn on. The AF illuminate will light for about 2~4 sec. This is due to the CPU in the flash resetting itself. If the AF illuminate light for more than 8 sec, it means battery is running low and replacement is needed. Flash Function Available with Nikon AF /Digital Cameras O=Function available Zoom Operation • The flash unit car adjusts the zoom head position from 24 mm to 85mm. to provide angle of coverage which matches the focal length of the lens in use . • By pushing the zoom setting Knob ( 2 ) and will show in zoom position widow ( 4 ). • The guide number changes when the flash coverage angle is changed. Page 5 Page 2
DZ 46 i-TTL DZ 46 i-TTL Power Sources Attaching and Removing the Flash This flash unit uses 4AA type alkaline dry cell batteries or NiCad & Ni-MH rechargeable batteries. Manganese batteries are not recommended, because of shorter life. Replace the batteries if Ready Light takes more than 30 seconds to light up. Be sure to turn off the Power Switch .Then insert the Mounting Foot (8) into the hot shoe on the camera and turn the Locking Ring (7) until it is tight. • When you attach or remove the flash, grasp the bottom of the flash to prevent damage to the Mounting Foot and the camera’s hot shoe. • If the camera’s buit-in flash is in the pop-up position, close it before you attach the flash unit. Battery Precautions • To assure proper electrical contact, clean the battery terminals before use. • To prevent battery explosion, leakage or overheating, use 4 new AA batteries of the same type and brand. Do not mix different types or new and used batteries. RED-EYE REDUCTION When you take a picture with flash, so times the person’s eyes reflect the flash light and appear as “red-eyes” in the picture. If you use the function of “Red-eye reduction “, the flash will blink approximately 1 second , before the shutter is released, and reduce the “red-eye”• Available with cameras providing red-eye reduction control only.• You cannot set this function on the flashgun directly. For details please refer to your comera’s instruction manual. • 3. Do not disassermble or short-circuit batteries, or expose them to fire or water, or they may explode. Also, do not recharge batteries other then NiCad rechargeable batteries. • To prevent Battery Leakage, remove Batteries if storing for long periods. • Battery performance decreases at low temperatures. Keep batteries insulated when the flash in cold weather. • As with any flash, it is recommended you carry spare batteries when on a long trip, or when photographing outdoors in cold weather. AF Illuminator for Autofocusing • When subject contrast is low or in low light, the AF illuminator is automatically activated when the camera’s shutter release button is pressed halfway. This illuminator enables the camera’s autofocus system to focus correctly. • The AF illuminator enables autofocusing with subjects up to about 6m away. • This working range of the AF illuminator is based on standard testing method with a 50mm lens. • The AF illuminator will not be effective if your subject has very low reflectance. Battery Installation • Be sure to turn the Power Switch to the off position, then slide and open the Battery Cover . • Insert 4AA size batteries into the battery compartment. Be sure the polarity (+,-) of the batteries are aligned according to the diagram in the chamber. • Close the Battery Cover . • Slide the Power Switch to the on position, the “ Power on “ LED will turn on. The Ready Light will light up after a few seconds. Press the Test Button to ensure that the flash is working properly. Auto Check (OK) Indicator When using the flash unit in TTL BL or i-TTL Autoflash mode, if exposure was sufficient, the auto check indicator ‘OK’ ( 10 ) will appear in the panel at the same moment when the camera’s shutter button is pressed. Power on Indicator When power Switch is turn on, the Orange LED will light up to indicate the unit is operating Flash Mode This unit has three firing modes: Manual ( Full ~ 1/8 ), TTL-BL and i-TTL. You can select the desired mode by setting the Flash mode Selector ( 11 ), Auto Power Off System A battery-saving automatic power-off circuitry is incorporated in this flash unit. If you do not operate any of the flash or camera controls for about five minutes, the flash-ready lamp will automatically extinguished and the flash unit will be in stand-by mode. To re-activate the flash, simply press lightly the camera’s shutter button or switch the flash unit to OFF and then ON again. IMPORTANT NOTE:Even though the flash unit is automatically cut off, it will still use up some of the batteries energy. Therefore, when the flash will not be used for a long period, it is recommended to set the Power switch to off position. Auto Flash Operation - i-TTL or TTL - BL The flash unit provides automatic i-TTL or TTL BL control of the flash exposure when used with the mating cameras which have auto flash metering feature. The i-TTL/TTL BL autoflash mode balances the exposure between the main subject illuminated by the flash and the background in ambient light, whenever possible. Thus, this i-TTL/TTL BL mode can be used under conditions ranging from darkness to fill-in flash. Page 3 Page 4