Download
1 / 19
190 likes | 271 Vues
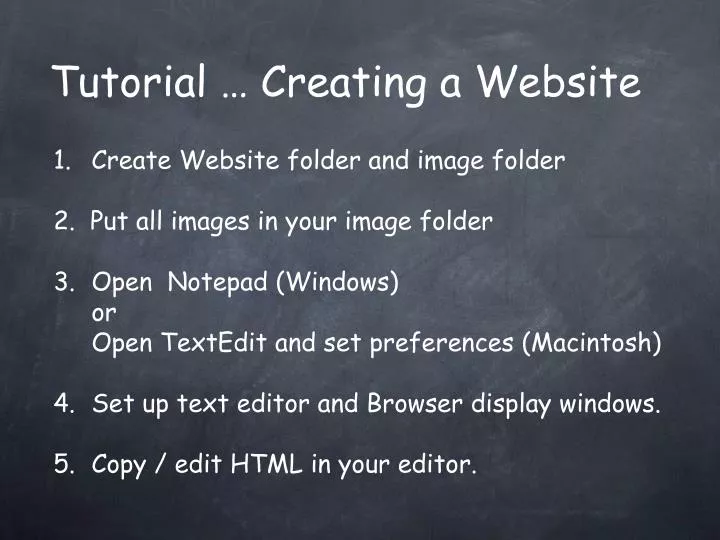
Tutorial … Creating a Website . 1. Create Website folder and image folder 2. Put all images in your image folder 3. Open Notepad (Windows) or Open TextEdit and set preferences (Macintosh) 4. Set up text editor and Browser display windows. 5. Copy / edit HTML in your editor. Step 1:.

E N D
Tutorial … Creating a Website 1. Create Website folder and image folder 2. Put all images in your image folder 3. Open Notepad (Windows) or Open TextEdit and set preferences (Macintosh) 4. Set up text editor and Browser display windows. 5. Copy / edit HTML in your editor.
Step 1: Set up folders for your Website Documents website-name1-name2 images Documents website-name1-name2 .html files .jpg files .gif files .png files (other resource files) images
Step 1: • Name your folders and files carefully!!! • File naming conventions: • No CAPITAL letters!!! • Use “-” not “_“ or not “ “ between words. • Create long, descriptive names that have a hierarchy. • - school-name-index.html • - school-name-hobbies.html • - school-name-games.html
Step 2: Put images in your images folder. You can search for .jpg or .gif or .png images in Google and File Save them in your images folder. You can create a drawing in PowerPoint. File / Save As that slide as a .jpg in your images folder. Remember to name them according to our file naming conventions.
How to get Notepad(Windows) Click on ‘Start’. Click on ‘Programs’. Click on ‘Accessories’. Click on ‘Notepad”. Step 3:
In Finder go on the top menu bar to the item that says Go. Under that click “Applications”. Scroll down through that page and find the application called TextEdit. Double click to open it. Step 3: How to get TextEdit(Macintosh)
What you will see Macintosh Preferences Setup
What you need to do to get text edit to write HTML Go to the menu bar and click text edit. You will see this menu. Click on the item that says “Preferences”. Macintosh Preferences Setup
Preferences-New Document Click the “New Document” tab at the top. Change all the preference to look like the picture on the next page. Macintosh Preferences Setup The goal is to open and save files in plain text format with UTF-8 encoding
Preferences-Open and Save Click the tab on top and change it to “Open and Save”. Compare and change your preferences to the picture on the next slide. Macintosh Preferences Setup
HTML Text Editor … Browser Step 4: Set up your text editor and browser so you can edit the HTML and see how the browser interprets your edits. You must save your edits in the text editor and then refresh the browser to view the changes.
How to get source code. Open a simple website design you like. Click on ‘View’ and then ‘View Source’. or Click on ‘Page’ and then ‘Source’. Copy all the HTML code. Paste the HTML code into your Notepad or TextEdit text editors. Step 5:
Opening .html files When you open the .html file if you double click it it will open in your default browser. To edit your web page, open the .html file in Notepad or TextEdit (Windows) Right Click on the .html file and then ‘Open With’ Notepad. (Macintosh) Control click on the .html file and then ‘Open With’ TextEdit. Step 5:
Opening .html files (Macintosh) When you Control Click on your .html file, this screen will come up. Move you mouse over the button that says open with. Click the one that says text edit. Step 5:
Saving .html files (Macintosh) Go to the menu bar and click “Save as”. The saving screen should come up. Step 5: (Macintosh)
Set the spot to save the document to your website folder. (or save to your desktop and drag it to your website folder) Name the document descriptively and make sure that at the end of the file name you put “.html”. (website-name-section.html) Make sure that plain text encoding is set to Unicode (UTF-8). Then click save . Step 5: (Macintosh)
Change the background color and the title text and the image name. Step 5: File Save, then Refresh your browser to view edits.