Download
1 / 69
700 likes | 708 Vues
ClearQuest End User Course ED 028. What we will cover. General Overview Differences between NT client and Web interface How to use the ClearQuest NT client How to use the ClearQuest Web interface PCR form/fields that are in ClearQuest Lab Exercises. Overview.

E N D
What we will cover • General Overview • Differences between NT client and Web interface • How to use the ClearQuest NT client • How to use the ClearQuest Web interface • PCR form/fields that are in ClearQuest • Lab Exercises
Overview • CQ is a change request management application • CQ has been customized for BAE SYSTEMS • Contains three CQ record types with matching CQ forms • PCR (Problem Change Report) CMP 1- 9 (Change Control, Software) • SRN (Software Request Notification) CMP 1- 4 (Release/Software, Baseline) • BN (Baseline Notification) CMP 1- 4 (Release/Software, Baseline) • View/Print the CQ forms with the applicable data • State transition lifecycle to fit our requirements • Records all actions in the History log against each record • (date/time stamp, user, action, from/to state) • Five roles - User, SW_Mgt_Authority, CM, cmcorrect, superuser • Contains an optional signature block
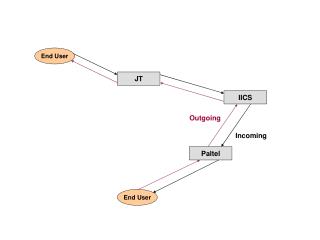
Overview • Accessing ClearQuest • To access CQ from your NT workstation, you will need CQ installed • To access CQ Web from your NT/UNIX workstation, you will need a browser that is pointed to the CQ Web site • Must have a user’s account with CQ. If you currently don’t have one, see your CQ administrator on your program
Using CQ WEB submit records view, modify, and promote existing records run predefined queries create/modify queries run predefined reports create/modify reports run predefined charts create/modify charts view STATE transition history Using CQ NT Client submit records view, modify, and promote existing records run predefined queries create/modify queries run predefined reports create/modify reports run predefined charts create/modify charts view STATE transition history NT client vs. browser
Logging in by using the NT client Enter your name and password Make sure you select the correct database NT client
ClearQuest Layout Query Builder is used to edit a query and view the display fields of the queried records Workspace area that contains Reports, Queries, and Charts Personal Queries folder/subfolders • You can save new or modified queries, reports, and charts • You can also create additional folders/subfolders • Queries, reports, and charts in the Personal Queries folder are viewable only by the user who created them Record form displays the data based upon a query The actual record that is displayed is based on the highlighted record in the query Public Queries folder • Contains the default Reports and Queries • Queries, reports, and charts are viewable by all users NT client
Run a Predefined Query There is a Public Query for each STATE, all records, all open records, and records assigned to the user Choose a query that you want to run from either the Personal Queries or Public Queries folder Just “double click on the query icon” NT client
Run a Predefined Query Displays the database name, query name and record type of the Public Query Note: You can modify a predefined Public Query and save it in the Personal Query folder NT client
Creating a PCR Query You can use an existing query by selecting the browse button Select the PCR record type NT client
Creating a PCR Query Display Editor Function If you need to, you can change the title of the displayed data NT client
Creating a PCR Query Query Editor Function NT client
Creating a PCR Query Query Editor Function NT client
Creating a PCR Query Query Editor Function NT client
Creating a PCR Query Query Editor Function NT client After defining your last filter, click on “Run”
Creating a PCR Query Result Set Function Displays database, record, and query name NT client
Using the Display Editor Display Editor Function Let’s modify the Display Editor by adding the STATE field NT client
Using the Display Editor Result Set Function The STATE field now appears in the display window NT client
Using the Query Editor Query Editor Function NT client The AND / OR operator
Using the Query Editor Query Editor Function NT client Dynamic Filter
Using the Query Editor Query Editor Function NT client Dynamic Filter
Using the Query Editor Query Editor Function NT client Multi-Dynamic Filters
Save a Query Saved queries are stored in the Personal Queries folder of the Workspace area NT client
Print an “ad hoc” Report from your Query You can print a query based upon your Display and Query Editor You can embed header/footer information NT client*
Run a Predefined Report • There is a matching form/report for each record type based upon: • Problem Change Report form SA-01-1553 • Software Transfer & Release Notice form SA-00-1743 • Software Release Notice form SA-00-2183 There is a Public Report for each STATE, all records, all open records, and records assigned to the user NT client*
Create a Report To run a report, select “New Report” from the “Query” pull down on the toolbar NT client*
Create a Report Report Format for PCRs: “Public Queries\PCR’s|\PCR Reports\PCR Report Format” Query to Apply: Select one from either your personal or public folder area NT client*
Create a Report Combines the Report form with the PCR record information NT client*
Save a Report You can save your report in your Personal Folder area NT client*
Charts You can easily create and save charts in your Personal Query directory NT client
Create a Chart Select “New Chart” from the Query pull down from the toolbar or click on the chart icon NT client*
Create a Chart NT client*
Create a Chart X Y NT client*
Drill down in a Chart “Drilling down” lets you examine the results included in your distribution chart more closely. When you drill down on chart records, ClearQuest queries the database for the records included in the chart area you specify. NT client*
Adding to the Public Folder Placing a query, report, or chart in the Public directory area • General user would use the export function and the designated super user would use the import function to place the item in the Public directory area • Super user has the rights to move the item from the Personal directory area to the Public directory area by dragging the item’s icon from the superuser’s private folder to the public folder or use the copy/paste function NT client*
Submit a PCR Select this button on the toolbar to submit a PCR To submit a SRN or BN, you need to click on the “Action” on the pull down menu bar and select “New” and pick the correct record type You can also submit a PCR from here NT client
Problem/Change Report tab Tabs with a red “X” contain mandatory fields Fields labeled in red are mandatory Displays the “To STATE” if an action has been selected against a PCR Displays the “Current STATE” if the user is just viewing a PCR Field is auto filled with current date but can be modified “Submitted By” field is auto filled with the submitter’s name PCR Number is assigned when the PCR reaches the STATE of “SMA Approved” NT client
SW Metrics tab All the SW Metrics fields have pull down menus All values in the pull down menus are taken from CMP 1-9 (Change Control, Software), Attachment A - PCR Classification Scheme Summary NT client
Assign tab Date fields are automatically filled in when the following STATE promotions occur “By who” is automatically filled in when the appropriate STATE promotion occurs NT client
Review Board tab The “DATE” field is automatically entered as today’s date but can be modified To accommodate programs that use hard copy in the sign-off process, the signature blocks in the Review Board tab are not required to be filled in The user name is automatically recorded in the middle field when a value (name) is selected in the first field and the PCR is updated NT client
Project Specific tab These fields in this tab is available for the program’s use NT client
Software Identifier tab Select the Cancel button to cancel the entries that you entered if you wish to cancel your entries Select the OK button to update the new record NT client
Default Settings You can set default values and save them for future submit records
Modify/Promote a PCR To promote/demote the PCR to another STATE, click on the Value button and select the appropriate State You can also perform other actions such as modifying a PCR by using the Actions button NT client
View the Action History By selecting the History option under View on the toolbar, you will know the “When, Who, Action, from STATE, and new STATE against the selected PCR Need to use the NT client to view the history NT client*
Logging in by using the browser Enter the path to the ClearQuest Web site i.e.: http://edents16/cqweb/logon/default.asp Enter your name and password Make sure you select the correct schema repository and user database browser
ClearQuest Layout Database selected Operations section allows the user to perform various tasks Workarea section displays your results and is the area that you submit and modify records Workspace section contains the Personal and Public Queries, Reports, and Charts browser
Predefined Query Workspace section contains the Personal and Public Queries to which you would double click to run Workarea section containing a query result You access the PCR record by single clicking on the # link browser