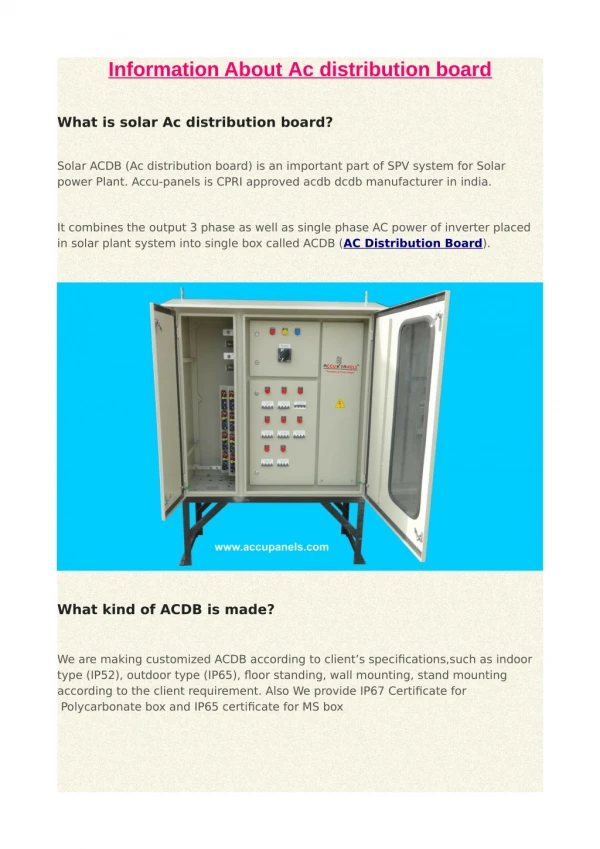
Download

1 / 16
160 likes | 168 Vues
Learning about AC signals. ES 110. Basic Components. Function generator LED Relay Speaker Pot Ohm ’ s Law Drawing the circuit Schematic capture: http://phet.colorado.edu/simulations/sims.php?sim=Circuit_Construction_Kit_ACDC. Part I: Checking the function Generator.

E N D
Learning about AC signals ES 110
Basic Components • Function generator • LED • Relay • Speaker • Pot • Ohm’s Law • Drawing the circuit • Schematic capture: http://phet.colorado.edu/simulations/sims.php?sim=Circuit_Construction_Kit_ACDC
Part I: Checking the function Generator Connect the setup as shown Change the frequency; what happens? Make sure you can measure the voltage and frequency of the signal on the scope. Take a snap shot of the signal and save it in a file.
Part II: Tone Generator with Volume Control Connect the setup as shown Change the frequency; what do you hear as you change the Pot value? What happens as you change the Frequency? Show to your instructor what you observe.
Part III: LED Brightness Control Connect the setup as shown – Use the 5V Change the frequency; what happens to the LED as you change the Pot value? Draw the circuit on paper. LED Create a table with 3 columns: Pot value, Voltage across the LED And Color of the LED. Record values for R=100, 1K, 2K, 5K ohms NOTE: to measure the Pot you must disconnect all wires
Part IV: Blinking LED Connect the setup as shown Change the frequency; what happens? Draw the circuit on paper. LED Keep the POT=500 ohm. Change the frequency. What happens? Explain.
Submission (create a file and submit the file. Don’t forget your names) • Part I: • Take a snapshot of the signal • On the signal show the frequency and voltage of the signal • What do you hear as you change the frequency? • Can you make a siren using two frequencies and a switch? Do this at the end. • Part II: • What happens as you change the potentiometer? Explain why. • Part III: • Create the table: • Part IV: • For what frequency ranges you can still see the LED blinking?
Part V: Checking the function Generator Connect the setup as shown T=1 msec F=1KHz This is the reference Vpp=2V
Using Cursers on the Scope Click on the Curser Button Use Y to measure Vpp and X to measure the frequency. This is one period
Using Multimeter to make AC and DC measurements • Watch this video and make sure you understand it. Let me know if you have any questions. http://www.youtube.com/watch?v=iJxXjn2GlEc
A- Make the following measurements: • Adjust the generator so you see a 2V peak-to-peak square wave signal with frequency of 8.5 KHz. DON’T forget UNITS! • Take a snapshot of the signal (your snapshot must contain at least 2 cycles of the signal)- Use the figure in the previous slide. • On you snapshot indicate how you measure Vpp, DC voltage (also called the offset), and the period (as shown the previous slide). Watch the video for more information. • Use MSWord Equations to calculate the frequency of the signal from your plot. Show all your work. • What is Vp of this signal? • Take another snapshot of the signal. This time make sure you set the voltage cursers to show the Vpp. • Calculate the Vrms for this signal. Show your work using MSWord Equations. • Connect the signal to a multi-meter, and measure the frequency of the signal. • Connect the signal to a multi-meter, and measure the DC offset and V(AC) Can you hear this signal?
B- Make the following measurements: • Adjust the generator so you see a 12V peak-to-peak sine wave signal with frequency of 750 Hz. DON’T forget UNITS! • Take a snapshot of the signal (your snapshot must contain at least 2 cycles of the signal)- Use the figure in the previous slide. • On you snapshot indicate how you measure Vpp, DC voltage (also called the offset), and the period (as shown the previous slide). Watch the video for more information. • Use MSWord Equations to calculate the frequency of the signal from your plot. Show all your work. • What is Vp of this signal? • Take another snapshot of the signal. This time make sure you set the voltage cursers to show the Vpp. • Calculate the Vrms for this signal. Show your work using MSWord Equations. • Connect the signal to a multi-meter, and measure the frequency of the signal. • Connect the signal to a multi-meter, and measure the DC offset and V(AC) Can you hear this signal?
Schematic Capture and Simulations Go to http://phet.colorado.edu/simulations/sims.php?sim=Circuit_Construction_Kit_ACDC and build the circuit below. What happens when you change the value of the resistance?
More Information: • Read about Voltage Dividers: http://www.acroname.com/robotics/info/articles/interface/interface.html • A good tutorial on building a photoresistor circuit: http://www.societyofrobots.com/schematics_photoresistor.shtml • Build a photoresistor circuit: http://www.acroname.com/howto/photoresistor/photoresistor.html • Investigate photoresistors, infrared light emitting diodes (IRLED), phototransistors, and fiber optic cable. http://online.sfsu.edu/~larryk/engr206/Lab%20project%202.pdf • Other photoresistor related projects: • Tone generator when the light dims • Light meter • How fast are you moving?
LED Brightness Control • Go to http://phet.colorado.edu/simulations/sims.php?sim=Circuit_Construction_Kit_DC_Only • Build the circuit using POT=100 ohms and switch. Take a snapshot and show it to the instructor. Use schematic symbols – lifelike symbols. • Build the circuit using POT=1000 ohms and switch. Take a snapshot and show it to the instructor.