Download
1 / 23
230 likes | 360 Vues
XSL. Unit 6 November 2. XSL. XSL eXtensible Stylesheet Language Basically a stylesheet for XML documents XSL has three parts: XSLT XPath XSL-FO. XSLT. The most important bit of XSL XSLT allows us to transform an XML document into another XML document

E N D
XSL Unit 6 November 2
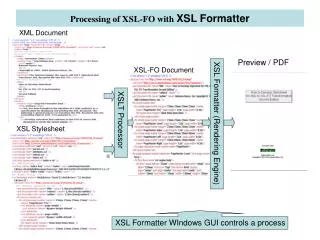
XSL • XSL • eXtensible Stylesheet Language • Basically a stylesheet for XML documents • XSL has three parts: • XSLT • XPath • XSL-FO
XSLT • The most important bit of XSL • XSLT allows us to transform an XML document into another XML document • For instance, transform an XML document into an XHTML document • XSLT relies on using XPath • We’re going to use it, but not cover it • Don’t have to go into detail in order to create simple, effective XSL documents
XSLT Basics • The whole idea behind XSLT is template matching • What’s a template? • Let’s say we have a list of students like what we’ve done in class: <student> <firstName>Marky</firstName> <lastName>Mark</lastName> <studentNumber>2001-22222</studentNumber> </student>
Templates, cont. • We know what one student “looks” like • All students follow the same format: Student: first name last name student number • Every single one of the students in our XML document are described in exactly the same manner • We can use a template to identify and use the parts of each student
Templates, cont. <studentList> <student> <firstName>Marky </firstName> <lastName>Mark </lastName> <studentNumber>200122222 </lastname> </student> <student> <firstName>Selma </firstName> <lastName>Blair </lastName> <studentNumber>200133333 </lastname> </student> …… </studentList>
Creating a New XSL Stylesheet • Created with a text editor • Saved with file extension “.xsl” • Just like with HTML, we have to put some “bits” at the top of our XSL file • Again, you do not have to have these memorized completely • I will provide a blank version online when/if needed
Creating an XSL Stylesheet, cont. <?xml version="1.0" encoding="ISO-8859-1"?> <xsl:stylesheet version="1.0" xmlns:xsl="http://www.w3.org/1999/XSL/Transform"> Or <?xml version="1.0" encoding="ISO-8859-1"?> <xsl:transform version="1.0" xmlns:xsl="http://www.w3.org/1999/XSL/Transform"> • You can use either “xls:stylesheet” or “xls:transform”, they are identical
Linking the XSL file to the XML file • The top of our XML file should read something like this: <?xml version="1.0" encoding="ISO-8859-1"?> <?xml-stylesheet type="text/xsl" href=“studentlist.xsl"?> • This is nearly identical to how we link HTML pages to CSS files • Again, an empty file will be provided for you if needed • But! You do need to know how to link to an XSL file
xsl:template • xsl:template is an XSL element • We are going to use it to apply rules when the template match is found • <xsl:template match = “/”> • match = “/” means that we’ll apply the template to the entire XML document • This is the next line of our XSL file
XSL File, so far <?xml version="1.0" encoding="ISO-8859-1"?> <xsl:stylesheet version="1.0" xmlns:xsl="http://www.w3.org/1999/XSL/Transform"> <xsl:template match = “/”> ………. </xsl:template> </xsl:stylesheet>
Beginning the Transformation to HTML • What do we need for an html file? • <html> • <body> • Maybe a <head> tag? • This is what we’ll add next to our XSL file
Beginning HTML <?xml version="1.0" encoding="ISO-8859-1"?> <xsl:stylesheet version="1.0" xmlns:xsl="http://www.w3.org/1999/XSL/Transform"> <xsl:template match = “/”> <html> <head><title>XML Example</title></head> <body> ………. </body> </html> </xsl:template> </xsl:stylesheet>
In-Class Example • Adding some HTML
How do we add data? • <xsl:value-of> gives us the value of a certain bit of our xml file • Which bit? • We’ll use the select property and the information about our tag • <xsl:value-of select =“studentList/student/first_name”/> • This long value for select is based on the structure of our XML document • <studentList> is our root element • <student> is contained within <studentList> • <first_name> is the data we’re interested in • Just like paths for URLs
In class Example • Adding some data to our html • Using more html tags
More than Student? • We can get the data for a single student, but what about our list of 3 students? • Or 300 for that matter? • We don’t want to cut and paste for every student • What if the number of students changes? • We can use the <xsl:for-each> element to loop through each of our students • Can use it to look through any “sets” of data nodes (think items with (+) marks)
Using <xsl:for-each> • <xsl:for-each> requires the use of the select attribute • <xsl:for-each select = “some expression”> • But what to use? • Depends on the repeat of the data • In the case of having a list of students • select = “studentList/student” • Basically you can read this as “for each student, apply these rules below” • <xsl:for-each select=“studentList/student”>
In Class Example • Adding for-each to loop through the students in the XML document • Reversing last and first name • Changing the format of the data
Sorting the Data • We can sort the data in our XML files • For instance, we can alphabetize our student list • Even if it’s not alphabetical in the XML file, the HTML output will have the items in alphabetical order • We are going to use the element <xsl:sort>
Using <xsl:sort> • We can specify what we are sorting on • First name? • Last name? • <xsl:sort select=“last_name”> • Default is to sort ascending (A, B…Z) • But we can reverse it by using the order property: <xsl:sort select=“last_name” order=“descending”/>
In Class Example • Sorting the student list ascending and descending • Using both first and last name • Another XML file with products