Download
1 / 21
210 likes | 362 Vues
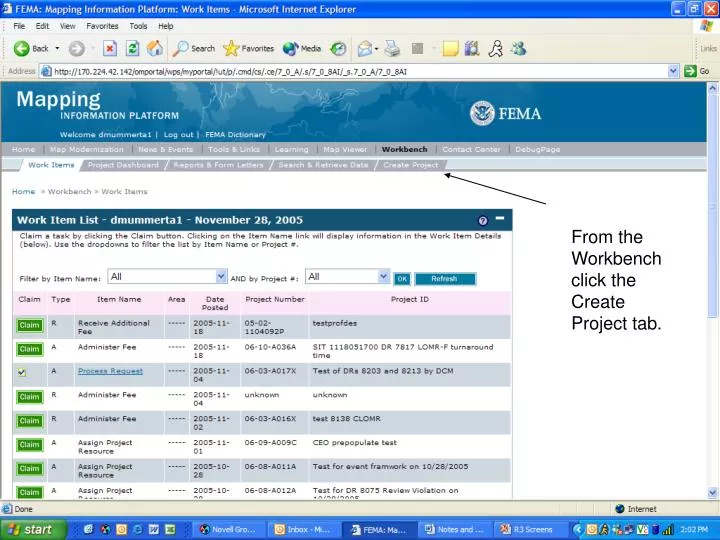
From the Workbench click the Create Project tab. Click the Amendments link.

E N D
Select the organization from the Org Name dropdown. The one you choose will depend on the group that will process your project. For instance, if you are creating a project in California you would select MOD RMC 8 because the group at RMC 8 will process the project.
If you have a previous case number from a conditional case or a dropped/suspended case, enter that case number to populate the Project Data. If you have a tracking number from an eLOMA or MT-EZ case enter it to populate the Project Data.
When you are creating a project that involves a fee you would select the appropriate Project Type, Lot Type, Fee Type, Fee Exempt Type, and enter the Fee Amount. If a fee was submitted with the data click Yes to the Fee Received with Initial Submittal question. If no fee was submitted with the data, leave the No button clicked. Click the Continue button.
Enter the contact information for the Main Requestor. Click the Continue button.
If there are any other requestors that need to get copies of the determination, add their contact information here. After entering their information make sure you click the Add Mailing Address button. Repeat for any more Other Mailing Addresses. Click the Continue button.
Flooding Source is not required at this point but you may add it if it is provided. Enter the Flooding Source name and then click the Add Flood Source button. Repeat for any additional flooding sources. Click the Continue button.
Use the dropdown menus to select the Community that you are creating the project in. You can bypass the dropdowns and enter the CID if it is provided.
The Map Panel Number isn’t required at this point but you may select it from the dropdown if it is provided. If the Map Panel Number is provided click the Add Map Panel button after selecting it from the dropdown. If you do not have the Map Panel Number skip that section and click the Add Community button.
After clicking the Add Community button the page will refresh. Scroll down to see the community information in the focus box. Click the Continue button.
Click the checkbox next to Send Acknowledgement Letter and enter the Acknowledgement Letter Date. Click the Continue button.
Review the Fee Information for the project. Click the Continue button.
Click the Expand All link to review all of the case specific data that was entered.
Scroll down to review all of the project information. At the bottom of the page click the Continue button.
To finish this Activity click the Complete Task button. Once you click the Complete Task button the Project will move to the next Activity in the Workflow and you will not be able to edit any of the information you entered.
After clicking the Complete Task button click the Create Another Project button or click the Maximize button to return to your Work Item List.