Download
1 / 35
350 likes | 490 Vues
Welcome to GSA’s Vendor and Customer Self Service (VCSS) course Section 3: Basic Navigation This presentation is compliant with section 508 standards. This version was last updated on January 12, 2011. Login to VCSS. To login to VCSS, perform the following steps:

E N D
Welcome to GSA’s Vendor and Customer Self Service (VCSS) courseSection 3: Basic Navigation This presentation is compliant with section 508 standards.This version was last updated on January 12, 2011.
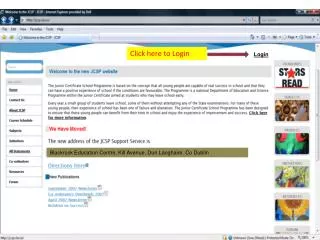
Login to VCSS • To login to VCSS, perform the following steps: Step 1: Go to the GSA launch page and select the Login to VCSS option. Step 2: On the VCSS main page, select the Loginhyperlink. Step 3: On the VCSS login page, enter the following login information: • User ID and Password sent in two separate emails from GSA. • Select the Sign In button.
View Notices • Upon successful login, the View Notices page displays. • Notices provide specific information, for example, notifying the customer when billings become available. • Review notices associated with your accounts and then select the Continue button.
Home Page • After reviewing notices, the home page displays. • View your outstanding balances by account. • Access these two navigation menus that appear on most VCSS pages: • The link strip, which is a set of clickable hyperlinks, located in the top right corner of the page. • The menu bar, which is a horizontal row of menus, with each menu item containing a drop-down menu of additional options. Link Strip Menu Bar
Link Strip • The link strip contains several hyperlinks to access other areas of VCSS. • The hyperlinks include: • Home • Notices • Personal Information • Preferences • Site Map • New Window Icon • Help • About • Sign Out • Contact Us
Link Strip (Continued) • Home hyperlink • Select the Homehyperlinkto return to the home page. • The home page is the same page that displays after you sign in to VCSS and view your notices. The home page also lists your outstanding balances by account.
Link Strip (Continued) • Notices hyperlink • Select the Noticeshyperlink to return to the View Notices page. • The View Notices page is the same page that displays after you sign in to VCSS.
Link Strip (Continued) • Personal Information hyperlink • Select the Personal Information hyperlink to maintain your personal information, which is only visible to you. • Review your User ID, Phone and Fax Numbers. Only your Full Name and Phone and Fax Number can be updated if it is not correct, then select the Save button. • When you create correspondence or a dispute, your information will be pulled from here.
Link Strip (Continued) • Preferences hyperlink • Select the Preferences hyperlink to access several settings that you can customize, organized by the following tabs: • Select the Preferences tab to display information help when you hover over links. • Select the Bookmarks tab to organize your bookmarks which are reviewed on slide 54. • Select the Usability Settings tab to set up keyboard shortcuts and customize your experience in VCSS. For example, set the ‘auto tab’ feature so that when you fill out a form in VCSS, your cursor automatically moves to the next field. • Select the User Information tab to reset your password and update your email.
Link Strip (Continued) • Preferences hyperlink • Select the Security Question and Answer Page tab to set up security questions and answers as a password retrieval tool. This is not required but is helpful to set up if you would like to be able to recover your password if you forget it.
Link Strip (Continued) • Site Map hyperlink • Select the Site Map hyperlink to view a list of the menu bar options as clickable hyperlinks. • This is an additional navigation tool to navigate through the hyperlinks as an alternative to using the actual menu bar.
Link Strip (Continued) • New Window Icon • There is a square-shaped icon in the link strip called the new window icon, and is next to the Site Map hyperlink. • Select the new window icon to open a new window of the same session of VCSS, while the current window you are working in also remains open at the same time. • Just like internet explorer, you have the ability to open multiple windows. • For example, place the windows side by side or switch back and forth between them, giving you the ability to look something up while you are working on something else. • Your original window has the Sign Out hyperlink in the link strip, while your new window has the Close Window hyperlink. Note that you should not use your browser’s X to close the window. Instead, select the Close Window hyperlink to close the window.
Link Strip (Continued) • Help hyperlink • Select the Helphyperlink to open a new window with GSA’s VCSS help documentation, where you can do the following: • Search for help content, organized by topic. • Learn more about VCSS and navigation. Note: This help page is currently what is available in VCSS and will be updated.
Link Strip (Continued) • About hyperlink • Select the About hyperlink to view the VCSS version information.
Link Strip (Continued) • Sign Out hyperlink • Select the Sign Out hyperlink to exit VCSS. • Upon signing out of VCSS, the VCSS exit page displays a clickable hyperlink to return to the VCSS login page. • Close Window hyperlink • Select the Close Window hyperlink to close the window and return to the previous window. • Displays only on new windows that have been opened.
Link Strip (Continued) • Contact Us hyperlink • Select the Contact Us hyperlink to access GSA contact information for VCSS. Note that the GSA Contact Us page will display the appropriate GSA contact information for both vendors and customers.
Menu Bar • Use the menu bar to navigate through your account and access account information. • Each menu item contains a drop-down list of menu options, grouped by function. • These menu items will be covered in separate sections of this presentation, as indicated below. • The Accounts menu is on slide 71. • The Statements menu is on slide 101. • The Payments menu is on slide 140. • The Correspondence menu is on slide 163. • The External Applications menu is on slide 182.
Breadcrumbs • Breadcrumbs show the path to the current page you are on. • Breadcrumbs include hyperlinks that represent the most likely path you might have followed to navigate to the current page you are on. • Located at the top of the page, below the menu bar, on various pages throughout VCSS. • Select a hyperlink in the breadcrumbs to return to a previous page, since you cannot use the back button in your browser. • For example, if you are on the Account Summary page, the breadcrumbs display showing the most common path to navigate to the Account Summary page. In this case, the Account Summary page is accessed from the Accounts menu.
Breadcrumbs (Continued) • Internet Explorer Browser Navigation • To navigate within VCSS, do not use your browser’s navigational tools, which includes the back button and the X used to close the window. • If you use your browser’s navigational tools accidentally, you will be signed out of VCSS and risk losing your work. • Instead, use the VCSS navigation tools, which are the breadcrumbs, menu bar, and link strip.
Bookmarks • If you access a specific page frequently in VCSS (for example, the Account Summary page), then add that page as a bookmark to access quickly at a later time. • If the page can be added as a bookmark, then the bookmark icon is located to the right of the breadcrumbs. • Bookmarks in VCSS work similarly to favorites in internet explorer. • Add a Bookmark • To add a bookmark, select the bookmark icon on the page you want to add as a bookmark. • A system message displays confirming the bookmark has been added.
Bookmarks (Continued) • Access a Saved Bookmark • Once you add a page as a bookmark, the Bookmarks menu item displays in the menu bar. • If you have not added a bookmark, the Bookmarks menu does not display. • To access the saved bookmark, from the menu bar select Bookmarks, then the name of the bookmark.
Bookmarks (Continued) • Organize Saved Bookmarks • Once you have added a few bookmarks, you can organize your bookmarks from the menu bar by selecting Bookmarks, then Organize Bookmarks. • Bookmarks display in the Bookmarks menu in the order in which they were added. To re-order bookmarks, select a bookmark and update the Rank field. • To re-name a bookmark, select the bookmark and update the Label field. • To remove a bookmark, select the bookmark and select the Delete button. • To save updates, select the Save button.
Hyperlinks • Blue underlined hyperlinks that list the name of a field, display on many pages. • Select the hyperlink to access a search page to search for values to enter in that specific field. • This can be helpful if you cannot remember a value to enter in a field. Instead, you can select the field’s hyperlink and then search for values. The hyperlinks work as a lookup to find the value you need to enter in that field. • For example, if you need to enter a statement number and you cannot remember the specific statement number to enter, select the Statement Number hyperlink. You are then taken to a search page to search for statement numbers. Once you find the statement number you need, select the statement number to enter in the Statement Number field.
Favorites • Favorites are frequently used values that can be saved. • Favorites are a feature of VCSS that will be available in a future release. • If you use a value frequently, then you can designate it as a favorite. • Favorites can be added to fields that include the favorites icon next to it, which looks like a small clothes-pin. Favorites are added by you only and remain from one login session to the next. • For example, if you have access to more than one account, designate a specific account as a favorite, by selecting the favorites icon and adding your account as a favorite.
Favorites (Continued) • Add a Favorite • Select the favorites icon next to the field. • In the favorites pop-up window, select the Searchhyperlink to search for field values. In this example search for account values.
Favorites (Continued) • Add a Favorite • On the search page, enter search criteria to search for valid values and then select the Search button. • In the search results, select a record to add the value as a favorite by selecting the favorites icon next to the record. • You can add multiple favorites.
Favorites (Continued) • Add a Favorite • Once you have added favorites for a field, to return to your previous page you can do either of the following: • Click the Selectbutton, which fills in the field with the selected record information, or, • Click the Cancelbutton, which does not fill in the field with the selected record information.
Favorites (Continued) • Access a Saved Favorite • Select the favorites icon next to the field that you added favorites for. • The favorites pop-up window displays with the favorite values you added. • Simply select the favorite record to populate the field with the favorite record value. • The field is now populated with the favorite record values. • In the example below, the account we previously added as a favorite is now populated in the appropriate account fields.
Standard Page Layout • Below is an example of a standard page layout for most pages in VCSS. Not every page follows this exact layout. • The top portion of the page has an area referred to as search criteria. • The bottom portion of the page has an area referred to as search results. search criteria search results
Standard Page Layout (Continued) • Search Criteria • In the search criteria area of the page, enter values in the search criteria fields to filter the search results that return, and locate the information you need. • If there are many records for the system to filter through, entering more search criteria can shorten the time it takes for the system to return records. • Most search criteria fields that are required will be marked with a red asterisk. • Use the wildcard character, which is an asterisk, to ease searching. This is covered on the next slide. • When you finish entering search criteria, select the Search button to run the search.
Standard Page Layout (Continued) • The wildcard character, which is an asterisk, can be optionally used in search criteria fields to substitute a character or group of characters. • You can add the wildcard at the beginning, middle, or end of a value. You can also add more than one wildcard character in a search field. • For example, if you want to search for correspondence with the subject line “I have a question”, then enter the following in the subject search criteria field. • You can add the wildcard to the beginning of a value. For example, enter asterisk, then “question”. • You can add the wildcard in the middle of a value. For example, enter “have”, then asterisk, then “question”. • You can add the wildcard at the end of a value. For example, enter “question”, then asterisk. • You can add more than one wildcard to a value. For example, enter asterisk, then “question”, then asterisk.
Standard Page Layout (Continued) • Search Results • The search results area of the page consists of rows of data called “records” that met the search criteria. • In some cases, a Totals row displays that gives you the total amount of that column (the Totals row displays total amounts for all records that meet the criteria, not just those being displayed). • Search results can display up to 1,000 records at a time. • Here are some options that you have to change how your search results display: • Minimize and maximize the search results list. • Use the scrollbars to scroll through the records. • Adjust column width by dragging the vertical column lines. • Change the number of records that display at once to 10, 20, 50, 100, or all. • Change the size of the search results by using the drag-able corner in the bottom right. 9567333 9567333
Standard Page Layout (Continued) • Search Results • In the search results, there are action buttons that display directly above the records. These action buttons tell you what you can do with the records. • The Sort button is a common action button used to sort all the records in the search results by column heading. • The View as CSV button is also a common action button used to export the records in the search results to a Comma Separated Value (CSV) file. • In addition, when you select a record in the search results, there may be action buttons that become available and are specific to the record selected. • For example, the View Statements and View Payments buttons are grayed out until you select a record. When you select a record, you can view statements and payments for that record.
Standard Page Layout (Continued) • Sort Records • If there is a Sort button in the search results, then you have the option to sort the records by up to three columns. • You do not need to select a specific record in order to select the Sort button, since all records are sorted. • Select the Sort button. • Select a Sort by column, then the Ascending or Descending radio button. • Select the Ok button to sort the records. • You can also sort individual columns by selecting a column heading to sort in ascending order. Select the column heading a second time to sort in descending order.
Standard Page Layout (Continued) • Export Records • If there is a View as CSV button in the search results, then you can export the records to a Comma Separated Value (CSV) file format, which can be opened in a Microsoft Excel spreadsheet. • You do not need to select a specific record in order to select the View as CSV button, since all records are exported. • Select the View as CSV button. • In the file download pop-up window, select the Open button to open the CSV file. Note that depending on your browser settings, you might need to allow pop-ups to use this view as CSV feature.