Download
1 / 59
590 likes | 750 Vues
WCM 4.0 Tutorial Quick Installation Guide Learn How to Create Your 1 st Playlist. Getting Started. Copy the 6 Sample Media files to your Local System: 1 Flash file 1 Video file 3 Image files 2 Ticker RSS Sample.

E N D
WCM 4.0 TutorialQuick Installation GuideLearn How to Create Your 1st Playlist
Getting Started • Copy the 6 Sample Media files to your Local System: • 1 Flash file • 1 Video file • 3 Image files • 2 Ticker RSS Sample After following the steps in this tutorial, you should see the resulting screen as below: 1st Ticker Info Images Logo in Flash Video in MPEG Images 2nd Ticker Info
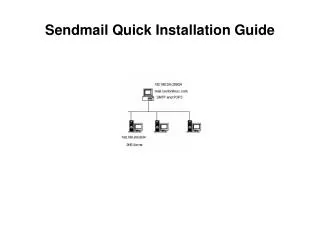
WebDT Content Manager Server Network Structure DT Research Signage Player connected to a display via HDMI/ DVI/ VGA cable Internet/ Intranet Any PC/ laptop to remote operating WCM
Before Installation • Download Java SDK 1.6 or latest version • Ensure that any firewall settings are disabled; firewall can be enabled after installation Insert the WebDT Content Manager CD & select Install WebDT Content Manager to begin installation During the installation, you will need the serial number on the cover of the CD Case
WCM 4.0 Installation • When you are installing the WCM, you can choose “Quick Setup” or “Customized Setup” Quick Setup To install the FULL SET of content servers within WCM 4.0 in one computer, please choose Quick Setup Customized Setup If you want to change advanced options, or install Content Manager Servers in different computers, please use Customized Setup, which allows you to choose the components to install and offers more configure options
WCM 4.0 Installation - Quick Setup • Install the full Content Manager Server on one computer • Choose “Quick Setup” to install • Default Service Account & Password 1 Database Superuser: dbadmin Database Superuser Password : 12345 Database service account : Postgres Database service password : Post_~gres Web Server Port : 80 You can Change WebDT Content Manager Folder 2 *Internet Explorer is required to login to WebDT Content Manager after installation
WCM 4.0 Installation - Customized Setup • 1. Download Java SDK 1.6 or later • 2. Customized Setup • 3. Setup Service Account & Password • 4. Web Server Port Default Setting You can set another Port Number if Port 80 has been used Service Account needs enough Permission to start/stop Service You can Change WebDT Content Manager Folder
After Installation Completed • Once the installation process is complete, the InstallShield Wizard Completed screen displays • A Start.html page will open to set up the server
Change Password for Administrator Security • For WCM Security, please change the Administrator’s password • Login to http://(server IP address):(port number)/index.jsp or http://localhost:(port number) to change the password User ID : administrator Old Password : Admin New Password : xxxxxx Confirm New Password : xxxxxx Organization : administration
Default Organization &Login Account/Password • A default Site will be automatically created after installation • Default values: User ID and Password are manager and 123456; Organization is My Site • Login to WCM, a message for SMTP settings will display • Go to Settings to complete your SMTP Server & Error Alert settings • Player Error Alert : Email or SMS (for users in USA) • SMTP Server Settings • SMTP Server Host: • Account ID: • Password: • Email Address: User ID : manager Password : 123456 Organization: My site
Change Organization & User ID/Password • 1. Change Organization & User ID/password by Administrator Account • 2. Modify Organization & Manager User ID with password • 3. Click Save Example Organization : demo Manger ID : manager Password : 123456 Email : dtrtest@gmail.com
Login by Manager Account • Login to the Manager account just created • Click Login Example User ID: manager Password : 123456 Organization : demo
WCM Interface 4 2 3 1 Frame 1 : Main Menu Frame 2 : Sub Menu Frame 3 : Setting Zone Frame 4 : Command Line
5 Steps to Starting the WCM Step1 - Register Player with WCM server Step2 - Assign the Player to a desired group Step3 - Upload & manage media files to WCM server Step4 - Edit Template & Playlist Step5 - Schedule & publish Playlist for assigned group
Connect Your Player & Register to WCM Before registering your DT Research Signage Player, you may need a mouse & keyboard for initial player registration
Player Registration to WCM Server • Power on the signage player, the registration screen will prompt automatically as below • Or to re-register the player, follow the steps below: • Exit the player by pressing Ctrl + Shift + Space • Navigate to Start | All Programs | DT Research | WebDT Signage Player & click Register WebDT Signage Player Again Demo Player - Player Name: Leave default name or give a new name - Group Name: You may leave it blank for now - Organization: demo - Password: 123456 (Default value) - Publish Server URL: http://(server IP address):(port number)/publish Example: http://192.168.112:81/publish http://signage.dtri.com/publish (default port is 80) demo 123456
Player Register to WCM Server • The Player is registered & a confirmation window displays • If registration is not successful, please check the Internet/network connection & the firewall settings
Create a Group 2 1 3 DEMO-A 1. Click “Player Group” 2. Click “New Group” 3. Input DEMO –A as Group name
Assign Player 1 2 1. Click “Assign Player” 2. Select the player & assign by clicking the Arrow Note: Before players are assigned to a group, the players are in the “Not Assigned” group by default
Preview Player 2 4 1 3 1. Click “Media” 2. Click “Preview Player” to install WebDT Preview Player Program to your PC 3. Start All Programs DT Research WebDT Preview Player 4.0 Start Player 4.Preview Player is only for preview function *To Preview a flash file, you will need to install Flash Player to the local PC
Preview 4 5 2 6 1 3 1. Click “Account Management” 2. Select the Account 3. Click to add preview players in the displayed window 4.Select the player you registered (or other players) to add as Preview Player(s) 5.Yourselected Preview Player(s) will be listed 6.Save the settings
Upload Media to WCM Server 2 5 4 3 1 • 1. Click “Media” • 2. Click “New Folder” to Create Media Folder for Management • Select “New Folder” then Click “New” & “New Media” • 3. Click “Browse” to find the Image files • 4. Input file Name as Image 1 & set the Duration as 6 seconds for each image file • 5. Click “Save”, see the file uploaded on left side - tree view panel • 6. Repeat the steps for uploading video & Flash files Note: Image files (BMP, JPG, etc) should be under Image category Multimedia files (SWF, MPG, AVI, URL, PPT) should be under Multimedia category If files are in the wrong category, the files won’t be displayed
Batch Upload Media 2 4 3 1 1. Select a Folder in the Media Library 2. Click “Batch Upload”, a batch upload screen opens 3. Click “Browse” to find the Image files 4. You can change the destination folder for media files uploaded
Create a Ticker 2 7 3 4 1 6 1. Click “Ticker” 2. Click “New” & “New Ticker” 3. Input ticker Name: Demo 4. Click to add one or several tickers 5. You can create several tickers including Static Text & RSS URLs at the same time; WCM server must be connected to the Internet for RSS URLs 6. Type text and/or RSS URL, e.g.: Demo for DT Research Signage System and http://newsrss.bbc.co.uk/rss/newsonline_world_edition/front_page/rss.xml 7. Save the settings
Create a TemplateAdd in Ticker Zone 2 3 4 7 5 1 6 8 1. Click “Template” 2. Click “New” & “New Template” 3. Input template Name: Demo Template 4. Select the Screen Resolution as “1920 x 1080” (Or other depending on your LCD) 5. Click “New Ticker Zone” to add the First ticker zone 6. Input ticker zone Name: Ticker Zone 1 7. Click “New Ticker Zone” to add the Second ticker zone, Input zone Name: Ticker Zone 2 8. Set ticker zone attributes including color/ size/ direction/ speed/ background (Input position percentages for the demo zones: L: 0.00 R: 99.99 T: 93.00 B: 99.99)
Create a TemplateAdd Zones 1 2 3 1. Click “New Normal Zone” to add new zones 2. Zone size and location can be set either by percentage or pixel. 3. Add Zone 2 , Zone 3 and Zone 4 4. Set position for each zone (example: set title zone: L: 0.00 R: 74.928 T: 7.00 B: 20.201) (Refer to appendix for more on how to set zone position by percentage or pixel)
Create a TemplateTranslucent Logo Function 1 You can set Translucent Logo in a normal zone, the images support alpha blending
Template Example Create six zones including a flash file, two image files, a video file & two tickers
Create a Playlist 2 5 3 1 4 Demo Template 1. Click “Playlist” 2. Click “New” & “New Playlist” 3. Input playlist Name: Demo Playlist 4. SelectTemplate: “Demo Template” 5. Click “Save”
Create a PlaylistInsert Media Files 4 1 3 2 1. Click “Zone 3” tab in lower panel 2. Select media file from tree view: Multimedia 3. Click to add the file to the zone 4. Save the settings Repeat the process to add video & image files to other zones
Create a PlaylistInsert Ticker 4 3 1 2 1. Click the tab in lower panel 2. Select Ticker file from tree view: Ticker 3. Click to add the ticker file to Ticker Zone 4.Save the settings
Preview the Playlist 1 2 1. After creating the Demo Playlist, click , a window will open to show all Preview Players 2. Select the Players to Preview
Scheduling 5 2 1 4 3 6 7 8 1. Click “Scheduling” 2. Select “Demo-A” group 3. Select “Demo Playlist” 4. Select today’s date & a time slot on the calendar, then insert the playlist by clicking 5. Click to edit more schedule details 6. Set up Start time & Duration (click Whole Day to have playlist scheduled for entire day) 7. Check the Recurrence box & add recurrence settings 8.Apply the settings, then Close window
Publish the Schedule 1 2 3 4 5 1. Click button, the Approve Schedule/Spot List window will open 2. Set Start Date & End Date 3. Click “Publish” to publish theschedule during the date range 4. To modify the template, playlist or schedule: click “Back to Edit”; the media files will still display at player side 5. When you “Reject“ to publish, the Media Files will be stopped at player side The final results will display on the players under “Demo-A” group after downloading is complete
Publish Rule 1 2 3 1. When a Schedule’s status is “Publish” or “Prepare to Publish”, the schedule is locked & cannot be edited 2. To edit the schedule, change the schedule status to “Reject” or “Back to Edit”
Setting Default Playlist for a Group • Looping a single playlist: if you would like to play a playlist repeatedly, use the “Default Playlist” feature (at Group level or Organization level) • Select the Group & apply the appropriate “Default Playlist”
Congratulations!You have learned how to quickly create and manage digital signage content on WCM4.0For more detailed information, please read the WCM User Manual
Appendix • Set Zone Attributes • Power Management Settings • Advanced Settings • Group Settings • Player Reboot / Remote Desktop Functions • Active Directory Support • Role/Privilege Management • Batch Register Tool • Wi-Fi & Resolution Tool • Software Development Kit (SDK) • Urgent Cast • PowerPoint Plugin
Appendix - 1Set Zone AttributesAdjust Zone Size & Location Arrange screen layout by counting each zone position by percentage or pixel
Adjust Zone Size & LocationCount each zone position by percentage Example: 1366 T B 683 pixels R 273.2 384 pixels 768 L 192 273.2 / 1366 = 20% 192 / 768 = 25% T: Zone top to Display top B: Zone bottom to Display top R: Zone right to Display left L: Zone left to Display left 683 / 1366 = 50% 384 / 768 = 50%
Adjust Zone Size & LocationCount each zone position by pixel For example: 1366 T B 683 pixels R 273.2 385 pixels 768 L 192 T: Zone top to Display top B: Zone bottom to Display top R: Zone right to Display left L: Zone left to Display left
Appendix - 2Power Management Settings Manage Power Settings for Signage Players 2 1 3 1. Click “Player Group” 2. Click the Group that the players belong to 3. Click the tab 4. Select the days & set the startup & shutdown time 5. Click “Apply” 5 4
Appendix - 3Advanced Settings • 1. Click “Settings” for advanced settings • 2. Choose a playlist as default playlist • Click to select a playlist file • 3. Or, choose an image as default wallpaper • Click to select an image file • 4. Choose to Always Show/ Never Show or Show When Idle the downloading progress bar on the signage display • 5. Set preferred time range to download the scheduled playlists • 6. Click “Save” 2 3 4 5 1 6
Appendix - 4Group Settings Group Settings for Your Signage Players 2 1 3 4 5 1. Click “Player Group” 2. Click the Group that the players belong to 3. Choose a playlist as your default playlist 4. Choose an image as the default wallpaper 5. Schedule/Spot List: choose how to display player schedule/ spot list: All, Summary, Only Schedule or only Spot List