Download
1 / 1
20 likes | 178 Vues
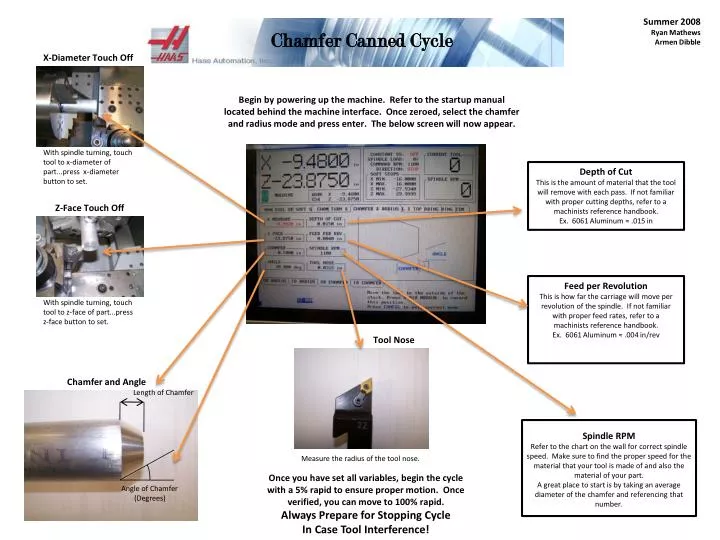
Summer 2008 Ryan Mathews Armen Dibble. Chamfer Canned Cycle. X-Diameter Touch Off. Begin by powering up the machine. Refer to the startup manual located behind the machine interface. Once zeroed, select the chamfer and radius mode and press enter. The below screen will now appear.

E N D
Summer 2008 Ryan Mathews Armen Dibble Chamfer Canned Cycle X-Diameter Touch Off Begin by powering up the machine. Refer to the startup manual located behind the machine interface. Once zeroed, select the chamfer and radius mode and press enter. The below screen will now appear. With spindle turning, touch tool to x-diameter of part...press x-diameter button to set. Depth of Cut This is the amount of material that the tool will remove with each pass. If not familiar with proper cutting depths, refer to a machinists reference handbook. Ex. 6061 Aluminum ≈ .015 in Z-Face Touch Off Feed per Revolution This is how far the carriage will move per revolution of the spindle. If not familiar with proper feed rates, refer to a machinists reference handbook. Ex. 6061 Aluminum ≈ .004 in/rev With spindle turning, touch tool to z-face of part...press z-face button to set. Tool Nose Chamfer and Angle Length of Chamfer Spindle RPM Refer to the chart on the wall for correct spindle speed. Make sure to find the proper speed for the material that your tool is made of and also the material of your part. A great place to start is by taking an average diameter of the chamfer and referencing that number. Measure the radius of the tool nose. Once you have set all variables, begin the cycle with a 5% rapid to ensure proper motion. Once verified, you can move to 100% rapid. Always Prepare for Stopping Cycle In Case Tool Interference! Angle of Chamfer (Degrees)