Download
1 / 18
180 likes | 331 Vues
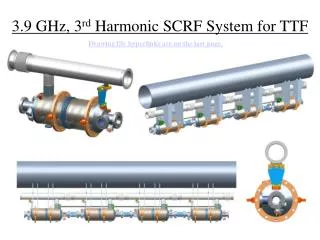
3 rd Harmonic He Vessel Welding. Helium Vessel-to-Cavity No. 3. 22 June 2008. Helium Vessel to Cavity #3 Welding. Overview of Welding Sequence 1. EB weld titanium helium vessel to large Ni55Ti conical end cap.

E N D
3rd Harmonic He Vessel Welding Helium Vessel-to-Cavity No. 3 22 June 2008
Helium Vessel to Cavity #3 Welding • Overview of Welding Sequence 1. EB weld titanium helium vessel to large Ni55Ti conical end cap. 2. EB weld titanium stepped end ring to small Nb55Ti conical end cap. This weld has an additional weld pass that differs from other dressed cavities. 3. TIG weld titanium stepped end ring to titanium helium vessel.
Vertical Welding Fixture Setup Place 9-cell niobium cavity with main coupler end down and large end-group clamped to “Leveling Plate” on fixture. Add helium vessel support threaded rods. Small End-Group Flange (Ni/Ti) Support Rods Large End-Group Flange (Ni/Ti) Clamp Block Leveling Plate
Helium Vessel Placement Thumb Nut Lower vessel and align vessel step to cavity end-group step. Secure with spring washers and thumb nuts. Hand tighten thumb nuts only!! Insure proper clocking of the helium vessel with respect to the cavity. Flat Washers Spring Washer
Helium Vessel to Cavity #3 Welding • STEP 1: EB weld titanium helium vessel to large Ni55Ti conical end cap on large end group flange A. Tack weld in four places at 90 degree increments -- E beam horizontal (perpendicular to cavity axis). B. Remove support rods. C. Place four additional tack welds between the original four tacks. Execute circumferential EB weld with E-beam horizontal (perpendicular to cavity axis).
E-Beam Weld – Ti Vessel to Large End-Group Flange 1A. Perform electron beam tack weld on large end-group flange. Location and angle of electron beam weld. Tack in (4) places equally around flange.
E-Beam Weld – Ti Vessel to Large End-Group Flange (Cont.) 1B. Remove support rods. Add four additional equally spaced tack welds. 1C. Perform electron beam weld on large end-group flange. Remove support rods and perform 360 degree continuous weld. Spring Washer
Ni55Ti conical end cap Weld Direction Ti helium vessel
Helium Vessel to Cavity #3 Welding • STEP 2: EB weld titanium stepped end ring to small Ni55Ti conical end cap A. Seat stepped end ring on lip of small conical end cap. B. Add fixturing to apply sufficient pressure to end ring so as to maintain proper fit and alignment during tack welding. C. Tack weld in four places at 90 degree increments with E-beam vertical (parallel to cavity axis). D. Remove fixturing. Add four additional tack welds E. Execute circumferential EB weld with E-beam vertical (parallel to cavity axis). F. Execute circumferential EB weld with E-beam perpendicular to the axis of cavity.
Threaded Rod Flat Washer Hex Nut Bottom Block Fixture Setup for E-Beam Weld at Small End-Group Flange Add threaded rods and “Bottom Block” assembly.
Small end group- flange before installation of stepped flange end ring View after stepped flange end ring installation (Titanium) Fixture Setup for E-Beam Weld at Small End-Group Flange (Cont.) 2A. Lower stepped flange end ring and seat on small end-group flange.
Fixture Setup for E-Beam Weld at Small End-Group Flange(Cont.) Plunger Holder 2B. Add “Plunger Holder” and “Spring Plungers” to add pressure to stepped flange end ring to maintain proper fit and alignment during tack welding. Spring Plungers. Each plunger provides 1.3 – 2.7 lbs. of down force. This is not enough load to de-tune the cavity.
E-Beam Weld – Ti Vessel to Small End-Group Flange 2C. Perform electron beam tack weld on small end-group flange. Location and angle of electron beam weld. Tack in (4) places around flange between spring plungers
E-Beam Weld – Ti Vessel to Small End-Group Flange (Cont.) 2D. Remove hardware. 2E & 2F. Perform electron beam welds on small end-group flange. Remove “Plunger Holder” and perform a 360 degree continuous weld.
E-Beam Weld – Ti Vessel to Small End-Group Flange (Cont.) E-beam (primary) NbTi small conical end cap E-beam Titanium spacer ring Approximate location of original joint
Helium Vessel to Cavity #3 Welding • STEP 3: TIG weld titanium stepped end ring to titanium helium vessel A. Based on estimated TIG weld shrinkage, adjust fixturing to deflect bellows such that after weld the bellows will assume a neutral position. (Unless shrinkage is too severe) B. Insert titanium filler ring in gap between stepped end ring and helium vessel. C. Install assembly in glove box and execute argon purge to desired level (< 20 ppm oxygen). D. Tack weld in multiple spots always trying to maintain uniform deflection around circumference. E. Complete TIG weld in segments with goal of maintaining uniform deflection around circumference (possibly use additional titanium filler rod to increase weld integrity). F. Place multiple fillet welds in segments, working up towards a complete circumferential weld.
TIG Weld Stepped Flange End Ring (Titanium) 360 degree continuous TIG weld. Small End- Group Flange (Ni/Ti) Move to an argon purged glove box and perform final TIG weld of titanium stepped ring to titanium helium vessel. Weld to be performed in a “free” state. A filler ring is added to fill the gap between the stepped ring and the helium vessel. The filler ring helps with alignment and supplies filler material to complete the weld. A fillet weld on top of the filler ring completes the assembly. Filler Ring (Titanium) Helium Vessel (Titanium)
TIG Weld (cont.) TIG fillet weld (0.062” dia rod) Helium Vessel Spacer / filler ring Stepped Flange End Ring Small End- Group Flange