Download
1 / 4
40 likes | 269 Vues
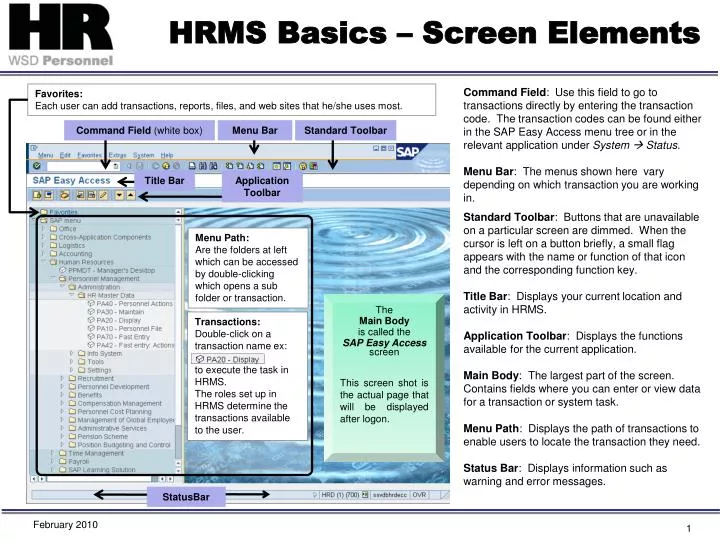
HRMS Basics – Screen Elements. Favorites: Each user can add transactions, reports, files, and web sites that he/she uses most.

E N D
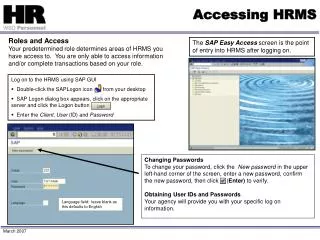
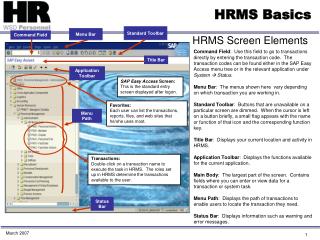
HRMS Basics – Screen Elements Favorites: Each user can add transactions, reports, files, and web sites that he/she uses most. Command Field: Use this field to go to transactions directly by entering the transaction code. The transaction codes can be found either in the SAP Easy Access menu tree or in the relevant application under System Status. Menu Bar: The menus shown here vary depending on which transaction you are working in. Standard Toolbar: Buttons that are unavailable on a particular screen are dimmed. When the cursor is left on a button briefly, a small flag appears with the name or function of that icon and the corresponding function key. Title Bar: Displays your current location and activity in HRMS. Application Toolbar: Displays the functions available for the current application. Main Body: The largest part of the screen. Contains fields where you can enter or view data for a transaction or system task. Menu Path:Displays the path of transactions to enable users to locate the transaction they need. Status Bar: Displays information such as warning and error messages. Command Field (white box) Menu Bar Standard Toolbar Title Bar Application Toolbar Menu Path: Are the folders at left which can be accessed by double-clicking which opens a sub folder or transaction. The Main Body is called the SAP Easy Accessscreen This screen shot is the actual page that will be displayed after logon. Transactions: Double-click on a transaction name ex: to execute the task in HRMS. The roles set up in HRMS determine the transactions available to the user. StatusBar February 2010
HRMS Basics OLQR web address: http://www.hr.wa.gov/payroll/HRMS/OnLineQuickReference/Pages/default.aspx What is HRMS HRMS is the Human Resource Management System designed to process payroll and personnel functions for the state of Washington. What is SAP? SAP is the software program that is updated and designed to manage HRMS functions. SAP = Systems, Applications, and Products in Data Processing February 2010
HRMS Basics • To view transaction codes in the menu lists, perform the following: • From the Menu bar, go to Extras Settings. • Click on “Display Technical Names”. • Click (Enter). Add transaction codes to your Favorites Menu • Drill-down to the transaction code you wish to add. • Menu Bar Favorites Add, or click on the toolbar • The transaction is added to your Favorites Menu. NOTE: You can also drag and drop transactions into your Favorites Menu. There are two ways to access a transaction screen in HRMS: 1) Menus • Allow you to navigate through a series of drop-down options similar to Windows Explorer • Menu options include the transaction description as well as the transaction code • Example: PA40 – Personnel Actions • 2) System Transaction Codes • Specific code that takes you directly to a specific transaction screen in HRMS. Enter the transaction code in the Command field on the Standard toolbar. Using Transaction Codes in the Command Field To view the transaction code bar, click on the right-facing triangle located on the tool bar. Once the transaction code bar is displayed, enter the alpha-numeric code for the transaction desired. The box with arrow provides a drop-down that displays the last few transaction codes used. February 2010
HRMS Basics Find First Prev Last Next New Save Back Exit Cancel Print Find Next Page Page Page Page Session SYSTEM MESSAGES Error An error message appears when a required entry has not been completed. HRMS will not allow you to continue until you correct the error. A red circle with an “X” appears on the status bar. Warning A warning message displays when HRMS detects a possible error. If everything has been entered correctly, you can press enter and continue with your work. Information An information message appears once you complete a process. Information messages do not require any further action. System Abend messages System abend messages indicate a problem with hardware or HRMS. Contact HRMS support for your agency if you encounter a system abend message. Save [Ctrl + S] Stores changes Back [F3] Returns to previous screen Exit [Shift + F3] Returns to SAP Easy Access, warning to save data Cancel [F12] Returns to SAP Easy Access, no warning to save data Enter [Enter] Validates required fields are entered before continuing Display [F7] Shows selected infotype data Local Layout [Alt +F12] Customizes HRMS Change [Shift + F5] Changes a record Copy [Shift + F9] Copies a recordMaintains audit trail Shortcut Creates shortcut to desktop Standard Menu [Ctrl + Shift + F3] Shows complete overview of HRMS User Menu [Ctrl + Shift + F11] Specific to user currently logged on New Session Opens a new session Matchcode Opens a selection list Execute [F8] Processes the transaction Overview[Shift +F8] Provides history of actions associated with an infotype Continue/Accept [Enter] Usually from a window or selection list Help [F1] Accesses HRMS Help and OLQR Print [Shift + P] Prints current screen Moves to First Page in document [Ctrl +Page Up] Moves to Previous Page in document [Page Up] Moves to Last Page in document [Ctrl + Page Down] Moves to Next Page in document [Page Down] Add to Favorites [Ctrl + Shift +F6] Delete from Favorites [Ctrl + Shift + F3] Move Favorite item up in list [Ctrl + Shift + F2] Move Favorite item down in list [Ctrl + Shift + F2] February 2010