Download
1 / 18
180 likes | 343 Vues
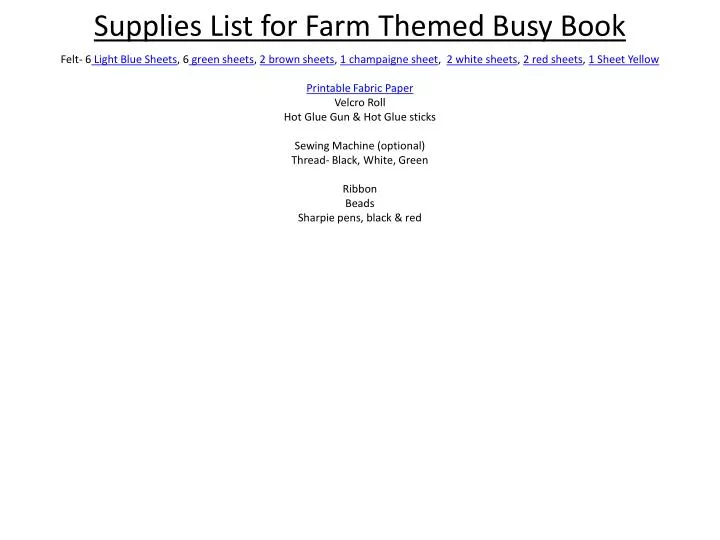
Supplies List for Farm Themed Busy Book. Felt- 6 Light Blue Sheets , 6 green sheets , 2 brown sheets , 1 champaigne sheet , 2 white sheets , 2 red sheets , 1 Sheet Yellow Printable Fabric Paper Velcro Roll Hot Glue Gun & Hot Glue sticks Sewing Machine (optional)

E N D
Supplies List for Farm Themed Busy Book Felt- 6 Light Blue Sheets, 6 green sheets, 2 brown sheets, 1 champaignesheet, 2 white sheets, 2 red sheets, 1 Sheet Yellow Printable Fabric Paper Velcro Roll Hot Glue Gun & Hot Glue sticks Sewing Machine (optional) Thread- Black, White, Green Ribbon Beads Sharpie pens, black & red
Print this page on the fabric paper as described in the materials list. • Cut out each picture (ignoring shadows) • Trace onto felt of desired color (I recommend using the felt that does not bend as easily), & cut out. (skip this step for the 2 chicks, owl, and nest) • Glue picture onto felt. • * I put everything on one page to save • fabric paper for you. Page 3 (Tree) Page 2 (barn) Page 5 (Dog House) Page 4 (Chicken)
Tractor Step-by-Step Instructions • Cut out the pieces from the template, and then cut those out of felt (colors specified in template). • Lay everything out on the page where you think It should go. • Choose where your corn stalks go, and sew them in place. • Next, sew the Dirt • Making the “dirt”: • When making the dirt, I recommend cutting in a wavy pattern on brown felt that will stretch all the way across the page, and when sewing, I recommend using black thread and making a “wave” pattern to give it texture. • Then, cut the Velcro to size, glue/sew, and line up with the corn stalks you have already sewn down. (optional ribbon attachment) • Write numbers on your corn (1-5) • Sew/glue the other side of the Velcro strip to the back of your corn (optional ribbon attachment here) (optional cut out leaves and glue to corn stalks) • Figure out where you are going to put your tractor. • Cut the picture of your child that you printed on the fabric paper out, making sure it is a little bigger than the hole for the tractor door. (additional info about this step on next page) • Glue the picture down where you decided the tractor door would go. • Place the tractor on top of the picture, and glue or sew the tractor down, making sure to situate it around the picture you just glued down. (If sewing follow sewing instructions pictured in the template) • Glue tractor window to tractor door. • Sew tractor door to tractor as instructed in the template. • Glue tractor wheels down. • Place the “trailer” below the corn on the corn page, and sew down as instructed in the template. • Glue wheels down. • Glue clouds if desired.
Tractor Page Additional Instructions • Putting your child’s picture in the book: • Using the printable fabric paper, find a picture of your child that you think would work to fit into the tractor opening, size accordingly (I recommend first printing on regular paper, so you do not waste your fancy fabric paper) • This may take a few tries as every computer & printer is different. • If you do not have experience sizing pictures, Microsoft PowerPoint is a great tool (if you have Microsoft Office installed on your computer, if not, Paint is pre installed on most computers, and works well too) Optional Clouds –cut out of white felt (glue to “sky”)
Cut along Thick, blue lines, sew along skinny, orange lines. Tractor Page Template • Cut corn out of yellow felt, • Use a Sharpie pen (any color) to write numbers on the yellow felt. • Cut Velcro strips , and sew/ glue accordingly • (if desired, you can also sew a piece of ribbon with the Velcro on the back of the corn and onto the stalk so the corn pieces will not get lost from the book) Front Wheel- cut out of black felt 3 4 2 1 5 Tractor door Cut out of Green felt, sew onto tractor following The orange line. Wheel interiors- cut out of yellow felt Tractor Window Cut out of blue felt, glue onto tractor door Cut out core stalks our of the green felt, and sew as pictured (right) following the orange line Rear Wheel Cut out of black felt You may also want to cut leaves out of the green felt and glue onto the page Cut area out, save for scrap Wagon/Tractor Trailer Cut out of green felt, and sew along orange lines. Making sure to leave top open for pocket to hold corn that is “picked”. Sew Door Here
Farm Page Instructions Cut out the pieces from the template, and then cut those out of felt (colors specified on template). Cut out farm animals specified on the fabric printout page (next page), and follow instructions on that page. Figure out how you want to do your grass, then cut and glue to page. (optional)-Glue/sew barn door highlights you cut out of the white paper onto the barn Lay everything out on the page where you think It should go, to get the idea of the set up you want to choose. Place the barn where you desire on the page. Next, Place the animal holder (pictured on the bottom right corner of this page) underneath the barn, where the bottom meets up with the bottom of the barn doors. Glue barn down *make sure you so not sew doors, or top of the animal holder down Sew edges and doors as instructed . Place the white barn roof onto the barn, and glue/sew down (if sewing use white thread) Place animals in the animal holder (pocket) you created. Next, follow instructions on cutting and sewing the fence on the farm template page. (next page) When I talk about the “clear scrap”, I am talking about that scrap plastic cover that you get when you buy a new comforter, sheets, ect. You, know the stuff you usually throw away? Animal holder- cut out of clear scrap (can also use same fabric/ felt as grass background), and sew down on skinny orange line (as shown below). Then, line barn overtop, and sew barn along skinny orange lines (as shown on next page), this will create a clear pocket for the animals to be stored in.
Barn door framing (optional) - Cut out of white felt, sew directly to barn doors in number order. (make sure you do not sew onto page, as barn door will not open , just sew to barn) *White thread is preferred Farm Page Template 3 5 Barn Roof- Cut out of white felt and glue or sew onto page along orange line (if sewing white thread is preferable here.) 1 3 2 6 4 Animal holder- cut out of clear scrap (as talked about in intro) (can also use matching felt/fabric used for the grass background, or yellow for hay), and stack fence (below on top) sew both together onto page as indicated in the skinny orange lines shown on the fence below. Fence-cut out of white or brown felt, and sew as instructed for animal holder pocket above) Barn- Cut out of red felt. Cut along lines (make sure to stop when blue lines stop on door and windows. Sew along orange lines.
Tree/apple Page Instructions Cut out pieces from template, and place on page as desired. Figure out how you want to make your grass, then cut and glue to page. Cut out owl and nest from the animal-fabric page. Place owl in the hole you cut out of the tree. Glue owl down. Glue tree down. Glue the 3 large “leaf” patches (if that is what you want to call them down) Sew the littlest leaf patch down as shown in template. Sew the brown part of tree trunk down over owl as instructed In the template. Glue nest down. (optional) number the apples or do letters. You could also cut out different colors to practice color recognition. Cut the Velcro to fit the apples. (you really only need a little piece) Sew/glue the rough side of the Velcro to the apples , and glue soft side to tree in desired areas. Sew basket down as instructed in template. (optional) You can also have a fence on this page, just follow the the instructions on the bottom right hand side of this page. Animal holder- cut out of clear scrap (as talked about in intro) (can also use matching felt/fabric used for the grass background), and stack fence (below on top) sew both together onto page as indicated in the skinny orange lines shown on the fence below. Fence-cut out of white or brown felt, and sew as instructed for animal holder pocket above)
Tree/apple Page Template Cut out of green fabric and glue down as desired for leaves of the tree. Cut out of green fabric and sew along orange line to hide the bird’s nest Cut tree out of brown fabric, and cut out hole for owl Cut out of brown fabric and sew along orange line to hide owl Cut out of brown fabric and sew along orange line to store apples in
Chicken Page Instructions Cut out pieces in the template, and cut out of felt as instructed. Choose what background color to use, and what color of felt to use for the “ground” Glue the big oval part of the nest down. (careful not to glue down on the crease of the book, as it will make the book less clean when it is closed (you might have to trim it a little bit to fit). Sew the Crescent part of the nest down as instructed in the template. Glue the chicks from the animal-fabric page to the solid eggs. (the eggs without cracks) Sew the cracked part to the solid eggs as instructed on template. You should now be able to open and close the eggs along the crack and see the chicks. (optional) cut out scrap pieces from dark and light brown felt, and glue to crescent . (make sure not to glue the top of the crescent down, as you will not be able to put the chicken in the “pocket” you created Tuck eggs in slightly, and glue down (cracked side facing out). Tuck mother chicken in. I cut little pieces from brown and champagne felt, making them look like sticks, and glued them to the nest to give it more dimension. (this is optional)
Chicken Page Template Chicken Nest- Cut out of brown fabric, and glue to page Chicken Nest “pocket”-Cut out of brown fabric, and rotate to fit to bottom of nest. Sew along orange line Place on top of blank eggs where chicks, and sew along orange line Eggs-cut out of white felt (the stiff kind as used for the barn) Glue Chick here Cut along blue lines
Feed the Dog Page Instructions Cut out pieces in the template, and cut out of felt as instructed. Choose what background color to use, and what color of felt to use for the “ground” Sew/glue ground onto page. Place dog house on page where desired. Sew/glue as instructed in template. Cut 3 pieces of ribbon, about 5 inches long each. Thread the beads onto the ribbon. Number the beads (if desired) Lay beaded ribbons out nest to each other. Glue down. Glue Blue & green felt over ends of ribbon. Tuck the dog in the doghouse.
Feed the Dog Page Template Cut out of Light blue felt, and glue over ribbon on the “sky” Cut out of green felt, and glue over ribbon on the “sky”

![Cultural Literacy – List 4 [Halloween-themed]](https://cdn1.slideserve.com/2182866/cultural-literacy-list-4-halloween-themed-dt.jpg)