Download
1 / 32
540 likes | 1.33k Vues
Emergency Department Blood Culture Contamination. Quality Improvement Project FY 2012 Staff Presentation. The Clinical Problem. Evidence of a high rate of blood culture contamination in the emergency department. ED Blood Culture Contamination Rate. Aim/Goal.

E N D
Emergency Department Blood Culture Contamination Quality Improvement Project FY 2012 Staff Presentation
The Clinical Problem Evidence of a high rate of blood culture contamination in the emergency department
Aim/Goal To reduce emergency department blood culture contamination rate before December 1, 2011. By January 1, 2012 to have an emergency department blood culture contamination rate 3% or less. Pull together a multi-disciplinary team of stake holders to re-examine practice.
How are blood cultures contaminated? Needle penetrates skin and/or needle penetrates blood culture bottle, that has not been prepared per recommended guidelines for obtaining blood cultures.
What contaminants exist? Normal Skin Flora: Coagulase negative Staph Diphtheroids (aka Corynebacterium) Micrococcus Strep viridans
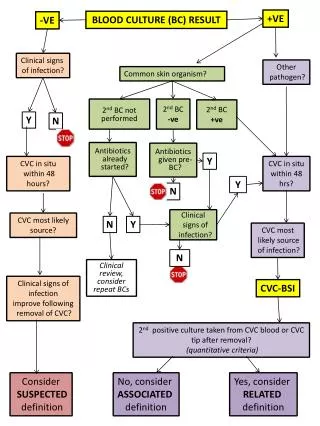
How does the lab know if it is a “contamination” or “infection”? The process of investigation: • If micro-organism found in Blood Culture then: • 1) Is it skin flora? • 2) How many bottles? • If one bottle of 4 than probably contamination • If greater than 1 bottle check sensitivity • 3) Sensitivity • If sensitivity is the same, isolated from multiple bottles, probably a true infection (UNLESS all 4 bottles are drawn from the same puncture site). • If sensitivity is different means different bugs were found in different bottles = probably a contaminant
Why is blood culture contamination an issue? • Patient Care Risks Increase! • One day average length of stay increase • Wrong antibiotics • Wrong diagnosis • Unneeded tests • Costs Increase • Hospital costs increase • Patient costs increase • Efficiency (opportunity cost) • WASTE in ED, Lab, pharmacy, Medical Staff, & case management staff time and effort
Literature Review • False positive blood cultures (aka Contaminated Blood Cultures): Increased length of stay, antimicrobial costs, costs of lab & radiology investigation. Average increase cost $7,502. • Alahmadi, YM et. al. (2011). Clinical and economic impact of contaminated blood cultures within the hospital setting. J Hosp Infec. 77(3): 233-6. • False positive blood cultures: increase length of stay by 1 day & increased patient charges by $8,700. • Gander, RM et. al. (2009). Impacts of blood cultures drawn by phlebotomy on contamination rates and healthcare costs is a hospital emergency department. J Clin Microbiol, 47(4): 1021-4.
Cost Value Analysis • Cost of one contamination = $8,000 • Per previous slides references (approximate) • Average Annual Contaminations = 136 • From Calendar Years 2010 & 2011 • 136 patients * $8,000 = $1,088,000 • IF the ED lowers BC contamination rate to 1% • Annual Cost Avoidance Savings = $330,000
Steps to Improvement 1) Share the data 2) Impart concern 3) Review the blood culture collection procedure 4) Add “IV start kits” to IV carts 5) Remove IV supplies from bedside carts 6) Direct feedback to care provider who drew a contaminated blood culture Quality Improvement = Culture of Safety!!!
Sharing is caring Feedback, feedback and more feedback!!!!! In-services Email Postings YouTube Direct observation Feedback to all persons with contamination
Goals Less than 3 % contamination rate Conversation with staff to understand WHY contamination occurred Fix all that can be fixed
Literature Review on CHG & IV • 50% fewer contaminated central lines • Mimoz, O (2007). Chlorhexidine-based antiseptic solution vs alcohol-based providone-iodine solution for central venous catheter care. Arch Intern Med 167(19): 2066-72. • Rate of CRBSI (per 100 catheters) CHG (2.3) vs. PI (7.3) vs. alcohol (9.1) • Maki DG, Ringer M, Alvarado CJ. Prospective randomized trial of providone-iodine, alcohol, and chlorhexidine for prevention of infection associated with central venous and arterial catheters. Lancet. 1991 Aug 10;338(8763):339-43 • CDC recognition (for 10 years) • http://www.cdc.gov/hicpac/pdf/guidelines/bsi-guidelines2011.pdf • CDC (Centers for Disease Control and Prevention). (2002). Guidelines for the prevention of intravascular catheter-related infections. MMWR, 51 (No. RR-10), 1-29. Erratum and correction for Appendix B in: MMWR, 51 (32), 711. • INS recognition • Intravenous Nurses Society (INS). (2006). Infusion nursing standards of practice. Journal of Intravenous Nursing, 29 (1 Suppl.), S1-S92.
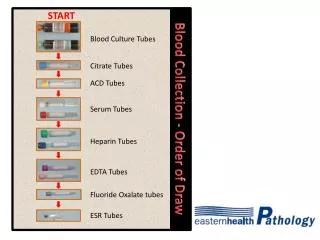
Things to know A blood culture is really two bottles (a set) 2 sets must be drawn (i.e. 4 Bottles) 1 set from a unique site (i.e. two sticks) Aerobic first (r/t air in the tubing) Steps to clean skin followed precisely Difference between CHG & Alcohol Don’t touch skin where you stick, please HH & PPE, Florence Nightingale was right
Need Phlebotomy? Phone: • ED Phlebotomist: x 5555 • ED Phlebotomist – Outside of the ED: x 4444 Beeper: • Always available: 11-5555
Drawing Blood Cultures • In the ED, typically one set is from an IV and a SECOND must come from a venipuncture. • Always get two sets; exception is the neonate • The IV Therapy Standards policy explains how to prepare the skin in a step by step fashion
How to start an IV (by policy) 1) Validate physician order for IV therapy. 2) Provide patient education as indicated. 3) Gather supplies and wash hands, maintain standard precautions. 4) Don gloves. 5) Wash intended venipuncture site with anti-infective soap and water if needed. 6) Remove hair from chosen site with clippers or scissors if needed. 7) Disinfect the insertion with a single-dose antiseptic solution, 2% chlorhexidine is the antiseptic of choice, and allow to become visibly dry (40 seconds).
How to start an IV (by policy) 8) Connect the injection cap to extension tube (if using). 9) Prime injection cap and tube with saline flush, leave the saline flush attached to cap. 10) Apply tourniquet above selected site. 11) Access the vein with the catheter at a 10-15 degree angle. 12) Once blood is seen advance the catheter proper off the styled. 13) Depress the needle retraction button on the catheter, while holding pressure over the IV site to reduce the amount of blood that will exit the catheter. 14) Attach the injection cap and extension tubing (if used).
How to start an IV (by policy) 15) Place the transparent occlusive dressing over the hub of the IV catheter and insertion site. 16) Secure hub with a single piece of tape over the hub or wing. 17) Flush the IV catheter with the saline, observe for complications. 18) Place a second piece of tape over the extension tubing. 19) Label the site with initial, size and date placed. 20) May apply a piece of net gauze to provide additional security.
Blood Culture Collection The lab offers this (policy) 1) Identify the patient 2) Locate the vein to be used 3) Tear open the chlorascrub packet and remove the swab, do not unfold. 4) Apply the swab to the desired puncture site by holding swab between thumb and index finger. Apply swab to the skin using repeated back and forth stroke for 15 seconds.
Blood Culture Collection The lab offers this (policy) continued 5) Allow the skin to air dry for 30 seconds. Do not blot or wipe dry. DO NOT Touch the skin after it is disinfected. Do not re-use swab. 6) While the site is drying, disinfect the visible part of the rubber stopper of the bottles using 70% alcohol wipes. Leave on the stopper until ready to use the bottles. 7) Mark the bottle with the recommended draw amount.
Blood Culture Collection The lab offers this (policy) continued • 8) Using a butterfly and holder, draw blood directly into each of the 2 culture bottles, aerobic bottle first. • 9) Invert the bottles four or five times to prevent clotting. • 10) Label each bottle adding your initials and time drawn.
Bottom Line • Wash your hands and put on gloves • Disinfect the insertion with a single-dose antiseptic solution, 2% chlorhexidine is the antiseptic of choice, and allow to become visibly dry (40 seconds). • Do NOT touch the puncture site • Wipe the tops of the blood culture bottles with alcohol before puncturing them with needle
Blood Volume for Blood Cultures • Single most important factor to GROWING microorganisms
YouTube.com • Here is a video on the blood culture collection process. It is not exactly what we do at the hospital, but it makes the important points. • Please be sure to always follow your hospitals policies and procedures. • http://www.youtube.com/watch?v=Fg540kvsWWM
What did that chart mean? • Chlorhexidine: 1) Is effective for about 4 hours after it is applied (Alcohol ONLY when wet) 2) If anything drops onto the prepared skin, CHG kills it (Not with Alcohol) 3) CHG Kills bugs in two different ways (Alcohol only one way) 4) Results show that infection rates are 50 - 400% greater with Alcohol.
Blood Culture Drawing Summary • Use Chlorhexidine when puncturing skin • Do NOT touch the skin after you clean it • Wipe the Blood Culture bottles with alcohol • Get two sets from two different sites!!!!
What more to expect? • Direct follow up if you draw a blood culture that is contaminated. • Feedback helps us grow! • Understanding the circumstances when the BC was drawn may lead to changes in systemic issues that can be addressed in the ED • Non-punitive quality & process improvement • Quality Improvement = Culture of Safety • Emails about progress • Requests for your feedback
CELEBRATE SUCCESS Blood Culture Contamination Rates Going DOWN