Download
1 / 30
1.06k likes | 2.33k Vues
Biology . Lab Safety & Using the Microscope. Safety in the Lab. Answer pre-lab questions. Think, pair, share Location of Safety Equipment including Emergency Exits Safety Questions Location of Lab E quipment Identification of Lab Equipment Analysis and Critical Thinking - HW.

E N D
Biology Lab Safety &Using the Microscope
Safety in the Lab • Answer pre-lab questions. • Think, pair, share • Location of Safety Equipment including Emergency Exits • Safety Questions • Location of Lab Equipment • Identification of Lab Equipment • Analysis and Critical Thinking - HW
Top 10 Safety Rules to Follow in the Biology Lab • Always follow the teacher’s directions. Never perform activities that are not authorized by your teacher. • Read ALL directions for an investigation several times. Follow the directions exactly as they are written. If you are in doubt about any part of the investigation, ask your teacher for assistance. • Keep your laboratory area clean and free of unnecessary books, papers, and equipment. • Be serious and alert when working in the laboratory. Never “horse around” in the laboratory. • Never eat or taste anything in the laboratory unless directed to do so. This includes food, drinks, and gum, as well as chemicals. Wash your hands before and after every investigation.
Top 10 Safety Rules to Follow in the Biology Lab • Report all accidents, no matter how minor, to your teacher immediately. • Point a test tube or bottle that is being heated away from you and others. Chemicals can splash or boil out of a heated test tube. • Never heat a liquid in a closed container. The expanding gases produced may blow the container apart, injuring you or others. • Never use broken or chipped glassware. If glassware breaks, notify your teacher and dispose of the glassware in the proper trash container. • When an investigation is completed, clean up your work area and return all equipment to its proper place.
Identify the following Lab Equipment: 1 3 4 2 5 Petri Dishes Slides Forceps 6 8 Erlenmeyer Flask 7 Dropper Graduated Cylinder 11 Slide Covers 10 Test Tube 9 Funnel Thermometer Beakers
Science Safety Rules Review List two of the top ten Science Safety Rules that students should follow in the science laboratory.
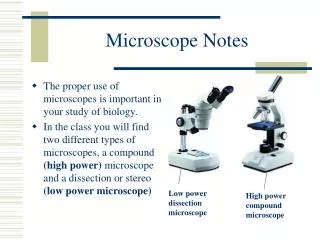
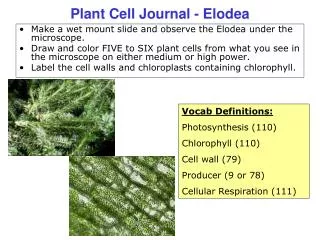
Parts & Function Eyepiece or Ocular Lens – contains a magnifying lens usually 10x magnification Arm – connects to base and supports the body tube; when carrying microscope one hand must hold the arm Coarse focus – raises and lowers the stage or body tube for focusing image; use on LOW power objective only Fine focus – slightly moves the stage or body tube to sharpen (adjust) the image; use on Medium or High power objective
Parts & Function Base – supports the microscope Light source/Illuminator/Projection Lens – produces light or reflects light up toward the eyepiece (may be a mirror) Diaphragm – regulates the amount of light passing up toward the eyepiece. Stage – supports the slide being observed Stage Clips – holds slide firmly in place
Parts & Function High Power Objective Lens – focuses minute details on slide; provides a magnification of 40x Medium Power Objective Lens – after finding image on low power, use to sharpen image; provides a magnification of 10x Revolving Nosepiece – holds the objectives and can be rotated to change magnification Body Tube – maintains the proper distance between the eyepiece and the objectives Low Power Objective Lens – 1st objective used for focusing; provides a magnification of 4x (10x if no Medium power obj lens)
Care & Handling Microscopes • Always carry the microscope in an upright position with two hands. One hand should support the base and the other should be on the on the arm. Do NOT swing the microscope CORRECT!!! INCORRECT!!!
Care & Handling Microscopes • Never touch lens with your fingers! Oil produced from your body smudges the glass. • Use lens paper and lens cleaning solution to clean the lenses on the microscope. • Paper towel will scratch the lenses. • Use a soft cloth to clean other parts of the microscope.
Care & Handling Microscopes • Always set your microscope on a clean, flat surface. • When finished with the microscope, always remove slides from the stage. • Rotate the nosepiece to the lowestpower. • Clean stage with lens paper.
Use of the Microscope • Carry microscope with one hand under base and grasp arm with other hand • Gently place the microscope on the table with arm facing you. • Raise body tube by turning the course adjustment knob until the objective lens is about 2 cm above the opening of the stage. • Rotate the nosepiece so that the low power objective is directly in line with the body tube.
Use of the Microscope • Look through the eyepiece and switch on the lamp or adjust mirror to that a circle of light can be seen. • Moving the diaphragm lever permits a greater or smaller amount of light to come through the opening of the stage. • Place prepared slide on the stage so that the specimen is over the center of the opening. • Use stage clips to hold slide in place.
Use of the Microscope • Look at the microscope from the side. Carefully turn the coarse adjustment knob to raise the stage until the low power objective almost touches the slide or until the body tube can no longer be moved. • Do NOT allow the objective to touch the slide • Look through the eyepiece and observe the specimen. If the field of view is out of focus, use the course adjustment knob to LOWER the stage while looking through the eyepiece until the object comes into focus. • You are moving the slide AWAY from the objective lens
Use of the Microscope • Focus the image as best you can with coarse adjustment knob. Then use fine adjustment knob to focus the image more sharply. • Adjust diaphragm lever to allow the right amount of light to enter. • To change the magnification, rotate the nosepiece until the desired objective is in line with the body tube. ONLY use FINEadjustment knob with medium and high power lens • FIRST use medium power lens to sharpen image. • SECOND use high power lens to focus minute details.
Microscopes Three types of microscopes Compound Light Microscope Transmission Electron Microscope (TEM) Scanning Electron Microscope (SEM)
Overview of Microscopes • Magnification – increase of an object’s apparent size • Total magnification:mag. of eyepiece x mag. of objective lens • Ex: (10X) x (4X) = 40X • Resolution (resolving power)– the distance needed to distinguish 2 points as separate
Resolving Power The human eye is capable of distinguishing objects down to a fraction of a mm. With the use of light and electron microscopes it is possible to see down to an angstrom and study everything from different cells and bacteria to single molecules or even atoms.
Compound Light Microscope • Specimen is enlarged as light passes through set of glass lenses • Can be used to view living specimens • Resolving power is limited to the physical character of light – up to 200 nm • Magnification up to 2000x • beyond ~2000x the image becomes blurry
Transmission Electron Microscope • Cannot be used to view living specimens • Transmits a beam of electrons focused by a set of magnetic lenses through a specimen • Creates a flat image • Magnification – up to 5,000,000x • Resolution – up to 0.2nm
Scanning Electron Microscope: • Cannot be used to view living specimens • A narrow beam of electrons is pass over the surface of the specimen, which is coated with a thin layer of metal, producing a 3D image • Magnification up to 500,000X • Resolution – up to 10 nm
Microscope Comparison http://www.sciencelearn.org.nz/Contexts/Exploring-with-Microscopes/Sci-Media/Interactives/Which-microscope
TEM image Transmission electron microscope image of a human leukocyte (also known as a white blood cell), showing the Golgi apparatus, which is a structure involved in protein transport in the cytoplasm of the cell. http://www.sciencelearn.org.nz/Contexts/Exploring-with-Microscopes
SEM image A head louse clasping a human hair. The image was taken using an SEM at 110x magnification. At low magnifications like this, SEM generates three-dimensional images that are in focus throughout the depth of the sample. http://www.sciencelearn.org.nz/Contexts/Exploring-with-Microscopes
Microscope Images http://remf.dartmouth.edu/imagesindex.html