Download

1 / 12
120 likes | 404 Vues
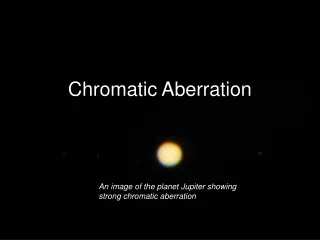
Chromatic Dispersion measurement. Chromatic Dispersion M easurement. Piotr Turowicz Poznan Supercomputing and Networking Center piotrek @ man.poznan.pl Kiev 9-10 October 2006. Chromatic Dispersion measurement. Equipment requirements. FTB-400 mainframe equipped with GP-407.

E N D
Chromatic Dispersion measurement Chromatic Dispersion Measurement Piotr Turowicz Poznan Supercomputing and Networking Center piotrek@man.poznan.pl Kiev 9-10 October 2006
Chromatic Dispersion measurement Equipment requirements. FTB-400 mainframe equipped with GP-407. FTB-5800-xx CD analyzer FLS-5800-xx series CD/PMD source Toolbox office software 6.21 or higher installed on FTB-400
Step 1. The FLS-5800 series source should be powered-up and allowed to complete its self test routine (less than 30 seconds). The user then has to select wavelength range and then activate the source. C band (nominally 1510 to 1560nm) and C+L band (nominally 1510 to 1610nm). Step 2. Inspect and clean the connectors on the appropriate patch-cord and connect to the source. Step 3. Power-on the FTB-400 and activate the FTB-5800 Step 4. Connect the patch-cord to the input on the FTB-5800 analyser module.
Step 5. • Check the input power level on the analyzer software. This is a basic Go/No Go indication to indicate if useable power is present before starting. This will save you time in your testing as • it will indicate whether: • · your source is truly activated, • if you are connected to the correct fibre (a common problem!) • and can potentially tell you to use longer averaging times (if the source signal is low)
Step 6 Select the wavelength range to match your FLS-5800 source settings:
Content Step 7 Select the acquisition parameters (step size and averaging time).
Content These settings dictate the overall test time. The higher the number of steps and the longer the averaging time, the better quality your end results. However, practical concerns mean that test times should be optimized as much as possible. A good starting point is as follows: Network length ~60km: Step size = 5nm, averaging time = 1 sec. This will be a total test time of < 5 minutes Network length ~120km: Step size = 1nm, averaging time = 1 sec. This will be a total test time of < 10 minutes
Content Step 8 Select the fibre type and fibre length
Content • The fibre type information is used to define the exact curve fit routine used on the data. Selecting your fibre type (e.g. Standard Fibre G.652) automatically selects the recommended curve fit for that fibre type. • The known fibre length should be used if the CD co-efficient is required in addition to the CD delay and CD slope. • Note • This selection can be changed in the results graph section after the data has been acquired or stored.
Content Step 9 Acquiring data.To begin data acquisition, press the GREENstart button. During acquisition, you see the data appearing point by point across the screen (purple crosses). There is also a count down clock to indicate how much time is left on the test. At the end of the acquisition, the analysis takes place. A curve fit is performed (purple line) and the CD calculated (blue line).