Download
1 / 17
170 likes | 273 Vues
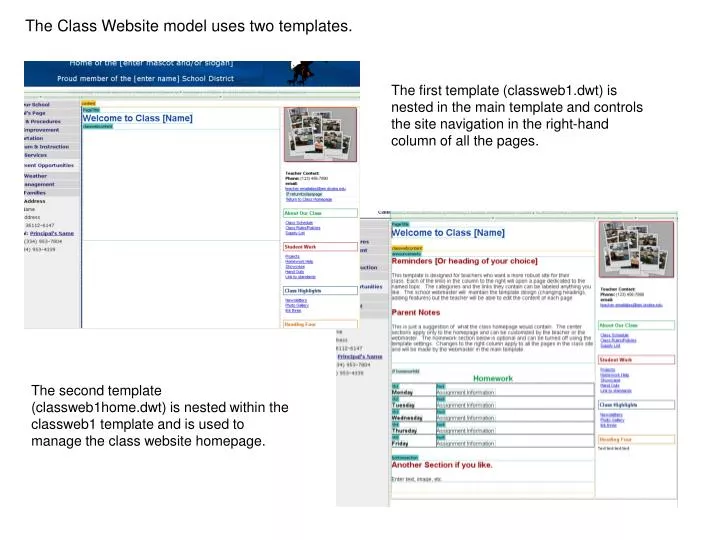
The Class Website model uses two templates. . The first template (classweb1.dwt) is nested in the main template and controls the site navigation in the right-hand column of all the pages.

E N D
The Class Website model uses two templates. The first template (classweb1.dwt) is nested in the main template and controls the site navigation in the right-hand column of all the pages. The second template (classweb1home.dwt) is nested within the classweb1 template and is used to manage the class website homepage.
Create Individual Class Website Templates from the Class Website Template Example You will duplicate and modify the class website template I provided to create templates for each class website. Start by creating a folder for each class website in your site file structure. The following slides describe how to use the class website template to create the templates for each class website.
Right click on the classweb1.dwt file in the Files panel. • Select Edit | Duplicate from the menu that pops up. • Right click on the Copy of classweb1.dwt file. • Select Edit | Rename. • Name the file classweb2.dwt (or 3 or 4 etc. or name it something that reflects the class or teacher.) • Click Update when prompted to update files. • Repeat the process for the classweb1.css file except rename it classweb2.css (or whatever corresponds to the name you gave the template.)
Open the new template you just created. • Locate the style sheet link in the code portion of the Dreamweaver work space. • Click inside the link tag. • Change the Href in the Link properties to the duplicated style sheet (classweb2.css). • Save the template. Click Ok whenever you see this error message.
Create a new page from the duplicated template. Select New. . . from the File menu. Make sure Page from Template is selected. Make sure the correct site is selected. Select the template you created in Steps 1-5. Check the box Update page when template changes. Click Create.
Select Template Objects | Make Nested Template from the Insert menu. • Give the new template a name that reflects that it is the homepage template for teacher/class. • Click Save.
Open classweb1home.dwt. • Select the editable regions (in the center section). • Copy the selected sections.
Return to the new homepage template you just created. • Paste the copied sections into the editable section named classwebcontent. • Click on the If homeworktbl tab to select the optional region. • Click the Edit button. • Leave everything the same in the New Optional Regiondialog box. • Click OK. • Save the template.
The preceding procedure created a set of templates for a class website. You will need to repeat the procedure for each class website that needs to be created. Once you have the individual class template created you will need to customize the template for the intended user (teacher/class). The classweb template is the main template that will control the navigation. The webmaster will be responsible for making requested changes to the navigation in the template as well as changes to the layout of the homepage. All content changes can be made by the user in Contribute. The user (teacher) can create new pages from their template in Contribute but if they want them to be linked from the side navigation the webmaster will need to add them to the template. I recommend you create the initial pages for the navigation before giving the user access in Contribute. At the very minimum you must create a homepage for each user before you can create their Contribute connection.
Create the teacher’s home page. Select File | New Make sure from Template is selected. Select the homepage template for the teacher who's page you are creating. Check the box to Update page when template changes Click Create
Populate the Title field and the Page Title header to reflect the class name. Save Select the folder you created for the class/teacher. Give the page a filename that reflects it is the class homepage. Close the homepage.
Create class website page(s). Select File | New Make sure from Template is selected. Select the page template for the class site you are creating. (NOT the class’s homepage template.) Check the box to Update page when template changes Click Create
Populate the Title field and the Page Title header to reflect the purpose/name of the page. Save Select the folder you created for the class/teacher. Give the page a filename that corresponds to the page title (no spaces).
You can close the page you created and repeat steps 1 – 9 to create more pages or follow these instructions (a little quicker) before closing the webpage. Save As to create additional site pages. Select Save As . . . from the File menu. Give it a new file name. Change the page Title and Page Title Heading. Save the new page.
Update the Class website navigation links. Open the class page template. Click on the link you want to update in the navigation. Click the link tag <a> in the Tag Selector. Use the point to tool to select the link destination. Repeat for the other links.
Save the template. Click Update when prompted: Update all files based on this template? Click Close when the updates are done. Close the template. Right click on the class website’s folder. Select Check in Check in the corresponding templates and CSS file.