Download
1 / 42
420 likes | 526 Vues
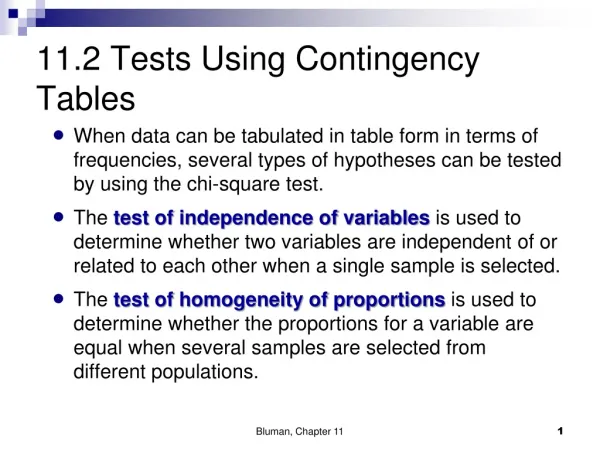
Using Lexmark for Tests. Elaine Wood Data Analyst, Assessment and Program Evaluation elainew@spokaneschools.org x7394. Workshop Objectives. 1. Print and Grade: 1.1 District-created tests 1.2 Teacher-created tests 2. Utilize additional features of the device

E N D
Using Lexmark for Tests Elaine Wood Data Analyst, Assessment and Program Evaluation elainew@spokaneschools.org x7394
Workshop Objectives 1. Print and Grade: • 1.1 District-created tests • 1.2 Teacher-created tests 2. Utilize additional features of the device • 2.1 Email files of student responses and graded results • 2.2 Select reports that might be useful 3. Gain exposure to some common “bugs” and how to address them 4. Obtain resources that can be useful in teaching others or for your own future reference.
Workshop Outline • District-Created Tests • Overview/Instructions • Practice in small groups • Teacher-Created Tests • Overview • Practice • Problem-Solving Tips • Review • Evaluation Form
District-Created Tests • Use the machine to print the tests • Grade/enter the students’ answers by the due date of that assessment • Reflect on your class results as shown in reports you select or response files you have emailed to yourself • School and/or district results are examined after individual teacher files are combined.
How to: Print District Tests • You may need to activate the screen • Choose “Print District Tests”
How to: Print District Tests • Decide: • Do I want an answer sheet printed for every student in my class (or selected students from my class)? • IF YES, choose “Print Classes” • Do I want a small number of answer sheets without student information in it? • IF YES, choose “Print Blank Bubble Sheets”
How to: Print District Tests • Hit “Next” after every step
How to: Print District Tests • Between steps, data is retrieved; this can take a little time
How to: Print District Tests • Select School (Know your 3-digit code)
How to: Print District Tests • Prompt for short list, then Select Teacher
How to: Print District Tests • MIDDLE SCHOOL – You may need to Select a Term • Decision Point: How is the class registered in SASI?
How to: Print District Tests • Select Course
How to: Print District Tests • Select Section(s) • Decision Point (for some): • Do I want an answer sheet for every student in several sections at once? • Do I want an answer sheet for some or all students in only one section? • If so, which students?
How to: Print District Tests • Identify the category of the test
How to: Print District Tests • Choose school type based on the test’s level
How to: Print District Tests • Identify the desired test
How to: Print District Tests • RECEIVE THE BUBBLE SHEETS
How to: Print District Tests • Things to NOTE: • Don’t forget to hit “Next” • There is no way to go back one step • But there is a “Home” button and a “Cancel” button • The machine will time out after several minutes • The machine has to perform some complex steps that are not instantaneous • Things that affect the amount of time: • Number of students • Bandwidth available
How to: Grade District Tests • You may need to activate the screen • Choose “Grade District Tests”
How to: Grade District Tests • Decide: • Do I want to scan one section or more than one? • This decision will impact how the reports are prepared for you and how the response/results files are organized. • Position the pages and hit “Next“ to start the scan
How to: Grade District Tests • Decide: • Which, if any, reports would be useful?
How to: Grade District Tests • Decide: • Do I want the response file and the result file in .csv format? • Does someone else want them?
How to: Grade District Tests • To email, enter only the name portion of a spokaneschools.org address • Multiple addresses can be entered if separated by a comma
How to: Print District Tests • You may need to activate the screen • Choose “Print District Tests” • Decide: • Do I want an answer sheet printed for every student in my class (or selected students from my class)? • IF YES, choose “Print Classes” • Do I want a small number of answer sheets without student information in it? • IF YES, choose “Print Blank Bubble Sheets” • Select School (Know your 3-digit code) • Prompt for short list, then Select Teacher • MIDDLE SCHOOL – You may need to Select a Term • Decision Point: How is the class registered in SASI? • Select Course • Select Section(s) • Decision Point (for some): • Do I want an answer sheet for every student in several sections at once? • Do I want an answer sheet for some or all students in only one section? • If so, which students? • Identify level of test • Select test subject category • Choose the test you want • RECEIVE THE BUBBLE SHEETS • Don’t forget to always hit Next
How to: Choose a Useful Report • Student Statistics Report • Lists all students’ scores for the overall test
How to: Choose a Useful Report(Student Statistics Report) ...AND lists all students with their scores for every learning target
How to: Choose a Useful Report Grade distribution ..for Overall Test ...repeated for every Learning Target
How to: Choose a Useful Report Student Grade Report Prints one page for every student with a copy of each student’s scanned answer sheet, a list of their responses and the correct answer (if needed), and a summary of their score overall and on every learning target.
How to: Choose a Useful Report Test Statistics Report Returns a one-page summary of the scanned group’s performance on the test.
How to: Choose a Useful Report Condensed Item Analysis Report For every question on the test, this report shows the number and percentage of students who selected each answer.
A quick note on bubbling: • Need not be pencil, but must reflect light • If you’re completing many forms, a marker will be your friend (but be aware of bleed-through) • Need not be fastidious, but must clearly identify one (and only one bubble) • The machine is set to allow erasure marks, so make sure the mark is fairly dark. • Can you guess what was read for each of the following:
Answers A only B only C only C only
What is meant by Results and Response .csv files? • Both can be opened by and manipulated in Excel • The Responses file shows each student’s answer for every question. • The Results file shows each student’s score for every item and their overall percentage.
ACTIVITY 1 • Work in small groups • One person will be the “teacher”; the others will be “students” • Work together to accomplish the following: 1. Print enough “Lexmark_Example_Test” student answer sheets for every “student” in your group 2. After every “student” has had a chance to answer the questions on their bubble sheet, grade the group. 3. Examine some of the reports generated.
Lexmark Example Test – Answer Key 1. If the screen is dark as you approach the Lexmark, C. touch the screen anywhere to activate it. WO 1.1., 1.2, 3.0 2. Select “Print blank bubble sheets” if you want: B. A small number of answer sheets with no student info on them WO 1.1, 1.2 3. It can be easy to forget to overlook the screen by overlooking this button A. “Next” WO 1.1, 1.2, 3.0 4. Which of the following is true about emailing response and results files? D. All of the above WO 2.1 5. Which of the following is true about scanning student work? C. A teacher with several sections of the same class can scan them together, if desired. WO 1.1, 1.2, 2.2
How to: Print Teacher Tests • A VERY SIMILAR PROCESS! • Key Differences: • No test has been created • No answer key has been created • The first page printed for every section will be the Answer Key. • As you walk through the steps on the touchpad, • Can choose to print an extra Answer Key • Print Classes/ Print Answer Key/ Print Blank Bubble Sheets • Must choose the format of the test (e.g. 15 MC questions) • Can give the test a name
How to: Grade Teacher Tests • Again, it’s very similar to grading district tests • Key Differences: • No answer key has been created • When you enter a stack of student work, place the Answer Key on the top. • You can grade multiple sections with one answer key. • As before, if you do so, all the students will be returned in alphabetical order. • Reports will not print for different learning targets. • No files are stored if you choose not to email the results and responses .csv files
ACTIVITY 2 • Work in the same groups • One person will be the “teacher”; the others will be “students” • Work together to accomplish the following: 1. Print enough 15 Multiple-choice student answer sheets for every “student” in your group. Name the test “Test on Lexmark” 2. Be sure the “teacher” gets the top sheet; it will say “Answer Key” on it. 3. After every “student” has had a chance to answer the five True/False questions on their bubble sheet, grade the group. 4. Examine some of the reports generated.
Some things to note... • As goes SASI, so goes Lexmark • Be aware that tests might not be finalized when they first appear on the menu. • If applicable, follow the calendar for your content area/ course • Every time you scan a district assessment, a unique file is created on the Lexmark server with a time stamp on it.
Who to contact • For timing of the tests/ deadlines: Coordinators/ Facilitators/ Coaches • For assessments that won’t print and/or provide reports (or emails): Elaine in Assessment and Program Eval. • For toner, it will vary by school and department. • For a problem with the Lexmark Hardware: ITSC HelpDesk
Summary: Discuss in Groups • How many differences can you identify between a teacher-created and a district-created test (in terms of Lexmark only, please)? • How can Lexmark be useful in your content area?
Please complete an evaluation for this workshop before you leave. Thank you.