Download
1 / 27
270 likes | 348 Vues
INTRODUCTION TO COMPUTER STUDIES Unit Five: Keyboard and Navigation. COMPUTER STUDIES DEPARTMENT JINJA COLLEGE. Unit Objectives. (don’t Write). To be able to use the Keyboard and Navigation tools: a. The mouse: ii. Structure of the standard mouse iii. Uses of buttons on a mouse.

E N D
INTRODUCTION TO COMPUTER STUDIES Unit Five: Keyboard and Navigation COMPUTER STUDIES DEPARTMENT JINJA COLLEGE
Unit Objectives (don’t Write) • To be able to use the Keyboard and Navigation tools: a. The mouse: ii. Structure of the standard mouse iii. Uses of buttons on a mouse. b. Keyboard: i. The structure of a standard keyboard ii. Sections of the Keyboard & their uses iii. Key combinations & their uses
Unit Introduction • In this unit, we shall be familiarised to the keyboard and the mouse – the main computer input devices. Much of the time will be given for practical work. The following will be done: • Utilizing word pad and typing tutors, to develop skills of typing. • Using Tools like Paint, to help students to develop skills in navigating and manipulating on-screen objects using the mouse. • As many examples of key-combinations especially the most important (2-key & 3-key combinations) as possible.
The Mouse • A mouse is a pointing device which allows users to move the cursor and make selections on the computer screen. A pointing device is any piece of hardware that is used to allow a user to input spatial data to a computer. • Just as you would use your hands to interact with objects in the physical world, you can use your mouse to interact with items on your computer screen. • You can move objects, open them, change them, throw them away, and perform other actions. • You can do all that by Pointing, clicking, and dragging Clicking (single-clicking) Double-clicking Right-clicking and dragging with your mouse.
Basic parts of a Mouse • A mouse typically has two buttons: a primary button (usually the left button) and a secondary button (usually the right button). You will use the primary button most often. Most mice also include a scroll wheel between the two buttons.
Holding and moving the mouse • Place your mouse beside your keyboard on a clean, smooth surface, such as a mouse pad. • Hold the mouse gently, with your index finger resting on the primary button and your thumb resting on the side. • To move the mouse, slide it slowly in any direction. • Don't twist it—keep the front of the mouse aimed away from you. As you move the mouse, a pointer on your screen moves in the same direction. • If you run out of room to move your mouse on your desk or mouse pad, just pick up the mouse and bring it back closer to you. • Hold the mouse lightly, keeping your wrist straight.
Mouse Pad • A mousepad or mouse mat is a surface for placing and moving a computer mouse. • A mousepad improves the usability of the mouse • It enables higher speed, more precision, and comfort for the user, compared to using a mouse directly on a table. • A secondary benefit was keeping the desk or table surface from being scratched, and reducing debris under the mouse
Pointing • Pointing to an item on the screen means moving your mouse so the pointer appears to be touching the item. When you point to something, a screen tip often appears that describes the item. • For example, when you point to the Recycle Bin on the desktop, a screen tip appears with this information: "Contains the files and folders that you have deleted." • The pointer can change depending on what you're pointing to. For example, when you point to a link in your web browser, the pointer changes from an arrow to a hand with a pointing finger HYPERLINK
Clicking (single-clicking) • To click an item, point to the item on the screen, and then press and release the primary button (usually the left button). • Clicking is most often used to select (mark) an item or to execute a command with a command button. Clicking is also called single-clicking or left-clicking.
Double-clicking • To double-click an item, point to the item on the screen, and then click twice quickly. If the two clicks are spaced too far apart, they might be interpreted as two individual clicks rather than as one double-click. • Double-clicking is most often used to open items on your desktop. For example, you can start a program or open a folder by double-clicking its icon on the desktop.
Right-clicking • To right-click an item, point to the item on the screen, and then press and release the secondary button (usually the right button). • Right-clicking an item usually displays a pop up menu with a list of things you can do with the item. • For example, when you right-click the Recycle Bin on your desktop, Windows displays a menu allowing you to open it, empty it, delete it, or see its properties. • If you're ever unsure of what to do with something, right-click it.
Dragging • You can move items around your screen by dragging them. • To drag an object, point to the object on the screen, press and hold the primary button, move the object to a new location, and then release the primary button. • Dragging (sometimes called dragging and dropping) is most often used to move files and folders to a different location and to move windows and icons around on your screen.
Scrolling • If your mouse has a scroll wheel, you can use it to scroll through documents and windows instead of using scroll bars. • To scroll down, roll the wheel backward (toward you). To scroll up, roll the wheel forward (away from you). • The scroll wheel helps you move up or down through documents, windows and webpages more easily. • On some mice, the scroll wheel can be pressed to act as a third button. Advanced mice might have additional buttons that can perform other functions.
Tips for using your mouse safely • Always ensure a clean, smooth surface, such as a mouse pad • Place your mouse at elbow level. Your upper arms should fall relaxed at your sides. • Don't squeeze or grip your mouse tightly. Hold it lightly. • Move the mouse by pivoting your arm at your elbow. Avoid bending your wrist up, down, or to the sides. • Use a light touch when clicking a mouse button. • Keep your fingers relaxed. Don't allow them to hover above the buttons. • When you don't need to use the mouse, don't hold it. • Take short breaks from computer use every 15 to 20 minutes.
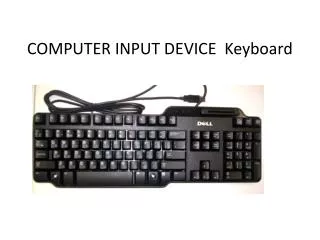
The key board • Whether you're writing a letter or calculating numerical data, your keyboard is the main way to enter information into your computer. • But did you know you can also use your keyboard to control your computer? • Learning just a few simple keyboard commands can help you work more efficiently.
Sections of the Keyboard & their uses • The alphanumeric keys include the same letter, number, punctuation, and symbol keys found on a traditional typewriter. • The Numeric keypad is handy for entering numbers quickly. The keys are grouped together in a block like a conventional calculator or adding machine. • Navigation keys are used for moving around in documents or web pages and editing text. They include the arrow keys, Home, End, Page Up, Page Down, Delete, and Insert • The function keys are labeled as F1, F2… up to F12. The functionality of these keys differs from program to program.
Typing text • Whenever you need to type something in a program, e‑mail message, or text box, you'll see a blinking vertical line. • That's the cursor, also called the insertion point. It shows where the text that you type will begin. • You can move the cursor by clicking in the desired location with the mouse, or by using the navigation keys. • In addition to letters, numerals, punctuation marks, and symbols, the typing keys also include Shift, Caps Lock, Tab, Enter, the Spacebar, and Backspace.
Roles of special keys • Press Shift in combination with a letter to type an uppercase letter. Press Shift in combination with another key to type the symbol shown on the upper part of that key. • Press Caps Lock once to type all letters as uppercase. Press Caps Lock again to turn this function off. Your keyboard might have a light indicating whether Caps Lock is on. • Press Tab to move the cursor several spaces forward. You can also press Tab to move to the next text box on a form. • Press Enter to move the cursor to the beginning of the next line. In a dialog box, press Enter to select the highlighted button.
Roles of special keys • Press Backspace to remove the character before the cursor (on the left of the insertion point), or the selected text. • Press Delete to remove the character after the cursor (on the right of the insertion point),, or the selected text. • Press the Spacebar to move the cursor one space forward. • Press the Esc key to Cancel the current task. • Application key - Equivalent to right-clicking the selection.
Using navigation keys • Left Arrow, Right Arrow, Up Arrow, or Down Arrow - Move the cursor or selection one space or line in the direction of the arrow, or scroll a webpage in the direction of the arrow. • Home - Move the cursor to the beginning of a line or move to the top of a webpage • End - Move the cursor to the end of a line or move to the bottom of a webpage • Page up/Down - Move the page up or down by one screen. • Turn Insert mode off or on. When Insert mode is on, text that you type is inserted at the cursor. When Insert mode is off, text that you type replaces existing characters.
Using the numeric keypad • The numeric keypad arranges the numerals 0 though 9, the arithmetic operators + (addition), - (subtraction), * (multiplication), and / (division), and the decimal point as they would appear on a calculator or adding machine. • These characters are duplicated elsewhere on the keyboard, but the keypad arrangement allows you to rapidly enter numerical data or mathematical operations with one hand. • To use the numeric keypad to enter numbers, press Num Lock. Most keyboards have a light that indicates whether Num Lock is on or off. When Num Lock is off, the numeric keypad functions as a second set of navigation keys
Three odd keys • Let's explore the three most mysterious keys on the keyboard: PrtScn, Scroll Lock, and Pause/Break. • Pressing PrtScn captures an image of your entire screen (a "screen shot") and copies it to the Clipboard in your computer's memory. From there you can paste it (Ctrl+V) into Microsoft Paint or another program. • Pressing Scroll Lock changes the behavior of the arrow keys and the Page Up and Page Down keys; pressing these keys causes the document to scroll without changing the position of the cursor or selection. • In some older programs, pressing the Pause/Break key pauses the program.
Key combinations & their uses • Press Alt+PrtScn to capture an image of just the active window, instead of the entire screen • Press Ctrl Home to Move to the top of a document and Press Ctrl End to Move to the End of a document. • Alt+Tab Switch between open programs or windows • Ctrl+A Select all items in a document or window • Alt+F4 Close the active item, or exit the active program • Ctrl+S Save the current file or document. • Ctrl+C Copy the selected item • Ctrl+X Cut the selected item • Ctrl+V Paste the selected item • Ctrl+Z Undo an action • F1 – Get help • F2 rename a selected item.
Tips for using your keyboard safely • Using your keyboard improperly can cause soreness or injury to your wrists, hands, and arms, particularly if you use your computer for long periods of time. To avoid this: • Place your keyboard at elbow level. Your upper arms should be relaxed at your sides. • Center your keyboard in front of you. If your keyboard has a numeric keypad, you can use the spacebar as the centering point. • Type with your hands and wrists floating above the keyboard, so that you can use your whole arm to reach for distant keys instead of stretching your fingers.
Tips for using your keyboard safely (cont) • Avoid resting your palms or wrists on any type of surface while typing. If your keyboard has a palm rest, use it only during breaks from typing. • While typing, use a light touch and keep your wrists straight. • When you're not typing, relax your arms and hands. • Take short breaks from computer use every 15 to 20 minutes.
END OF UNIT: Unit Five: Keyboard and Navigation NEXT UNIT: Unit six: Categories of Computers