Download
1 / 55
830 likes | 1.13k Vues
Get VirtualBox. Go to www.virtualbox.org and select:. Note: - the OS on which you will install VirtualBox is called the host OS . - the OS you will install on VirtualBox (later) is called the guest OS. * These notes are based on VirtualBox 5.2 and CentOS 7 (ISO version 1804).

E N D
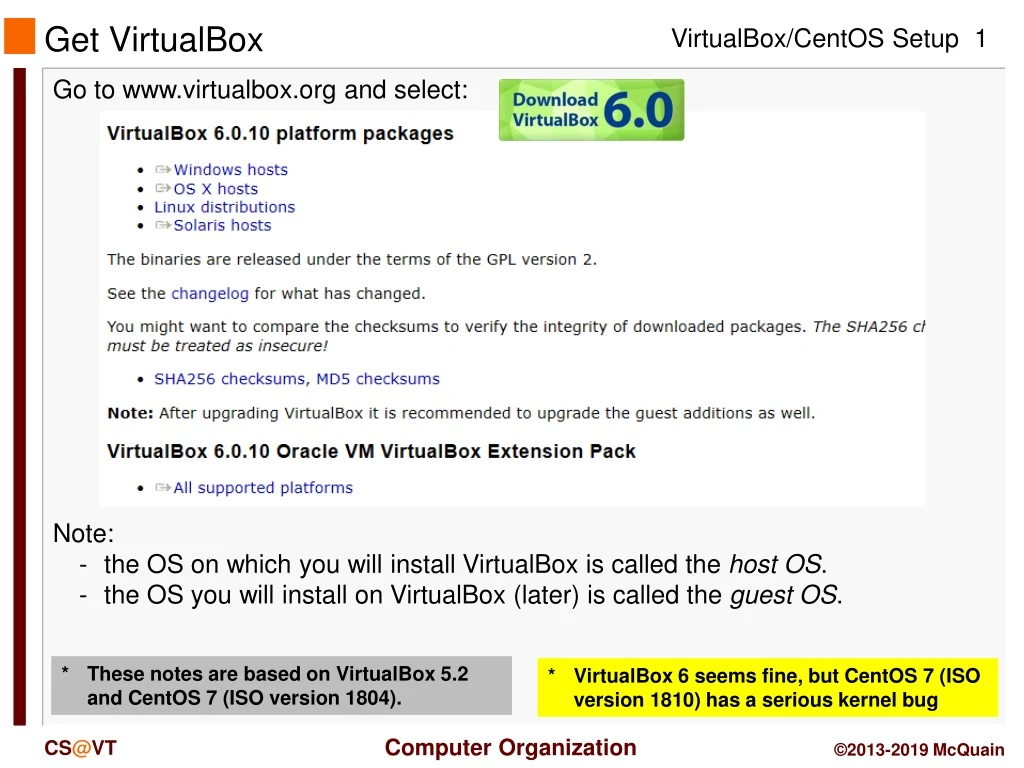
Get VirtualBox Go to www.virtualbox.org and select: Note: - the OS on which you will install VirtualBox is called the host OS. - the OS you will install on VirtualBox (later) is called the guest OS. * These notes are based on VirtualBox5.2 and CentOS 7 (ISO version 1804). * VirtualBox 6 seems fine, but CentOS 7 (ISO version 1810) has a serious kernel bug
Begin the VirtualBox Installation Run the VirtualBox installer. The first few screens are typical and probably do not require you to make any changes to the default options:
Start VirtualBox Once the base installation is complete, start VirtualBox:
Install the VirtualBox Extensions Select File/Preferences and select the Extension Pack file you downloaded: … and install it…
Install the VirtualBox Extensions Authorize the installation … … accept the license … ... and wait for …
Starting VirtualBox Restart VirtualBox. Select New to create your virtual machine: Enter a Name: If you use a descriptive name for the VM, VirtualBox should auto-detect the proper OS type and Version.
No 64-bit Options? What if you only have 32-bit options listed? There are two likely possibilities: Hardware virtualization support is not enabled on your system. Reboot. Go into the BIOS and look for something like VT-X and turn it on. You are running Win8 or Win10 Pro or Enterprise and Hyper-V is turned on: Follow the instructions at: https://www.petri.com/how-to-disable-hyper-v-completely-in-windows-10
Configuring Memory for the VM Specify the amount of memory you'll give the VM. In this example, I'm installing on a host machine with 8GB of RAM; with less, I'd probably given the VM 1GB. On my current working laptop, I have 16GB of RAM and gave my VM 4GB.
Configuring a Virtual Hard Disk In the next dialog, select the option to create a new virtual hard drive now. Take the default hard drive file type in the next dialog unless you're concerned about being compatible with some other virtualization tool like VMWare. Next, I recommend choosing a fixed-size hard disk.
Configuring a Virtual Hard Disk I generally make this 32GB, but make it smaller if you're short on space. That said, the virtual HD should be 20GB or more.
An Empty VM Now, you have an empty virtual machine/ That is, a formatted (virtual) hard disk and no OS installation on it.
An Empty VM Click on Details to bring up a more information about your empty VM:
VM Settings There are a couple of crucial VM settings; right-click on your VM and bring up the Settings dialog: Under Display, enable 3D Acceleration. Under General/Advanced, make the shared clipboard and Drag'nDrop Bidirectional.
Get CentOS CentOS matches the department’s servers, including the rlogin cluster, so that is what you should install. All our servers run CentOS 7. That's where we will evaluate all of your assignments. When downloading an ISO for CentOS, be aware that the file is fairly large… Be sure you've gotten all of it… Disclaimer: the following notes illustrate one session installing CentOS 7 on VirtualBox5.2, running on Windows 10 Enterprise, on a particular underlying hardware system. YMMV. Mine certainly has…
Get CentOS Go to centos.org, use the Get CentOS link at the top of the page, and select the link for the distribution option you want (I recommend DVD ISO): The 1804 ISO is buried in the CentOS archives: http://archive.kernel.org/centos-vault/7.5.1804/isos/x86_64/
Beginning the CentOS Installation Select the VM and click Start. VirtualBox will recognize the empty system and prompt you to select an installation disk. Click the folder icon. Select your CentOS ISO file; then click Start...
Running the Installation Code The following sequence of screen shots are mostly self-explanatory… Select Install CentOS 7... … and it grinds away awhile…
Running the Installation Code Some basic settings need to be established: Installation site Initial software configuration Language
InstallationDestination This will be the virtual harddrive you just created... take the defaults.
Software Selection Here, I prefer the GNOME desktop and I want to be sure that I install the development tools (compiler, etc). Make other choices as you like... more packages can be installed later.
Initiate Installation Fire up the installation routine...
root Account Setup While the installation is running, set the password for the root (superuser) account. root is the administrative account. You will use that for most software installs and some other activities. Do not forget this password!
User Account Setup I also set up a user account for my personal use. Security advice notwithstanding, I prefer to run as an admin… this is NOT the same as being root.
Reboot Eventually you should see the completion screen (it takes awhile, depending on how many software packages you chose, the speed of your machine, etc). Now, you need to restart the virtual machine...
License Screen The restart will bring you to the license screens: Skip network setup for now…
Login Screen The restart will now bring you to the login screen: I prefer Gnome Classic… the slides that follow assume that.
Initial Options CentOS starts with some basic language and keyboard configuration:
Initial Options You may setup access to online accounts… or not… You may configure some privacy settings …
Initial Options Eventually you will reach completion:
GNOME Help On first startup, you'll be offered help for the Linux environment: Ignore this or explore it, as you like... it's all available at any time.
Starting the Network Click the Network icon and turn on the network... the default settings are usually OK.
Make the Network Automatic Click the gear icon for settings, and enable the network to be on automatically.
Shutdown CentOS At this point, shut CentOS down. It is IMPORTANT to always shutdown correctly… improper shutdowns may render the VM unbootable!
Back it Up!! I recommend making a total backup of your virtual machine right now! This gives you an emergency, pristine VM when things go wrong… Do this with the VM shut down! Do it frequently!
Exporting a Virtual Machine The process creates a single file backup of your entire VM. I suggest tagging the name with the date you made the backup… and keeping more than one backup around. • You can: • use Import Appliance to reload this if your VM is damaged later • copy this to another computer and import it to a VirtualBox installation there
Exporting a Virtual Machine Just use the default settings and they will most likely suffice. Back It Up!!
Software Updates Restart your VM. I recommend running a general software update at this point. Go to the Application/System Tools menu and pick Software Update...
Software Updates There will be a lot of available updates at this point… I'd just take all of them:
Software Updates You'll have to use the root password again… Restart after the updates complete… And… I recommend making another full backup of your VM at this point. This is a better starting option if things go wrong later. If everything seems to still work: Back It Up Again!!
VirtualBox Guest Additions The VirtualBox Guest Additions provide additional functionality for your VM. One note: until you install the VirtualBox Extension Pack (slide 5) and the Guest Additions, some things like mouse capture and scaled displays may not work. Another note: if you run the system updater or install other software on your VM, you may have to reinstall the Guest Additions.
VirtualBox Guest Additions The CD image is included in the VirtualBox installation package. You must mount the CD image: CentOS should recognize the installer once the image is mounted:
VirtualBox Guest Additions Pay attention to the console window during the installation. If there are error messages, the Guest Addition may not have been installed properly. Restart the VM again. At this point, I often encounter problems… which are often resolved by performing several restarts of the VM…
New Options Selecting Scaled Mode allows you to cleanly resize the VM window; I find this to be very handy: At this point, I sometimes encounter problems… which are often resolved by performing several restarts of the VM… however, the vast number of different video cards makes this a bit twitchy… Sometimes, toggling back to regular mode and retrying scaling resolves issues.
Shared Folders The most efficient way to transfer files between your VM and the host OS is to set up a shared folder that both OSes can see. Pick the folder you want to share; I'll use C:\share on my Windows 10 host. In the VirtualBox Manager, click on Shared Folders and select the Add Folder button, then enter the path to the shared folder and make it permanent: Linux is somewhat unhappy with spaces in file/directory names…
Shared Folders Then, in CentOS become root and execute the commands: mkdir/media/windows-share mount.vboxsfshare /media/windows-share The first command creates a directory on your CentOS installation. The second command links that directory to the one you selected earlier.
Accessing Files The Gnome desktop has a file manager, that is similar to those in Windows and OS X:
Accessing rlogin The Gnome File tool provides drag-and-drop file transfers with rlogin: Note how I am including the path to my rlogin home directory
Additional Stuff: yum As you use your CentOS system, you'll probably discover new tools you'd like that are not included by default. In most cases, if you know the name of the software package you'd like to install, you can do so by running the yum tool. yum has many options and you should skim its man page. For instance, we can use yum to determine what version of a package is installed: [wmcquain@localhost ~]$ yum list installed gcc Loaded plugins: fastestmirror, langpacks Loading mirror speeds from cached hostfile * base: mirror.es.its.nyu.edu * extras: centos.mirror.constant.com * updates: mirror.umd.edu Installed Packages gcc.x86_64 4.8.5-28.el7_5.1 @updates [wmcquain@localhost ~]$
Additional Stuff: yum We can use yum to install or update a package: [wdm@Centos65 ~]$ yum install tree . . . You need to be root to perform this command. [wdm@Centos65 ~]$ su Password: [wmcquain@localhost ~]$ su Password: [root@localhostwmcquain]# yum install tree . . . Resolving Dependencies . . . Dependencies Resolved . . . Transaction Summary ==================================================== Install 1 Package Total download size: 46 k Installed size: 87 k Is this ok [y/d/N]: y You need to be root to install or update a package: Now I am root ... bwa ha ha! yum has determined what needs to be installed, shown me that info, and now wants confirmation...
Additional Stuff: yum We can use yum to install or update a package: . . . Downloading packages: tree-1.6.0-10.el7.x86_64.rpm | 46 kB 00:00:00 Running transaction check Running transaction test Transaction test succeeded Running transaction Installing : tree-1.6.0-10.el7.x86_64 1/1 Verifying : tree-1.6.0-10.el7.x86_64 1/1 Installed: tree.x86_64 0:1.6.0-10.el7 Complete! [root@localhostwmcquain]# exit yum triggers the installation.. Now I will cease to be root ... that much privilege can be dangerous.