Download

1 / 68
770 likes | 961 Vues
Metasploit a short tutorial. Thanks to Jos Wetzels & Wouter Bokslag. STATUS OF THESE SLIDES. Status: third version, improved and extended tutorial which includes use of vmware . Additional slides not included in the program for the moment Additional slides need to be polished.

E N D
Metasploita short tutorial Thanks to Jos Wetzels & WouterBokslag
STATUS OF THESE SLIDES • Status: third version, improved and extended tutorial which includes use of vmware. • Additional slides not included in the program for the moment • Additional slides need to be polished. • Backrtrack Linux has been replaced by Kali linux (www.kali.org). • The slides have not been updated yet • Armitage / name of department
Let’s start - TBCHANGED • Students are supposed to install metasploit on their computer. • The slides we make here are done using • Kali lunux and armitage on the attacking side • http://www.kali.org/ • Metasploitable on the attacked side. • Metasploitable is a linux distribution full of bugged services, that can be used to practice metasploit attacking skills. • See: http://www.offensive-security.com/metasploit-unleashed/Metasploitable • BTW: the last link is a beautiful site/tutorial on the use of linux. • We start with an exercise and then we get into the explanation • This exercise is *obligatory* / name of department
Setup • Warning: much more than like running webgoat, running metasploitablemakes you vulnerable also to external attacks. • Be ready to be hacked. • So, if you run it on your usual computer using vmware, use the network configuration “host only” • This will make sure you cannot be hacked from oustide. • Setup I use for this small tutorial (and for most of what I do) • Mac + 2 virtual machines (one with kali 2.0, the other one with metasploitable) • You can download / name of department
(OLD) Instructions for Windows • Instructions for Windows are probably the following (they are old, and if they are not correct, find the solution yourself, ok? Real hackers are not stopped by silly details): • Download Metasploit it should comes with ARMITAGE and NMap built-in. • Download VMWare Player (It’s free) • Download Metasploitable • Open Metasploitable in VMWare Player and run it • Log in with msfadmin: msfadmin • Get root using sudosu with password msfadmin • Check if network connection is up & running using ifconfig/ping, else use dhclient. Note down Metasploitable IP. • Start ARMITAGE (Start -> All Programs -> Metasploit Framework -> ARMITAGE) • or: root@kali:~# armitage & / name of department
Instructions for Linux/vmware • Install Kali and Metasploitable in two different virtual machines • Make sure they are connected with the “host only” system • Change the root password. • Use the following command (regularly) to make sure you have the last version installed • # apt-get update && apt-get upgrade • Meaning “type apt-get update && apt-get upgrade ” / name of department
Warning Some of these slides are written from the Windows perspective. Some others are written using Backtrack. Corrections to the slides are more than welcome. Again, you are expected to sort mismatches yourself. / name of department
Starting up BT with Kali • # startx (check if needed) • do this only if the x-windows system doesn’t start on its own. • Open a terminal window • # service postgresqlstart (check if needed) • mayrequire: • # /etc/init.d/postgresqlstart • #service metasploitstart (on Kali 1) • #msfdb (on Kali 2) • #armitage • That will try to connect to metasploit RPC server: click “connect” • If Metasploit is not running it will kindly ask you if it should start it for you. Click “yes” and be patient / name of department
Oops Depending on the network configuration you could get an error message: In this case…. #ifconfig eth1 Link encap:EthernetHWaddr 00:0c:29:b8:b6:58 inet addr:192.168.232.129 Bcast:192.168.232.255 Mask:255.255.255.0 / name of department
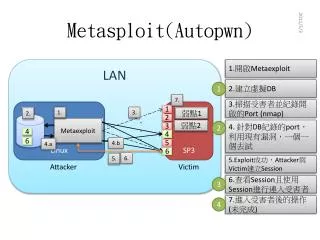
Using ARMITAGE (the interface to Metasploit) The juicy interface Armitage = Metasploit ++ Metasploit console / name of department
Hosts I’ve already “added” we see in a minute how to do this The console / name of department
To find out the “local” hosts • With ifconfig you know what is the IP address of your (virtual) machine. • You need to scan the network for the other ones. • To add the hosts (one of the many ways) you can use nmap directly from Armitage • Hosts > Nmap Scan > Quick Scan (OS Detect) • You don’t want nmap to scan the whole network, so it is better if you have an idea which addresses you are looking for. / name of department
About Scanning • You can initiate NMap scan through Hosts -> NMap Scan -> Intense Scan, All TCP Ports • But watch out: this is a very heavyweight scan. System administrators are going to see it happening. And they'll ask you questions. • Initiate Auxiliary scan through Hosts -> MSF Scans • Wait until both scans complete (MSF Scan will notify you with a message box, NMap scan tab will say so) • See what ports are open and what services they are running by right clicking the target -> Services / name of department
If the scanning went well…. You get an inviting-looking message, and now the target computer(s) is on your radar / name of department
Now you need to get in…. You can use “login” if you have a legitimate log in to the target system. (assume we don’t) Your goal is to find vulnerable services You can go for a deeper scan Right-click “scan”. And then …. / name of department
Gathering information You have discovered the operating system (see the penguin) Now right-click “services” / name of department
Finally > Attacks > Find Attacks …. / name of department
Finding the right attack Right click > Attack > ftp: you get to see 5 (in this case) exploits on (known vulnerabilities of) the ftp service that are known by Metasploit and that you *might* be able to use to attack the target. There is no guarantee that the target actually is actually vulnerable to any of them. So which one should you use? The hard way is to look at the features of the attacks one by one (more on how to do this later) and see if they match the target. The easy way is to use the “check” function. NB: not all exploit can be “checked” Let’s try it… / name of department
Some tries…. / name of department
So far, little luck • If we check the ftp exploit, we get only two types of results: • [*] This exploit does not support check • The target might be exploitable, but you don’t know, OR • [*] The target is not exploitable • Meaning the target does not contain the vulnerability needed by the exploit. Perhaps it has been patched, or it uses sw that does not match the exploit. • So? We try other attacks. • For instance: • Attack > misc > distcc_exec, • Exploiting service distccd / name of department
Bingo! • So this is something we can and will use. • To do so, we’d better first learn how to use the MSF console. • Which is the leftmost tab in the lower part of the screen / name of department
Exploitation, the graphical way… • Find suitable attack suggestions (as opposed to manually identifying them) • Attacks -> Find Attacks - • When message box notifies you attacks have been found, ‘Attack’ menu is added to host rightclick-menu. • Find vulnerable services by rightclick • target -> Attack -> ‘Service name’ -> Check Exploits • This will open a tab which runs ‘check’ method for each possible exploit, Press CTRL+F and search for vulnerable. • Some exploit modules do not support `check` method, try these manually or check their descriptions. You can also search manually in the left-hand menu under ‘exploits’. / name of department
But old pros like you use the MSF Console • It is the only supported way to access most of the features within Metasploit • Provides a console-based interface to the framework • Contains the most features and is the most stable MSF interface • Full readline support, tabbing, and command completion • Execution of external commands in msfconsole is possible / name of department
Some of the commands While using MSFConsole other commands become available: Check -> check if target is vulnerable to selected exploit (not always supported) Exploit -> Run exploit with set configuration Run -> Run auxiliary with set configuration / name of department
Command-line Search We know that our target is attackable via the distcc_exec exploit We now want to build the attack from the console First we need to find the exploit (this *does* work in KALI) Type `search distcc You might have to be patient waiting for the answer / name of department
Note Here you see as result exploit/unix/misc/distcc_exec , but on your release the directory may vary. Now you want to know more about this exploit. So you invoke: info exploit/unix/misc/distcc_exec / name of department
+ references (not included in this screenshot) / name of department
Options TBD: check the automatic targeting • As you can see there are two basic options: • RHOST -> Contains the target address • RPORT -> Contains the target port • The info also notifies you that the maximum payload space is 1024 bytes and targeting is done automatically (instead of having to select one depending on target host details) • We’ll get back to this payload thing in a second. • Type `use exploit/unix/misc/distcc_exec` to use the exploit • You enter in “exploitation mode” • Type `help` to view the exploit commands / name of department
Exploit Commands • So: what can we do with this exploit? • In itself, it simply sets the first step in a (e.g.) buffer overflow. • And what can we do as second step? • Meet the payload…. / name of department
The carrier and the payload distt_exec is basically a “carrier”, that can probably carry many different kind of payloads. Our goal is to get full control of the target machine, so let’s see if we can do this using this carrier. / name of department
Let’s choose a Payload • We know we have 1024 bytes of payload space (which is enough for a lot of purposes). Let’s see what you can do with it, type • show targets (here not needed because it is an “automatic target exploit) • show payloads (next slide) / name of department
Show Payloads A shell is what you want to get. Bind TCP: a shell on the target machine, which listens to a given port. Reverse TCP: a shell on the target machine, which connects back to the attacking one (bye bye firewall… no problem with NAT translations etc) Two years ago there were half as many payloads…. Type ‘info cmd/unix/bind_perl` to display information about this payload / name of department
Info on bind_perl / name of department
Set payload; show options Options of the exploit Options of the specific payload / name of department
Going on…. Type `set RHOST 192.168.232.128` to select our target Since our RPORT is already set correctly and RHOST isn’t necessary for the payload we won’t set those Our bindshell will listen on port 12467 (????, in other images) if it is executed successfully, keep in mind this port has to be free and preferably above 1024 (since most services don’t run as root – and only root can listen to ports below 1024) For some exploits, we can type `check` to see if the target is vulnerable, we won’t do it for this one though Type `show evasion` to show evasion methods (we will not select any) Now type `exploit` to exploit our target / name of department
Alternative way to set LPORT, etc … • Set LHOST to the IP of the attacking machine (if you’re not using a pivot, this is your own IP) • Let LPORT be whatever it is • Set RHOST to be the IP of the target machine • Set RPORT to be the port of the vulnerable service (in this case 3632 of distccd) • Click Launch / name of department
BINGO!!! Notice how armitage tells you that the target has been compromised. Now we can do basically anything on it. / name of department
Graphical Notation / name of department
Did you succeed? • If you are successful, the target machine icon will be red with electric jolts and the console tab will notify you have a shell. A menu option for the shell will be added to the rightclick menu of the target. • NOTE: For Unix targets a shell is the default payload, for Windows targets a meterpreter session is the default payload. These can be modified through working from the console tab and using MSFConsole instead of the GUI. Results are added to the GUI though. • Interact with Shell 1, you now have compromised the target machine. / name of department
Meterpreter? (1) • Typically, you want to have a shell on the target system • So the payload executes a command interpreter • Like /bin/sh/ • This approach, however, has disadvantages: (think about it a sec) • Easily detectable: • The execution of a program involves the creation of a process, which can be detected by a host-based intrusion detection system (whitelisting) • Chroot problem. • If the application you exploit is chrooted, then it is impossible for it (and thus for your payload) to refer to objects outside the chrooted environment. So you can't call the /bin/sh altogether (there appear to be ways out of this, but if you are at that level you should not sit in this class) • Limitation of the command interpreter • which may have access to a limited set of commands / name of department
Meterpreter! (2) • The meterpreter is a meta-interpreter that runs within the exploited application. • Evades the problems we mentioned so far • NOT Easily detectable. • The meterpreter does not need to start a new process. Also, the meterpreter extensions, and the meterpreter server itself, are all executed entirely from memory (technique called called Remote Library Injection) • In some cases the injected application keeps on running. • DOES NOT HAVE A Chroot problem. • It executes all commands within the exploited application, so it doesn't have to access other resources (which would be difficult in the case of a chrooted application) • DOES NOT SUFFER Limitations of the command interpreter, • actually you can write your own command extensions as long as they can be compiled into a DLL. • / name of department
For intstance We can start a shell Notice the extra menu item “Shell 1” that has appeared when you right click. Click “interact”, and what you get is / name of department
A shell on the target machine It appears as new tab in the bottom window. / name of department
You upload some files Use: Try it on a custom file Then go to your console, type “ls” and notice that the file has been uploaded. It could be an executable, of course. / name of department
You can pass the session to yourself or someone else. http://www.fastandeasyhacking.com/manual Once you exploit a host, duplicating your access should be a first priority. MeterpreterN -> Access -> Pass Session will inject meterpreter into memory and execute it for you. By default this option is configured to call back to Armitage's default Meterpreter listener. Just click Launch. You may also use Pass Session to send meterpreter to a friend. Set LPORT and LHOST to the values of their Meterpreter multi/handler. If your friend uses Armitage, have them type set in a Console tab and report the LHOST and LPORT values to you. These are the values for their default Meterpreter listener. So if you launch on Pass Session, you’ll get a second shell / name of department
Post-exploitation modules Now you are in, you have control of the target, but you want to carry out specific tasks, like keylogging. You can use one of the many ready post exploitation modules. Exercise: try some of these exploitation modules. / name of department
For instance Post-module firefox_creds… / name of department
Payload Usage in Armitage • ARMITAGE has static payloads • (Shell for Unix target, Meterpreter for Windows target) • but supports MSFConsole in a tab. • Great use of payloads in ARMITAGE: Generating payload executables • Let’s generate Payload ELF. / name of department
Take a look at "adduser” (1/3) • Either use left-hand menu, or / name of department
Take a look at "adduser” (2/3) • but old pros like you use the MSFConsole. • > use payload/linux/x86/adduser • (note: requires root shell!) • > set USER metasploit • > set PASS metasploit • > generate –t elf –f C:\\dir\\naughtyelf (don’t use double-quotes) / name of department