Download

1 / 37
370 likes | 374 Vues
HyperKYC is a digital record management solution that allows financial institutions and stock brokers to store and manage client documents, including KYC data and broker-client agreements. It offers features such as scanning and uploading documents, data verification, remote branch submission, and secure storage.

E N D
KYC for Financial Institutions • A Financial Institution or Stock Broker has many lines of service’s that it offers to its clients like share trading, portfolio management, commodities trading etc. for which various type of agreements are created. • Additionally the contracts of clients among other documents need to be stored. These forms have to stored and retained by the Broker as they are subjected to audits by SEBI, CDSL, NSDL, etc and auditors.
Digital Record Management for KYC • HyperKYC not only records KYC data but also facilitate to print/extract ,upload UCC data to exchange. • Any branch located at any remote place in the country can submit broker-client agreement form through HyperKYC on the same day to Head Office. • These forms include personal details, photograph, signature and a client – broker agreement.
Features • The system can be used in two modes: • Scan and upload KYC documents and attachments • Enter all the details of the KYC, then scan and upload the actual documents- here the complete details of the KYC are entered and information is verified for completeness of information. This entry of the KYC has been found to be very useful in verifying that all data is entered and prevents adverse remarks during inspections. • The software is web-enabled and the data can be entered / scanned at remote branches and retrieved at the HO / anywhere else based on the authority of the user.
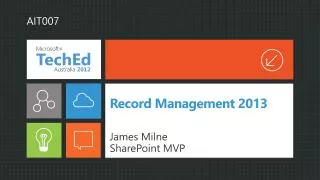
Image Capture Flow • Collect all the application forms once they have been approved and a customer ID had been assigned to that client. The application forms along with supporting documents are scanned and saved in type of agreement wise e.g. DP, KYC , Area wise shared folder in the DMS server with customer ID as the unique identifier character as the file name. • 2. Each application form, agreement and the supporting documents will be considered as a single document and will be stored as a multi page tiff image with a unique file name and single index template. • 3. These files will be scanned in HyperKYC with Customer ID, Customer Name and Location. Additional indexing can be done by means of integration, whereby the Brokers/DP ’s back end system is integrated with HyperKYC to auto populate the fields in the DMS.
Image Capture Flow Application form with all the other documents received Transferred to Shared Folders HyperKYC DMS Database Enter/ Scan Index to HyperKYC File Saved With Specific Name
Delete Files in PDF Format
Registration form, and Photograph is uploaded
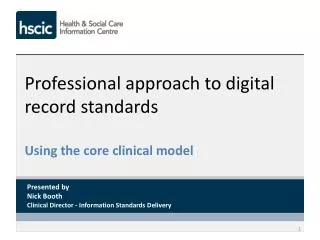
Admin Login (HO): After log in to admin, the admin users have rights to create, update, deactivate and activate branch user admin and branch users. And also HO can add and delete bank master, DP master, and State master. User Login HO: Admin user can enter, extract and see all those records (client registration forms) entered by different branch offices and users. He can have full rights to accept and reject those records (client registration forms) at any time. Branch Admin Login: Branch admin login can create new users, modify user, deactivate, and activate for his branch and see all records entered by branch admin as well as branch admin users of particular branch. Branch User Login: After login as a particular branch user, user can enter records (Client registration forms) and navigate to incomplete forms, completed forms, rejected forms, remarked forms, print forms, add digital signature, digitally signed forms, scan and upload, view scanned pages, HO modification status, and HO modifications. User Login (for particular branch): After login as a particular branch user, user can enter records (Client registration forms) and navigate to incomplete forms, completed forms, rejected forms, remarked forms, print forms, add digital signature, digitally signed forms, scan and upload, view scanned pages, HO modification status, and HO modifications. ADMIN MODULE
HO Admin Login Admin Login Enter User name & Password ‘HO’
Select Branch Office Users List Admin Users List
Create User Select Branch Office Admin
Branch Office Admin Modify User Login to HO Admin User
1) Option :Modify User: This option is used to modify the head office, branch office admin user’s permissions. The following drop down list box contains Head office and branch office admin. Once you select any of the option either Head office and branch office admin displays the selected 2) Option: De-activate Users: In deactivate users feature you are going to deactivate Head office or branch office, to do deactivate click on the Deactivate button, before doing de-activate - select user type whether Head office users or Branch office users admin. If you select any one of the user type, it is going to display all Head Office or Branch Office list that are related to selected user type. Once I have selected branch office – all branches are displayed. If I selected Head Office – all head office lists are displayed. 3)Option : In-activate Users List: In order to activate the deactivated users, select In-activate users list option. After clicking on to Inactivate users list the following screen will be appeared. From the following screen, select user type either Head office or Branch office to view list of head offices or branch offices Features of Ho Admin Login
Click on ‘ADD NEW BANK’ Bank Master
DP MASTER Search / Edit / Delete DP To Add New DP
State Master
Option : Bank Master: To add new and existing banks use this option “Add New Bank”. Here Bank name, Branch name, City, MICR number, IFSC Code and branch address fields are available. This bank information can be available at Client registration form on second page. Here you can Search / Edit / Delete Bank information by using Bank MICR Number. Option : DP Master: To add new DP and existing DP use this option “Add New DP”. Here DP ID, DP Name, DP Address, Depository type fields are available. This DP information can be available on Client registration form in KYC Application. Here also we can Search/ Edit/ Delete DP Master by using DP ID. Option : STATE Master: To add new State and existing State use this option “State List”. Here State details field is available. This state information can be available on Client registration form in KYC Application. We can Edit/ Delete STATE Master.
Trading Client In order to enter new client registration form for individual or non-individual
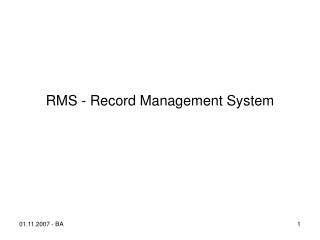
Trading Client • In order to enter new client registration form for individual or non-individual. Trading client registration form consists of 7 pages. Go through Page1 to page7. In page1 select offline client / online client and individual / non individual, fill the entire information. Each page consists of following details • Page 1 : Client details • Page 2 : Bank details • Page 3 : Financial Details • Page 4 : Brokerage Details • Page 5 : Depository Account Details • Page 6 : File Upload Details • Page 7 : View Entire Details • Page 7 displays the entire details of particular client. You can see and print forms /report of that particular client by clicking on the view report button. You can see all uploaded documents by clicking on the View scanned Pages button. If the yellow color text is displayed then the client details are pending.
PAGE 7 Showing Pending Details
To Create Sub-users in Branch Office • If you login with Head office and you are going to create branch user admin then select User management and various permissions. Select User management if and only if you are going to create sub users in your branch office. After selecting permissions you need to click on the create button. • After clicking on the create button your branch office user admin will be created successfully. After that sign out the application and login with newly created user name and password. By this username and password you can select Login type. You can login either with User Login or Admin Login. If you need to create new Sub – Users under your branch login with (Login Type) Admin Login. • Enter newly created user name and password to create sub – users in branch office. • Admin user can enter, extract and see all those records (client registration forms) entered by different branch offices and users. • Here we can Create, Modify, Deactivate and Inactivate users.
FUNCTIONAL REQUIREMENT Hardware • A regular server class machine is recommended to run the server application with appropriate storage and backup device. • Minimum Configuration: Pentium IV – 2.8 Ghz or higher processor speed with 1 GB or more RAM, minimum 1 GB free hard disc space on drive or partition where the server application will be installed including 10MB of space required for empty database. The database size will progressively increase with input of metadata. The disk storage can be considered based on the total volume of images to be archived. Operating System • Windows server/ Windows 2003 /Windows 2008
Tech. Support: The software will be supported by our customer support cell with the following methods. • 1. Support over telephone, internet chat, messenger, desktop sharing, etc. • 2. More detailed support over E-Mail, wherein client send us specific query along with attachments for reply. • 3. Regular Updates and additions on the software from our Support Cell. Additional AMC for subsequent years will be @ 20% of software cost. AMC support will be all online or telephonic.
Contact HyperSoft Hypersoft Technologies Ltd 28 Goyal Society, Moti Valley Tirmulgherry Secunderabad 500015 • Phone :040-27744754 • Phone: 040-27744413 • E-mail : sales@hypersoftindia.net • Web: www.hypersoftindia.net