Download
1 / 51
520 likes | 633 Vues
FOR557. Command Line Useage. Command Line. No choices (menus, clicking). YOU have to remember what to type! Strange stuff like Arc: &workspace e:yournameugisdata. Command Line. Arc: &workspace e:yournameugisdata. Arc prompt (you are supposed to type something). Command Line.

E N D
FOR557 Command Line Useage
Command Line • No choices (menus, clicking). YOU have to remember what to type! • Strange stuff like • Arc: &workspace e:\yourname\ugis\data
Command Line Arc: &workspace e:\yourname\ugis\data Arc prompt (you are supposed to type something)
Command Line Arc:&workspace e:\yourname\ugis\data & tells ARC that the following command is an AML
Command Line Arc: &workspace e:\yourname\ugis\data The command: Name of a program to execute
Command Line Arc: &workspace e:\yourname\ugis\data The argument to this AML is the path to a workspace e: is the drive letter The rest is a hierarchy of folders
Local disk (E:) yourname ugis data Path e:\yourname\ugis\data
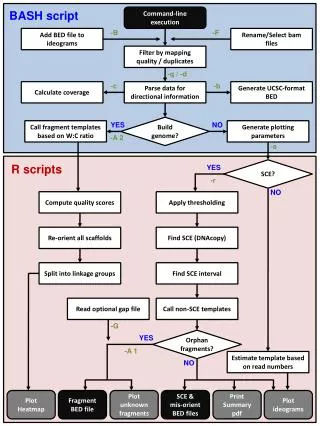
&workspace &station Create Drawenvironment Draw Coordinate digitizer Mapextent Editfeature Usage Kill Quit Listcoverages Describe Select Arc Arcedit In chapter 4 these cmds are used
A Incantation of Cmds ARC: &workspace e:\lpherrrin\land ARC: listcoverages ARC: station 9999 ARC: arcedit ARCEDIT: editco stuff ARCEDIT: drawenvironment tics arcs nodes ARCEDIT: draw
A Mantra of Cmds ARC: &workspace e:\lpherrrin\land ARC: listcoverages ARC: station 9999 ARC: arcedit ARCEDIT: edit stuff ARCEDIT: drawenvironment tics arcs nodes ARCEDIT: draw &WORKSAPCE Allows you to change the directory at which ARC is pointing (or using). And it can only point to 1(one) directory BUT you can run multiple Arc sessions.
A Mantra of Cmds ARC: &workspace e:\lpherrrin\land ARC: listcoverages ARC: station 9999 ARC: arcedit ARCEDIT: edit stuff ARCEDIT: drawenvironment tics arcs nodes ARCEDIT: draw LISTCOVERAGE Lists all the coverages in the current workspace. If there are no coverages then the current workspace is NOT a workspace! OR use&SYS DIR Too see all contents
ARCEDIT Launches the arc editor, one of the most used programs in ARC The following 3 are arcedit commands – they do not work in ARC! Or may do something you don’t expect! A Mantra of Cmds ARC: &workspace e:\lpherrrin\land ARC: listcoverages ARC: station 9999 ARC: arcedit ARCEDIT: edit stuff ARCEDIT: drawenvironment tics arcs nodes ARCEDIT: draw
Abbreviated Cmds ARC: &workspace e:\lpherrrin\land &works ARC: listcoverages lc ARC: station 9999 ARC: arcedit ARCEDIT: edit stuff ARCEDIT: drawenvironment tics arcs nodes ARCEDIT: draw drawe works for above
Cmd help structure • BUILD <cover> {POLY | LINE | POINT} • < > enclose required argument • lower case arguments replaced by a name • { } enclose options in upper case • | means OR • # is a place holder • BUILD mymap POLY
These will allow scrolling through last n commands Navigation • A/I has this neat little trick: The horizontal arrow keys will allow you to scroll through the current command and edit it by backspacing over characters and typing new ones. Try it – it is a great time saver when you screw up a command!
Creating digital data Creating digital data orHow to be a dig-grunt
OUTLINE • Digitizing • Why we are doing it? • What are we going to do? • How are we going to do it?
Data structures • There are only three data types • point • user id in a poly cov • point data ( i. e... wells) • line • poly Warning: You can’t mix poly and point data! Because A/I can’t tell the difference between labels and points
Coverages • The data structure you will be making is called a coverage • A coverage contains geographic and attribute data • Part of the coverage is a folder called INFO. • A workspace contains both coverages and an INFO folder
INFO files • The INFO folder is the key to a workspace. • If a folder contains an INFO folder it is a Workspace • Workspaces can be moved using DOS or Windows explorer operations • Coverages CANNOT be moved except by the use of COPY in ARC
File Structure root F: F:/Jones F:/Jane F:/Harry F:/Jones/H20 F:/Jane/build F:/Harry/Srp F:/Jones/dock F:/Jane/street F:/Harry/tfd F:/Jones/shore F:/Jane/street/A2 F:/Harry/ejst F:/Jane/street/A2 F:/Jones/Info F:/Harry/stuff F:/Jane/street/info
File Structure root F: F:/Jones F:/Jane F:/Harry F:/Jones/H20 F:/Jane/build F:/Harry/Srp F:/Jones/dock F:/Jane/street F:/Harry/tfd F:/Jones/shore F:/Jane/street/A2 F:/Harry/ejst F:/Jane/street/A2 F:/Jones/Info F:/Harry/stuff F:/Jane/street/info
The book “problem” • Find site for laboratory • Criteria • suitable soil • suitable landuse • >20m from streams • <= 300m of sewer • area >=2,000m2
Data layers for the “book problem” • Find site for laboratory • Criteria • suitable soil soil cover poly • suitable landuse landuse cover poly • >20m from streams hydro cover arc • <= 300m of sewer sewer cover arc • area >=2,000m2 final product poly
Sources of this data • soil cover poly NRCS? • landuse cover poly Planning? NRCS? • hydro cover arc USGS • sewer cover arc City engineering
landuse I n t e r s e c t soil & use OK soil hydro Simplified Book Process
landuse I n t e r s e c t soil & use OK soil Erase- cov Select >= 2000 hydro Buffer stream Simplified Book Process
Getting ready • Format ZIP disk if necessary • Follow the directions to move the “book” data from CD to your zip drive –move the data directory from the CD to the root of your zip • Start Lesson 4 • Prepare paper map • Tape map down on digitizer near the center
YourMap Existing data Prepare the manuscript • Tics numbered • Start/stop points on all island polys • Nodes marked on long arcs • Boundary extended by 1/16” Why: Because what you digitize will be clipped to fit within a surrounding coverage! Your boundary will be clipped off
Map on the digitizer • Some digitizers in the lab have a plastic sheet over the active surface. Tape your map on top of the plastic sheet or you will not be able to mark the “done” arcs are you go. • Not marking as you go is a MAJOR BOO BOO!!! • NOTE: You DO NOT have to put the map back in the same place every time - A/I will adjust for map placement. That is what registering TIC’s is all about.
Putting the map on the digitizer • Orientation does not matter • Make it flat and tight • BUT you must be within active zone of tablet • Experiment to see where active zone is by watching the light on the digitizer as you move the cursor around.
Starting Arc/Info • Alwaysstart any of the arc programs (arcedit, arcplot, etc.) from ARC • ARC is started from the icon on the left side of the screen or from Start Menu • Can only be seen after you login • userid: FOR557 • password: lagis
First Incantation • Launch Arc • Go to folder: &WORKSPACE path • Create a new workspace in that folderCREATEWORKSPACE name • Move into the new workspace &WORKSPACE name
Fire up ARCEDIT • When you start ArcInfo you will have a prompt like • Arc: • Type arcedit • Specify which digitizer is hooked to your computer • Digitizer 3400 Com1 -- for Calcomp digitizers • Digitizer ALTEK32 -- for LUCY • Digitizer 9100 Com1 -- for RERUN • Follow book in creating a TICCOV • UseCREATE to make a new cover from the TICCOV into which you are going to digitize data • NEVER, EVER digitize data into your TICCOV!!!
Input from digitizer • Startarceditto edit the new coverage • Arcedit: edit [cover] • Arcedit: drawe all • Arcedit: draw • You have to tell A/I where data is coming from • Type COORDINATEDIGITIZER(or COODIG) to tell arcedit data is coming from digitizer • Use COOMOUSE | CURSOR for mouse input • Use COOKEYBOARD for keyboard input
What is a TICCOV? • A TICCOV is a special coverage which contains only TICs • TICs are the spatial locators for the coverage • TICs have x,y coordinates • table inches • real world coordinates • Note: the name TICCOV is not Holy but is sort of standard. You can use any name you want for a TICCOV - note the two uses of the word: a coverage name and a type of coverage!
Creating a new coverage • Now you have to create a new coverage of TICs only • After creating a workspace and doing • arc:&Station 9999 • arc: arcedit • arcedit: coo dig • arcedit: CREATE TICCOV1 • digitize a minimum of 4 tics • Signal the end of tic input with TIC-ID = 0 1: CREATE will create a TICCOV out of whole cloth OR it will create a new coverage from an existing coverage (TICCOV)
Inputting tics • Always hold puck same way and approach the tics from same direction • You are going to • enter the TIC-ID from the PUCK!!! • WAIT FOR THE ID TO APPEAR ON THESCREEN!!!! • if ID is wrong enter a B or a # to redo • IF OK enter an A or an * • NOW Pput the PUCK X-HAIRS over the tic • Then press ANY KEY on the PUCK
Done with tics? • Enter tic id 0 (zero) then press A or * • Now you will be asked to enter corners of the data boundary or EXTENT • Click on upper right and lower left corners of box (imaginary) enclosing data • This is called the BND or EXTENT of the cover • SAVE the coverage
Paper Extent of total book data Extent of your book data Your data goes in here BND? EXTENT? TIC
Setting the drawing environment • DRAWENVIRONMENT TIC IDS (DRAWE TIC IDS) • DRAW • Yup! two commands • DRAWE sets the draw environment (tics, arcs, label points, etc. {or all}) • DRAW draws that environment
Create a real coverage • Type CREATE LANDDG01 TICCOV • CREATE make new coverage from another • DON’T digitize data into your TICCOV! • Re-enter tics (why?) • Accuracy! What if initial tics had error??? • ARCEDIT will give RMS error - a comparison of the two tic sets • If =< 0.005 you are OK • if not OK do it again • if still not OK then error is in original, redo ORIG!!
Editing environment • NODESNAP --- sets distance over which nodes will be snapped and how they will be snapped • NODESNAP CLOSEST .05 • set features to be edited • EDITFEATURE ARC (EF ARC) • set drawing environment • DRAWE ARC NODE LABELS IDS
Now add the arcs • What to do to with the arcs????? • ADD • On each NODE press 2 • On each vertex press 1 • Pattern is 2 1 1 1 1 2, 2 1 1 1 2, 22,212 • NOT 21111211122212 • Press 9 on the puck when you are done. • 1) vertex 2) node 3) • 4) del vertex 5)del arc 6) • 7) 8) 9)QUIT
TRICKS • BE CAREFUL!!!!!!!!!!!!!!!!!!!!!!!!!!!! • MARK ARCS AS YOU DO THEM • duplicate arcs are a real PAIN to remove • Use only enough vertices to define curves • DO NOT use stream digitizing!!!
More tricks • How to digitize - 2 methods • Overshoot method • overshoot each arc intersection a wee bit • use CLEAN to clean up the coveage • make intersections, delete dangles • but this moves stuff around on you - ‘puter decides • Node method • put a node at every arc intersection • count on the snap distance to snap the nodes together
If you have data that looks like this then the best technique is to digitize the straight lines and let CLEAN put in the nodes Why? Because you cannot digitize a straight line if putting in nodes! If you do it carefully then clean will remove the overshoots also! Using Clean
Digitize the long straight lines and then split the arcs at the intersection points to put in nodes Now digitize the other lines and let the snap distance work to snap the nodes Another technique
More tricks • Don’t wait to delete arc if you see it is wrong! • Use the 5 option on the puck if just added • If is an old arc then quit ADD (9) • You are still in edit feature arc (STATUS) • : SELECT • put x-hair on offending arc to select it (yellow) • : DELETE • Do a few arcs and check, DELETE ALL if you are not happy and restart
More tricks yet • Use the STATUS cmd to find out where you are (try it, you’ll like it!) • To see if you have dangles • drawe node dangle ; DRAW • To move a node • EF NODE • MOVE • May have to set EDITDIST AND SNAPDIST