Download

1 / 30
300 likes | 402 Vues
UK Autodesk Maya Training Programme. Brought to you by Autodesk Education & Teach Design. 2 Day training event Day 1. Two Day Teacher Education and Development. Overview of day 1. Introduction to the environment 2d Nurbs Curves 3d Nurbs Curves Polygon Modelling

E N D
UK Autodesk Maya Training Programme Brought to you by Autodesk Education & Teach Design 2 Day training eventDay 1
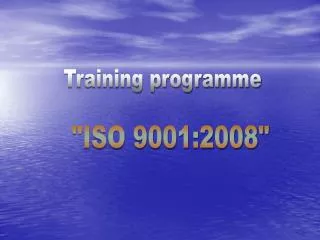
Two Day Teacher Education and Development Overview of day 1 • Introduction to the environment • 2d Nurbs Curves • 3d Nurbs Curves • Polygon Modelling • Creating a character using polygons • Blend shape deformers
List of Assets Video Tutorials Before we begin, you will need access to all video tutorials, and example outcomes. Video 1 – Intro to Nurbs modelling Video 2 –Nurb modelling 3d shapes Video 3 - Polygon Tools Video 4 – Character Creation 1 - Body Video 5 – Character Creation 1 - Eye Video 6 – Character Creation 1 – Eye lids Video 7 – Character Creation 1 - Mouth Video 8 – Blend shape deformers Video 9 – Setting up Animations and paths Video 10 – blend shapes sequence keyframing Video 11 – Cameras Video 12 – Cameras keyframe Video 13 – Cameras Sequencing Video 14 – Lights Video 15 – Materials
Introduction Our task today is to model a character, explore alternative approaches where possible, and establish you as a competent user of the software.Go to the start menu, and under Autodesk, select the software option:
Starting the Software – interface, start procedures, saving your work Things to set before we start:
Starting the Software – interface, start procedures, saving your work Set the project file location: Set the undo to infinite:
Features of the Maya environment – Ribbon, Menus Menu Sets Status line Shelf Panel toolbar View cube Navigation bar Qwerty Tool box Workspace Quick Layout buttons Layers Play back Time Slider Range Slider
The Create tab – Creating Nurbs models Construct Nurbs surfaces using Nurbs Primitives or by Nurbs Curves You will use:- NurbsPrimatives- CV Curve Tool (control Vertex)- EP Curve Tool (Edit Point)- Bezier Curve Tool
2d sketching – Using Nurbs Curves We will now go through 4 different ways of sketching using the Nurbs creation tools Nurbs Primitives CV Curve Tool EP Curve Tool Bezier Curve toolEach of these techniques will take you through how to use standard settings and go into the settings dialogue box to set your own preferences After each demo, attempt to use each technique with the support of the video. Each video has sound (headphones might be applicable for students) which will talk you through the steps. Video 1 – Intro to Nurbs modelling
3d sketching – Using Nurbs Curves We will now go through 4 different ways of sketching 3d models using the Nurbs creation tools Extrude Loft Rotate Using an image planeEach of these techniques will take you through how to use the tools to produce a 3d form After each demo, attempt to use each technique with the support of the video. Each video has sound (headphones might be applicable for students) which will talk you through the steps. Video 2 –Nurb modelling 3d shapes
The Create tab – Creating Polygon models Construct 3d shapes using polygon Primitives Video 3 - Polygon Tools • You will use:- Polygon Primitives- Edge, Face and vertex selection- Extrude- Bevel • Wedge Face • Merge • Merge Vertex • Polycount • Bridge • Combine and Separate
Break for Lunch Having used all the creation toolsWhen we return we will concentrate on using the tools to create a simple character for animating.Once we have this in place, we can discuss extension tasks to today’s learning, including;- Project Pinocchio for character creation- Importing simple characters- Mapping standard moves from the Visor
Character Creation– Using Polygon Modelling tools In this session we are going to look at how we can use some of the Polygon modelling tools that we have already used, plus learn further mesh editing tools • Additional Features covered: • - Attribute Editor- Channel Editor- Insert Edge loop - Select loop- Material Attributes- Booleans – Union, Intersection, Difference- Using the Outliner and Panels- Parent and child • Hypergraph panel • Interactive Split tool Video 4 – Character Creation 1 - Body Video 5 – Character Creation 1 - Eye Video 6 – Character Creation 1 – Eye lids Video 7 – Character Creation 1 - Mouth
Blend shape deformers – Use to set up facial expressions To help us with setting up facial expressions for our animation we are going to set up some Blend shape Deformers for our character. Features covered: - Lock selected- Duplicate- Duplicate with transform- Duplicate special- ‘g’ short cut command- Hide selection Video 8 – Blend shape deformers
Summary on Maya skills learnt so far Today you have: • Learnt about the User Interface including the; Primary Environment; UI Navigation/Interaction; Graphics Window Display and Navigation Control • Applied 2D tools including; Creating 2D Nurbs curves; CV Curves; EP Curves; Bezier Curves; Modify Curves; Different properties of Nurb curves. • Created 3D features using 3d Nurbs modellingincluding: Extruding, lofting, Revolving and using an image plane. • Created 3D features using Polygon tools including: Extruding, Bevelling, Wedge face, Merge, Bridge, combine and seperate • Used Polygon modelling using the following: Insert Edge loop, Select loop, Material Attributes, Booleans – Union, Intersection, Difference, Using the Outliner and Panels, Parent and child, Hypergraph panel, Interactive Split tool • Learnt how to set up Blend shape deformers.
UK Autodesk Maya Training Programme Brought to you by Autodesk Education & Teach Design 2 Day training eventDay 2
Two Day Teacher Education and Development Overview of day 2 • Setting up animations and animation paths • Keyframe animation of Blend shape deformers • Using Cameras • Keyframing cameras and sequencing • Lights • Materials
Setting up Animations and Animation Paths In this session we are going to look at how we can use a curve to set up a motion path, how to set the playback time and how to use keyframes. Additional Features covered: - Time line- Playback area- Playback preferences- Motion Path- Hide- Key selected- Keyframes- Break Connections Video 9 – Setting up Animations and paths
Keyframe animation of Blend shape deformers In this session we are going to look at how we can use out blend shape deformers and lock different expressions at different points in our sequence using keyframes. Additional Features covered: - Time line- Key all using the blend shape deformers menu- Key feature using the channel box editor Video 10 – blend shapes sequence keyframing
Using Cameras In this session we are going to look at how we can use cameras to shoot different sections of our animation. • Additional Features covered: • - Safe Action- Safe Title- Tumble • - Track • Dolly • Camera • Camera and aim • Camera, aim and up • Camera parenting to character • Clip Planes • Background colour Video 11 – Cameras
Break for Lunch • Having set up our cameras and animation paths.When we return we will concentrate on Keyframing cameras and sequencing the shots, adding different Lights to our scenes and adding materials. • We will then round up the two day course with a review of what we have learnt, and take the ACU exam. • After we can discuss how to work with students and groups of students using these resources and discuss other projects available.
Keyframecameras and sequencing In this session we are going to look at how we sequence our cameras to create an animation. Additional Features covered: - Animation editor - Camera sequencer- Create shot - Playblast Video 12 – Cameras keyframe Video 13 – Cameras Sequencing
Lights In this session we are going to look at how we can add different light effects into our scene. • Additional Features covered: • - Turn all light off • IPR renderer • Ambient light • Render settings window • Light attribute editor • Directional light • Point light • Spotlight • Look through selected • Area light • Depth Map shadows • Ray trace shadows Video 14 – Lights
Materials In this session we are going to look at how we can add different Material effects to objects in our scene. • Additional Features covered: • - Hypershade • Common Material Attributes • 2d textures • 3d textures • Checkerbox Video 15 – Materials
Other points new to the 2014 ACU These are some new items that have been added to the ACU test that were not originally on the 2012 Certified user coverage The root joint is the highest joint in a skeleton’s hierarchy. A skeleton can have only one root joint. You can move and orient the entire skeleton in world space by translating and rotating the root joint
Other points new to the 2014 ACU These are some new items that have been added to the ACU test that were not originally on the 2012 Certified user coverage HumanIK tools in Maya provide a complete character keyframing environment with full body and body part keying and manipulation modes, auxiliary effectors and pivots, and pinning. IkFk Control Lets you manipulate and key the joints of a joint chain that has an animated IK handle. In addition to being located in the local IK Handle Attributes, IkFk Control is also present in the global skeleton settings
Discuss and Review – what have we covered, what are the alternatives This is your opportunity to bring everything together and summarise what we have achieved. This would be an ideal opportunity to share some of the individual work you have achieved, allow the whole group to see the range of different solutions you have arrived at, and address any questions about how students might engage with these resources..
What Next, Q&A – and close • At this stage in the day, do we have any questions about Autodesk Maya?It is important that you appreciate it will take some time for you to be fully conversant with all of these procedures but, on the road to achieving this, there is a lot of support out there; http://area.autodesk.com/ • firstly, all of the activities demonstrated live today are available in video format for you to review again and again until you are confident – www.autodesk.com/designthefuture • the Autodesk Student Community - http://students.autodesk.comis an excellent way to link with colleagues and is a source of free student software • Digital STEAM Workshop - http://curriculum.autodesk.com/student/publichas a wealth of learning resources, look out for the Digital Study Packs • looking ahead, you will find the Student and Faculty Expert community - http://www.studentexpert.netis a great source of teacher experience