Download
1 / 24
240 likes | 324 Vues
PURGING FINANCIAL DATA. Session 1E 2014 KASBO Spring Conference Sheila Miller, Munis Business Analyst Office of KIDS KY Department of Education. Overview . We have gone from this… To this… Now what do we do?. Overview (cont.).

E N D
PURGING FINANCIAL DATA Session 1E 2014 KASBO Spring Conference Sheila Miller, Munis Business Analyst Office of KIDS KY Department of Education
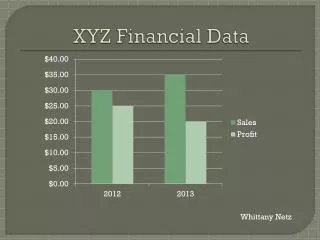
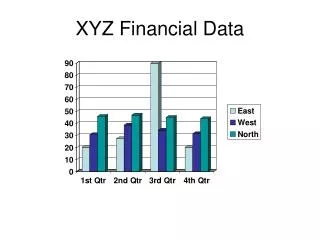
Overview • We have gone from this… • To this… Now what do we do?
Overview (cont.) • Overflowing storage rooms with boxes of paperwork used to remind us to perform an annual purge of documents no longer necessary. • The same process needs to be applied to Munis that we applied to the stockpile of papers we used to accumulate prior to having an electronic method for financial processing. • This session will provide you with the information needed to develop a purge schedule and to complete the purge process in your district.
Overview (cont.) • Munis retains all detail transactions associated with each account in G/L history. • Detail transactions are of little value after several years. • KDE recommends retaining seven years of detail history - current year and six prior years.
District Considerations • Develop a schedule to purge history transactions. • How many years of information do you want to retain? • What time of the year will you purge? (Suggestion: Purge after completion of prior year’s audit and submission of audited AFR to KDE.) • Who will be responsible for the process?
Requirements & Recommendations for Purge Process • No users should be in the system when purge functions are being performed. • Generate and save all recommended reports. • Perform purge process one fiscal year at a time.
Purge Programs Covered in this Session • History Journal Entries • Requisitions • Purchase Orders • AP Checks • AP Invoices • Saved Reports Directory
Purging History Journal Entries Save the detailed history transactions prior to purging by using one of the following: • Journal Inquiry/Print Financials >General Ledger Menu >Journal Entry/History >Journal Inquiry/Print • Account Detail History Report Financials >General Ledger Menu >Journal Entry/History >Account Detail History Report
Purging History Journal Entries (cont.) No users should be in the system when purge functions are being performed. Financials >General Ledger >End of Period > Purge History Journal Entries
Purging History Journal Entries (cont.) • Select Define and enter the year in the Most Current Fiscal Year to Purge field. • Select Unload and enter a name for the file. (Example: FY07DETHIST) • You may be prompted to enter a file name for the unload of Unused Journal Numbers. Enter a file name and click OK. (Example: FY07UNUSED) • Select the Purge button and select Yes to purge the detail transactions.
Purging Requisitions This will be performed only if your district processes Requisitions. Financials >Purchasing >Purchase Order Processing >Purge Requisitions • The following warning will appear: • User can select Yes if all users are off the system. Note: Munis processes a nightly backup of the system.
Purging Requisitions (cont.) • Select Define and the following screen will appear: • Enter starting and ending requisition dates. Save a copy of the requisitions being purged. • Select Purge then Yes to Continue with purge? if you are ready to proceed.
Purging Purchase Orders Financials >Purchasing >Purchase Order Processing >Purge Purchase Orders User can select Yes if all users are off the system. Note: Munis processes a nightly backup of the system.
Purging Purchase Orders (cont.) • After responding Yes to the warning message, the following screen will launch: • Save the report that is generated. • Select Purge then Yes to . Select Define and enter starting and ending purchase order dates for the fiscal year you are purging. (The starting and ending purchase order numbers will populate with a default range of numbers.)
Purging AP Checks Select: Financials >Accounts Payable >Cash Disbursements >Purge Accounts Payable Checks The following screen will display:
Purging AP Checks(cont.) • Select the Define button. • Choose a range to purge • Cash account/check • Check date; or • Batch • Depending on the range chosen in the above step, you will need to complete one of the following options: • Cash Account/Check Range • Cash Account/Check Date Range; or • Batch Range • Choose Checks to Remove – Void cleared or All cleared • Select OK and a message will appear to Confirm Record Set. Respond Yes, Continue if you are ready to proceed with purge.
Purging AP Checks (cont.) • Select Purge button and the following screen will display: • Select Yes if you are ready to proceed. Note: There is no output option when purging AP Checks.
Purging AP Invoices Select: Financials >Accounts Payable >Invoice Processing >Purge Accounts Payable Invoices • The following warning will display: • User can select OK if there are no other users in the system. Note: Munis processes a nightly backup of the system.
Purging AP Invoices (cont.) The following screen will display after selecting OK to the warning message: Select Define. Leave the Vendor Range as is that defaults into the screen. Enter the Most current fiscal year to purge. Select Yes, Continue to the Confirm Record Set screen if you are ready to proceed. Note: Remember to only purge one fiscal year of information at a time.
Purging AP Invoices (cont.) • Output the invoices that will be purged by selecting Save . • Select Unload and enter a file name into each of the screens that will display. (Examples of file names - 2007INV, 2007INVDET, 20071099) • Select Purge when you are ready to proceed. • Select Yes to the confirmation message that will appear.
Saved Reports Directory • Consider having all users clean up files in the Saved Reports Directory (spool file). • There may be thousands of files in your directory that are of no use. Select: Departmental Functions >My Saved Reports
Saved Reports Directory (cont.) • Select Mass Delete Reports. Check boxes will appear at the left of the User ID. • User can then check the box of the saved report if the report can be deleted from the directory. • Once all selections have been made, select OK . • Select Yes, Purge from the confirmation screen if you are ready to proceed with deleting the files. Note: Many items may need to be kept in Saved Reports. Be careful to only delete the files that are no longer needed.
Items to Consider for Purged Data • Determine where to keep the files that were saved during the purge process. • Determine how long you will need to keep the files. • Remember to consider local, state and federally mandated requirements for retention of records.
Questions… Please contact me if you have questions regarding the instructions contained in this presentation. Sheila Miller Office of KIDS, Kentucky Department of Education 502-564-2020 ext. 2259