Download
1 / 14
140 likes | 236 Vues
COMP541 Final Missing Pieces of MIPS: Adding Memory & I/O. Montek Singh Apr 11, 2012. Summary of Remaining Labs, etc. HW #2 (last one) assigned later today due Fri April 20 Lab Demos Fri April 20, 1-2:50pm grade by 4/23 Mon April 23, 1-3:30pm grade by 4/25

E N D
COMP541Final Missing Pieces of MIPS: Adding Memory & I/O Montek Singh Apr 11, 2012
Summary of Remaining Labs, etc. • HW #2 (last one) assigned later today • due Fri April 20 • Lab Demos • Fri April 20, 1-2:50pm • grade by 4/23 • Mon April 23, 1-3:30pm • grade by 4/25 • Wed April 25, 1-2:15pm: final chance for demos • grade by 4/27 • Optional Take-Home Test #2 • assigned April 20 • due anytime up until Apr 30, 3pm (final exam slot)
Tasks for Lab Final Project/Demo • April 13: Lab 10 Completed • Show: • show a complete and working Lab 10 • I will show you how to: • add keyboard/joystick/mouse • integrate your VGA display code • April 13-20: Demo development • Do: • add any new instructions you need • develop your game/demo app (keep it simple!) • April 20, 23, 25: • Show: • show a complete and working final demo
A few tips on finishing up your MIPS • Sign extension: simple • assume all of your I-type instructions are signed • e.g., lw, sw, addi, beq • thus, simply sign-extend every immediate operand • just extend value of bit 15 to upper 16 bits • Add any other instrs needed • slt could be very useful for loops! • you can do without all “unsigned” instructions • Do everything step-by-step!
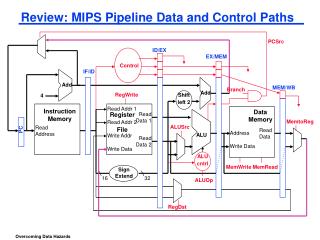
Memories • Word width • both instruction (IM) and data memories (DM) have 32-bit words • be careful about word vs. byte addresses • i.e., whether or not to multiply/divide by 4 • size IM so it can hold your code (say, 200 instructions) • size DM so it can hold all your data (say, 100 words) • lw and sw should suffice • skip lb and sb • they could be done in software
Memory-Mapped I/O • Simple technique for accessing I/O • give each I/O device a “fake” memory address • i.e., CPU reads and writes a specific range of memory locations for I/O devices • using lw and sw • pretending I/O devices were simply memory locations • net effect is reading and writing I/O • each device is assigned its own range of memory • “address space” • example: • data memory from ’h0000_0000 to ’h0000_FFFF • VGA display (screen memory) from ’h1000_0000 to ’h1000_03FF • joystick status at ’h1100_0000 • mouse status at ’h1100_0004 • keyboard status at ’h1100_0008 …
Memory Map 0000 0000 Data Memory Do you test all bits in your memory decoder? Up to you. 0000 FFFF • Keep in mind: • your character memory may have different word widths • e.g., x1, or x8, etc. • you may need to do some address and data conversion gap 1000 03FF Character Memory gap 1100 0000 joystick, etc.
Memory Map • How to do in Verilog? • Let’s do this interactively!
Adding I/O • Look at memory-mapped I/O • Conceptually like this
In Reality • Isolated from CPU • On standard buses • PCI • Ours will typically be simpler • Just memory addresses
Joystick, mouse, etc. • You’ll add joystick or keyboard (or both) into memory locations that you can read • e.g., at two locations right above character memory • I will show you on Fri
How Does Processor Begin? • One way is to initialize PC to 0 • or some other predefined address • Another possibility is to have a reset • each time you hit a reset button, PC starts again at 0 • Make sure to have instructions there • Modern computers have flash memory to boot CPU or go to configuration utility • On (very) old computers had to enter boot program on front panel
Summary • Now we are done with creating a CPU! • Start creating your final demo!