Download
1 / 16
160 likes | 241 Vues
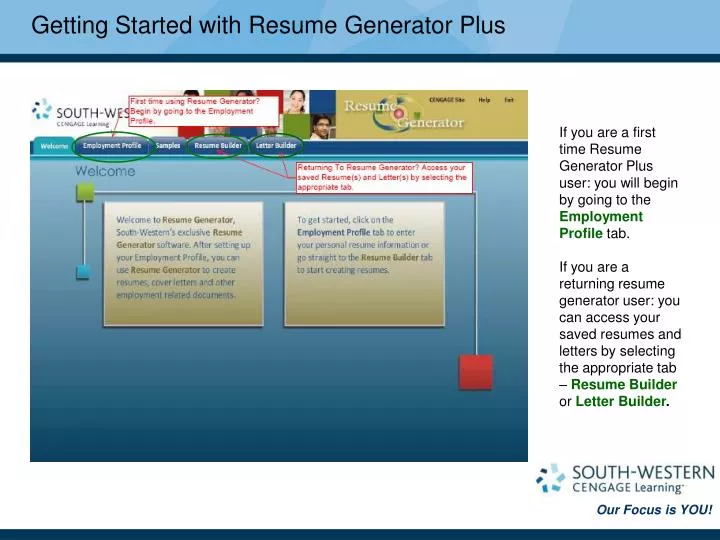
Getting Started with Resume Generator Plus. If you are a first time Resume Generator Plus user: you will begin by going to the Employment Profile tab.

E N D
Getting Started with Resume Generator Plus If you are a first time Resume Generator Plus user: you will begin by going to the Employment Profile tab. If you are a returning resume generator user: you can access your saved resumes and letters by selecting the appropriate tab – Resume Builder or Letter Builder.
Building Your Employment Profile The Resume Generator Plus stores all of your personal information under the Employment Profile tab for easy access and update. To build your Employment Profile start by entering your personal information under each section.
Resume Generator Plus Featured Tools Navigation tabs across the top make it easy to toggle between your profile, samples, resumes, and letter building tools. By clicking on the CENGAGE Site link at the top right of the screen you can find easy access to textbook companion sites and other Cengage products and services. The Help link next to it provides 24/7 Technical Support Service.
Resume Generator Plus Featured Tools When inputting your personal employment history, there is a helpful Tipssection on the right of every screen. Under Add/Edit Employment History the drop down selection boxes make it easy to input information and the identified required fields make sure you don’t skip over important information. The Automatic Spell Check highlights misspelled words.
Need Ideas? Check out the Sample Tab Need ideas, check out the Samplestab. Select a sample to view by clicking on the View button. Read about how to use the sample document in the Tips Information on the right side of the screen.
Need Ideas? Check out the Sample Tab The sample document opens in Microsoft Word so you can edit it with your information.
Using the Resume Builder: Creating a Resume Under the Resume Builder tab, you can create a new resume. Just click on the Create Resume button on the tool bar then choose New Resume. A pop-up box will appear asking you to name the resume. Each named resume will then appear in a list on the left of the screen under My Resumes.
Using the Resume Builder : Assign Headings Assign headings to your resume under the Resume Builder tab by selecting the Assign Headings button on the toolbar. You can then select from the headings listed in the pop up box. Once you have selected a heading, you can move them up or down in the Resume Builder by dragging and dropping the highlighted areas into place.
Using the Resume Builder: Adding/Editing Information Adding and editing information is easy in the resume builder: If you have already entered information into your employment profile you can checkspecific items you want to appear in the resume and then select Add to Resume. To create a new entry select New. Once created it will be available in your employment profile and in the selection list above. Select Edit if you want to change information you have added to the resume.
Using the Resume Builder: Selecting a Layout The Resume Generator Plus comes with eight pre-made layouts for you to use. To choose a layout for your resume select Layout from the tool bar. A pop-up box will show you the layouts to choose from. Select a layout and click Assign to apply it to your resume. Once a layout is selected, the name will appear in yellow on the tool bar.
Using the Resume Builder: Preview, Print, and Save As… Select SaveAs from the toolbar to save the resume as Word, PDF, or plain Text format. Select Preview from the tool bar to view and print your resume layout. Scroll through your document to check for length and page breaks. You can always go back into the Resume Builder tab and make edits. You can also make any adjustments to the layout in Word.
Using the Resume Builder: Creating a Reference List You can generate a reference list by selecting the Reference List in your tool bar. A selection pop-up box will appear for you to add your references. If you have entered your references in the Employment Profile they will appear in a selection list at the top of the pop-up box. You can checkmark the references you want to include and select Preview to see the list in your chosen layout. You can also save the list as a Word document or PDF. If you want to add a new reference to your list, just select the New button.
Using the Letter Builder: Creating a Letter The Resume Generator Plus comes with twelve pre-made letters that fit various employment needs. There are nine different cover letters, a post interview letter, resignation letter and reference letter formats. You can select one of your saved letters listed on the left under My Letters to edit or create a new letter by selecting Create Letter.
Using the Letter Builder: Creating a Letter Read through the Tips and suggested text to make sure the letter type meets your needs. You can change to another type by selecting a new letter from the drop down box. The letters are available with pre-populated text. You can Edit each section by selecting edit on the blue header bar.
Using the Letter Builder: Editing a Letter Use the Letter Builder tab to edit a letter. In the Openingpop up box you can edit the boldfaced text as indicated Bold, italic and underline tools are offered so information can be appropriately emphasized when necessary.
Using the Letter Builder: Preview, Print, and Save As… The Letter BuilderLayouts, Preview, and Save As buttons work the same as the Resume Builder buttons. The Letter Builder layouts match the layouts found in the Resume Builder, so students can compliment their resume with a matching cover letter or follow-up with a matching thank you note.