Download
1 / 9
90 likes | 307 Vues
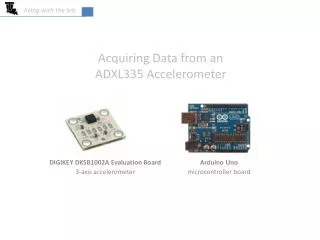
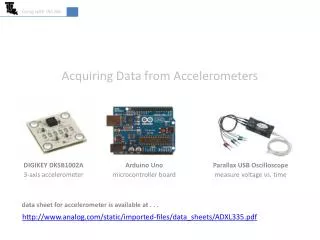
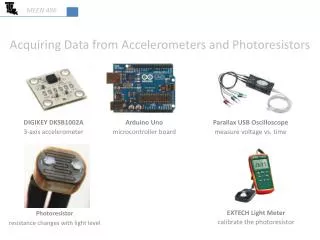
MEEN 486. Acquiring Data from Accelerometers and Photoresistors. Arduino Uno microcontroller board. DIGIKEY DKSB1002A 3-axis accelerometer. Parallax USB Oscilloscope m easure voltage vs. time. EXTECH Light Meter calibrate the photoresistor. Photoresistor

E N D
MEEN 486 Acquiring Data from Accelerometers and Photoresistors Arduino Uno microcontroller board DIGIKEY DKSB1002A 3-axis accelerometer Parallax USB Oscilloscope measure voltage vs. time EXTECH Light Meter calibrate the photoresistor Photoresistor resistance changes with light level
MEEN 486 Implementing a 3-axis Accelerometer: Hardware • DKSB1002A is a prototyping board • $20 from www.digikey.com • Screw holes for mounting board onto “object of interest” • Board is ~ 20mm square • ADXL3355 3-axis accelerometer chip • 3-axis • ±3g • COM - ground • VSS - power (we will provide 5V) • X - acceleration in x-direction • Y - acceleration in y-direction • Z - acceleration in z-direction z x y
MEEN 486 MEEN 486 Implementing a 3-axis Accelerometer: Wiring to Arduino • COM - ground • VSS - power (we will provide 5V) • X - acceleration in x-direction • Y - acceleration in y-direction • Z - acceleration in z-direction
MEEN 486 Implementing a 3-axis Accelerometer: Programming void setup() { Serial.begin(9600); } void loop() { int xaccel = analogRead(0); int yaccel = analogRead(1); int zaccel = analogRead(2); Serial.print(xaccel); Serial.print(" "); Serial.print(yaccel); Serial.print(" "); Serial.println(zaccel); }
MEEN 486 Implementing a 3-axis Accelerometer: Analysis of Output • Output from accelerometer will vary from 0 to 5 V • Output when +x points upward: __________ • Output when +x points downward: __________ • Difference: _______ • Change in acceleration = 2g • Change in accelerometer per g: ___________ • Output when accelerometer is flat: _________ z x y
+x qx ax qx 1g (perceived vertical acceleration) MEEN 486 Implementing a 3-axis Accelerometer: Angle Measurement z x y θx = asin(ax/g) • Expected output of Arduino when accelerometer is flat: _________ • Expected output of Arduino when accelerometer is at 45 degrees? ________ • If the Arduino output is 350, then what is the angle? ___________
MEEN 486 Measuring Output of Accelerometer with Parallax Scope 5V switch trigger input 10kW • Attach channel 1 leads between x-acceleration signal and ground • Oscilloscope plots voltage vs. time • Export data to a file to acquire voltage (or acceleration) vs. time data • Using a switch circuit to trigger data acquisition
MEEN 486 Calibrating a Photoresistor • Build photoresistor circuit • Connect the analog output of the circuit to an oscilloscope, Arduino or other data acquisition device • Associate output of the photoresistor circuit as measured by your data acquisition device with the light reading from a calibrated light meter • Use linear regression to determine an equation that relates the output of your data acquisition device to light level 5V photoresistor analog pin 3 10kW
MEEN 486 Extension to Other Sensors • This presentation shows how an accelerometer and a photoresistor can be used to record physical measurements • An Arduino or a Parallax Oscilloscope, two inexpensive devices, were used to acquire data • You can check out any of the items discussed in this presentation for your MEEN 486 project; refer to the equipment link on the MEEN 486 website for other equipment and devices that are available to you • The principles applied here can be extended to other sensors that output a voltage signal