Download
1 / 12
120 likes | 257 Vues
R.O.M. System. Team: RISC Takers Team Members: Paul Banks, Yorick Robinson, Evan Tu , & Hans Weggeman Louisiana State University – Senior Design September 24, 2013. Project Overview. Remote Outlet Management System (ROM System)

E N D
R.O.M. System Team: RISC Takers Team Members: Paul Banks, Yorick Robinson, Evan Tu, & Hans Weggeman Louisiana State University – Senior Design September 24, 2013
Remote Outlet Management System (ROM System) • An affordable Home Automation System • Key Features: • Power Monitoring • Continuous streaming of device power consumption to database • Ability to view data in a variety of ways • Device Monitoring • Will be able to see which devices are on/off • Be able to see a time based diagram of device activity • Ability to turn devices on or off • One click will turn the device on/off • Will be able to set a schedule that the device will follow
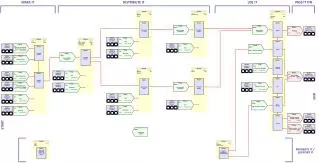
4 Main Components • ROM Plug-In • There will be a microcontroller and associated circuitry used to monitor power, device activity, and turn the device on/off • Main Hub • A microprocessor will run the server, receive data from the ROM Plug-Ins, and route commands from the user • Database • All of the data will be stored here, along with user login data and the framework for the website • Website/App • Will facilitate user access to the system and allow ease of use to the key features of the system
A majority of our parts have arrived • Basic database functionality has been created • Raspberry Pi has been set up with RaspbianDistro and configured to work with the database • MSP430s are here, and Code Composer Studio has been downloaded • The app has a storyboard and partial data model • Power Supply and Current Sensing circuits are partially complete Work Performed to Date
Login system coded and supports a single user • Minor Error Handling • Interfaces with a functional test site • Backbone of the database is complete, allowing for modular development of database Database
The Raspbian OS has been loaded on to an SD card and inserted into the Raspberry Pi • The BIOS has been edited for memory allocation and the OS has an updated Apache and SQL • The proper database repositories have been downloaded and set up for integration with the Raspberry Pi • Node.JS, Lineman, NPM, etc. • Code Composer Studio has been downloaded and basic programs have been tested on it to gain familiarity with the environment Raspberry Pi/MSP430
User interface is nearly complete. • Login view. • New profile view. • Partial scheduling view. • Device detail view. • Data model is in progress. • Partial user data model. • Need to implement device data model. • Attempting to correctly configure NSURLConnection class. (Depends on specifics requirements of the database code) • This will enable use of the HTTPURLRequest. Website/App
Circuits • Transformerless Power Supply • Current Sensing • Switching Component • Preparing Circuits Power
We might have to use a relay switch instead of a semiconductor device • SOIC vs. PDIP • Triac • Figuring out how to query a database through the app • Website is not running on a PHP background, but rather AngularJS, so we can utilize the functionality of Node.JS • Not having all of the parts in prevents testing Challenges and Changes
X-Bee should arrive (Start integrating those into the system) • Get two devices to talk to each other with simple messages (ROM Plug-In <-> Main Hub) • Integration between App and database (Able to influence database through app) • Current measuring circuit complete • Able to read correct current data through the ROM Plug-In (ADC working correctly) • Switching circuit complete • Can send a signal from MSP430 to “flip the switch” • Have PCB design ready to be constructed • Smart Plug-In and Central Hub Housing dimensions defined Checklist for Next Milestone