Download
1 / 20
210 likes | 805 Vues
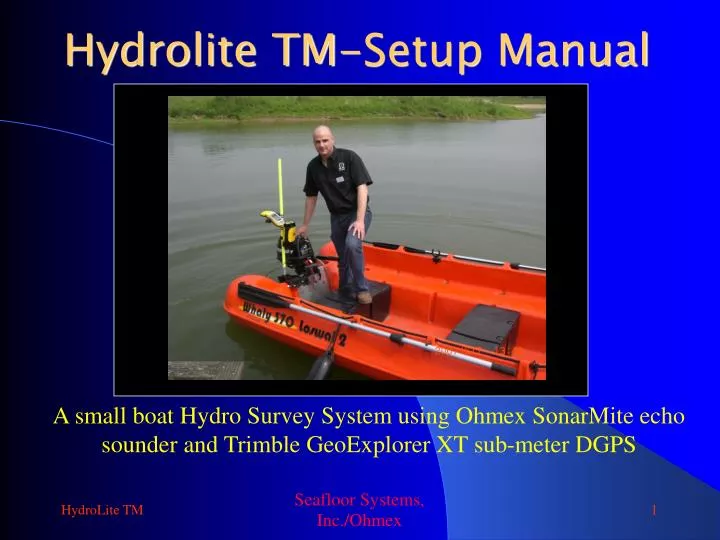
Hydrolite TM-Setup Manual. A small boat Hydro Survey System using Ohmex SonarMite echo sounder and Trimble GeoExplorer XT sub-meter DGPS. System Components. SonarMite BT-TM system SonarMite Transducer with Mount Survey Pole with Transom Mount Trimble GeoExplorer XT

E N D
Hydrolite TM-Setup Manual A small boat Hydro Survey System using Ohmex SonarMite echo sounder and Trimble GeoExplorer XT sub-meter DGPS Seafloor Systems, Inc./Ohmex
Seafloor Systems, Inc./Ohmex System Components SonarMite BT-TM system SonarMite Transducer with Mount Survey Pole with Transom Mount Trimble GeoExplorer XT SonarXP and Handheld software Optional external “Hurricane” GPS antenna for use in difficult GPS environments
Step 1 – Assemble System 1. Attach transducer and mount- Use a 7/16ths or an 11m wrench to tighten transducer mount.See Ohmex documentation for more information on transducer mounting information. 3. Connect survey pole pieces – Attach the survey pole pieces with the threaded heads up. Place the survey prism at the bottom end of the pole. Clip on Geo XT and SonarMite.- Make sure the Sonarmite is secured in the Velcro Harness. Attach to pole, securing Velcro strap and hand tightening the mount. 2. Install transom mount – Place transom mount halfway down pole, use thumbscrew and push-button for adjustment. Seafloor Systems, Inc./Ohmex
Step 2 – Run GPS Controller Acquire satellitesAfter turning GeoXT on, select GPS in the bottom right corner of your initial windows screen. If your unit doesn’t have this option, Tap Start / Programs, then tap the “GPS Controller” Icon.When opened, the GPS controller will automatically connect and acquire satellites. When the GPS is locked, the information window will show, Lat., Long., Elevation, PDOP (<5), and the words “heading locked”. At the top of your screen the # of satellites will be displayed, to the right you have your corrections icon, once corrections are received there will be a visible blue airplane icon. Your sub meter corrections will be digitally displayed above your # of satellites.Once the position is acquired, do not tap the X button in the corner, this will cause the GPS to disconnect. Instead, press the windows icon in the upper left corner to use other applications. Set output Tap on Start / Settings. In the Settings menu, choose the “Connections” tab at the bottom. Click on the “GPS Connector” icon Press the “setup” tab to configure internal and external COM ports. Set NMEA Output to “Internal – COM 2” Seafloor Systems, Inc./Ohmex
Step 3 - Run SMppc 1.Tap on ‘Start’ / Tap on ‘Programs’. Find the ‘File Explorer’ icon and tap it. 2. Tap on the icon at the top and select “My Device” 3. Select the “Program Files” Folder. 4. Select the “connections” folder. 5. Inside the “connections” folder you will find your SMppc acquisition program. Tap on that The software will begin running and will stay running in the background until closed using the memory editor. To close the program: 1.Tap on Start / Settings. In the Settings menu, choose the “system” tab at the bottom. 2. Select the “Memory” Icon. 3. Select the “Running Programs” Tab and then tap the “Stop all” button. Press “ok” and “X” button in the upper right hand corner to return to the Today screen. Seafloor Systems, Inc./Ohmex
Step 4 – Configure GPS in SMPPC Select COM port (COM 2)This is the COM port used in “Set Output” section of “Step 2” Select GPS Menu Seafloor Systems, Inc./Ohmex
Step 5 – Configure Bluetooth in GEOXT 1. Tap on Start / Settings Tap the “Connections” Tab at the bottom and then select the Bluetooth icon 2. Make sure the device is turned on and is discoverable. Before you go to the next step, plug your transducer into the sonarmite. Next, tap the “Devices” tab at the bottom. 3. There should be a partnership between the Geo XT and the SonarMite. If not, tap the word “New Partnership” 4. If you choose new partnership, the device will search for new Bluetooth devices. Once you find the SonarMite, select it and choose to share the Serial Port. IF AT ANY TIME YOU ARE ASKED FOR A PASSKEY, USE THE BLUETOOTH STANDARD 0000, 1111, or 1234 5. Tap the “COM Ports” tab at the bottom. You should see an incoming COM port coming from the SonarMite. 6. If Not, tap the words, “New Outgoing Port”. A list of Bluetooth Devices will show up, tap on the SonarMite Icon. 7. Choose a COM port that is not being used by the Geo XT. COM 8 works. 8. You should now be able to connect to the SonarMite in the SMppc program. The SonarMite should be assigned the COM Port that you assigned (higher than COM 6) The default for the Geo XT GPS is COM 2. Seafloor Systems, Inc./Ohmex
Step 6 – Configure Sonarmite in Smppc Select Port Usually higher than COM 6.(This is the port used in #7 of “Step 5”) GPS Parser The Factory default setting will work with HydroLite-TM Select SonarMite menu Seafloor Systems, Inc./Ohmex
Step 7 – Check Software • Is GPS coming in and being tracked on middle pane? • Is Echo Sounder data being displayed on bottom pane? • While logging, press the “E” to the right of the bar at the bottom to log an event? Seafloor Systems, Inc./Ohmex
Step 8 – Enter File name Enter desired file name Logging to this file can be toggled on and off using the “Logging” option in the “File” menu. Select Log file menu When a file name is entered “logging” will become available. Seafloor Systems, Inc./Ohmex
Seafloor Systems, Inc./Ohmex Troubleshooting Tip: If the GeoXT locks up or is not functioning correctly, press and hold the green power button for 15 seconds to reset the unit. When the screen goes blank the system has been reset. If this doesn't respond, try 65 seconds. Your saved data will not be harmed by using this reset method.
Use Logging On/Off to toggle data collection Step 9 - System Running Create a new logfile. Select logging to start logging, select logging again to End logging. Each time logging is check on and off you are amending to the current file, create a new logfile to close out the existing logfile if you are not planning to acquire under that specific file. File Menu Seafloor Systems, Inc./Ohmex
Step 10Way Points Waypoints are a series of geographical points consisting of Latitude, Longitude, and a sequential waypoint number. This enables the surveyor to select a point to start from and a point to go to. Your left/right indicator at the top of your SMppc acquisition program uses these points to help you navigate down your survey lines. These waypoint files need to be in the following format- Lat Lon P1 Lat Lon P2 And so on. Both of the coordinates for each way point need to be degrees.decimal degrees. This xyz file is space delimited. All files need to be created in notepad and saved as a .xyz file. You then use active sync to place the .xyz file within a file on your GeoXT. Go into your directory on your PC and copy the .xyz file. Within active sync select explore. Paste your .xyz file in a folder on your GeoXT that you will later access from your SMppc to load as a waypoint file.
Step 11Way PointsLoading and using *If your GPS Controller and SMppc program are already running, skip step 1 and 2. • Start GPS Controller • Start SMppc Program. • Devices>GPS>COM 2>OK=GPS enabled *Within SMppc you must first connect with the GPS controller and visually see Points coming in before you can load your Waypoint file….Next go to….. • File>Waypoint>Load. Within this menu your xyz file should automatically be displayed. If not, think back to the file you copied it into with active sync, locate that file and load your xyz waypoints. • Your waypoint file should now be loaded in your GPS points screen.
Step 12Way PointsLeft/Right indicator • To enable your left/right indicator…..Go to.. • Start>Waypoint>Mark. • Select the point you’ll be starting From and the point you’ll be going To. Once those 2 points are loaded, your left/right indicator will show how far off line you go to Port or Starboard. 3. Be sure to run each line beginning with the point specified as From and end that line with the point specified as To. This ensures that your left/right indicator is true to the direction of travel.
Step 13 - Connect PC Cradle Connect using ActiveSync GeoExplorer in Trimble PC cradle device Seafloor Systems, Inc./Ohmex
Step 14 - Import data to SonarXP File Import menu SonarXP post process software Seafloor Systems, Inc./Ohmex
Step 15 - Edit data in SonarXP Full on-screen editing Display Properties Setting Seafloor Systems, Inc./Ohmex
Step 16 – Save/Export to CAD Seafloor Systems, Inc./Ohmex
Systems other than GEO XT IF you are using a portable data logger that is not the GEOxt it is imperative that it runs on the windows mobile operating system. The software to run the Sonar Mite is designed to run on this platform. Please use the previous information and adjust according to the Data logger you are using. Systems that have been tested in-house that are compatible with our hard/software include: Trimble Ranger, Recon, Nomad, TSC2, TSCe. Other devices should work as long as they are running the Windows Mobile operating system. Seafloor Systems, Inc./Ohmex