Download
1 / 63
630 likes | 932 Vues
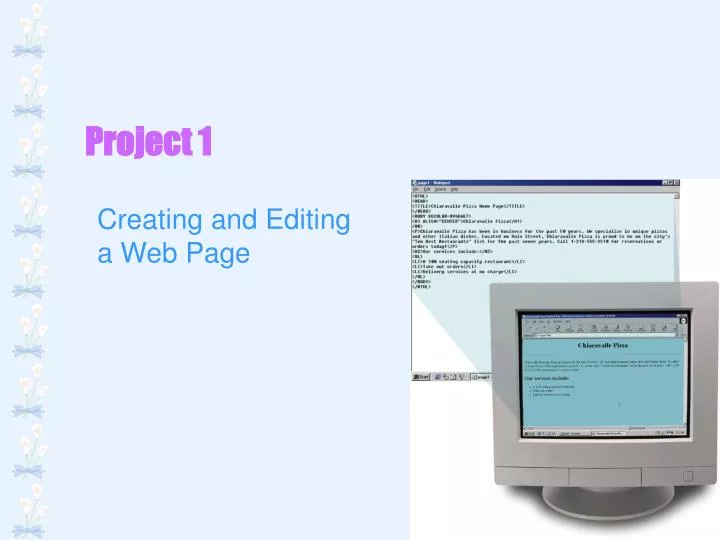
Project 1. Creating and Editing a Web Page. Objectives. Identify elements of a Web Page Start Notepad Describe the Notepad window Enter the <HTML>, <HEAD>, <TITLE>, and <BODY> tags Enter a paragraph of text, a bulleted list, and HTML tags Save an HTML file. Objectives.

E N D
Project 1 Creating and Editinga Web Page
Objectives • Identify elements of a Web Page • Start Notepad • Describe the Notepad window • Enter the <HTML>, <HEAD>, <TITLE>, and <BODY> tags • Enter a paragraph of text, a bulleted list, and HTML tags • Save an HTML file
Objectives • Change the background color of a Web page • Center a heading • Start your browser • View the HTML file in your browser • Print an HTML file from Notepad • Print a Web page from your browser
Objectives • Use a definition list • Quit Notepad • Quit your browser
Title Bookmarks Body Background Normal text Paragraph Bulleted list Headings Images Horizontal Rules Image map Hotspot Animated images Hyperlinks Web Page Elements
title heading horizontal rule image paragraph body links bulleted list animatedimage Web Page Elements
Point to Accessories Click Notepad Point to Programs Click Start Starting Notepad
Click Maximize The Notepad Window
menu bar Untitled – Notepad window text area scrollbars The Notepad Window
Wrapping Text in Notepad • The text you type will scroll continuously to the right unless the WordWrap feature is turned on • Select Word Wrap in the Edit menu
Entering HTML Tags and Text • Four tags define the overall structure of standard Web pages: • <HTML> and </HTML> • Indicates file is an HTML document • <HEAD> and </HEAD> • Introduction to the rest of the file • Indicates the area where the title will be placed • <TITLE> and </TITLE> • Indicates the title that will display in the title bar • <BODY> and </BODY> • Indicates the boundaries of the Web page
initial tags insertion point Entering Initial HTML Tags It is good form to be consistent when you type tags, adhering to a standard practice
all Web page content will be placed here ending BODY and HTML tags Entering Initial HTML Tags If you notice an error in the text, use the BACKSPACE key to erase all the characters back to and including the one that is incorrect
Headings • Used to separate text and introduce new topics • Vary in size, from <H1> through <H6> • Use the same sized heading for the same level of topic
main heading Entering Headings Since the Chiaravalle Pizza heading is the first line after the BODY tag, it will be the first thing displayed on the Web page
Paragraphs • Most text on Web pages is in paragraph format • The <P> tag has an optional ending tag • When a browser finds a <P> tag, it starts a new line and adds a paragraph break • Try not to type large sections of text without having paragraph breaks
paragraph tag and text Entering Paragraphs The <BR> (break) tag breaks a line of text and starts a new line, but does not add vertical spacing like a <P> tag
Creating a List • Lists structure your text in outline format • Unordered (bulleted) lists • <UL> and </UL> marks the beginning and end of unordered lists • Ordered (numbered) lists • <OL> and </OL> marks the beginning and end of ordered lists • The <LI> and </LI> tags define list items • The TYPE attribute defines the default bullet or number type
Unordered Lists <H3>Unordered Lists</H3> <UL TYPE=“disc”> <LI>First item – type disc</LI> <LI>Second item – type disc</LI> </UL> <UL TYPE=“square”> <LI>First item – type square</LI> <LI>Second item – type square</LI> <UL> <UL TYPE=“circle”> <LI>First item – type circle</LI> <LI>Second item – type circle</LI> </UL>
Ordered Lists <H3>Ordered Lists</H3> <OL TYPE=“1”> <LI>First item – type 1</LI> <LI>Second item – type 1</LI> </OL> <OL TYPE=“A”> <LI>First item – type A</LI> <LI>Second item – type A</LI> </OL> <OL TYPE=“a”> <LI>First item – type a</LI> <LI>Second item – type a</LI> </OL> <OL TYPE=“I”> <LI>First item – type I</LI> <LI>Second item – type I</LI> </OL> <OL TYPE=“i”> <LI>First item – type i</LI> <LI>Second item – type i</LI> </OL>
bulleted list tags and text Creating a Bulleted List
Saving the HTML File • You must save the file before you can view it in your browser • HTML files must end with an extension of .htm or .html • .html extensions only work on Web servers running an operating system that supports long filenames
With a floppy disk in drive A, select Save As from the File menu Saving the HTML File
The Save As dialog box File name text box Saving the HTML File
Click the Save in box arrow Type page1.htm in the File name text box Saving the HTML File
Point to and click 3½ Floppy (A:) in the Save in drop-down list Saving the HTML File
Click the Save button Saving the HTML File
new file name Saving the HTML File
Using a Browser to View a Web Page • After you save your HTML file, you may view your Web page in a browser • The HTML file displays in your browser just as it would on the Web • Windows allows you to view the page in your browser while keeping Notepad open
Starting Your Browser Locate and click on the icon in your Start menu that identifies your Web browser This varies on each computer
maximizebutton Internet Explorer Window menu bar standardbuttonstoolbar address bar default startup page status bar Your Browser
Click the Address bar Opening a Web Page in Your Browser
Type a:\page1.htmin the Address text box,then press ENTER Opening a Web Page in Your Browser
title main heading H2 heading paragraph body ofWeb page bulleted list Your Web Page
Click the Notepad button on the taskbar Activating Notepad
Activating Notepad Now it is time to add some elements to the Web page that make it more interesting
Adding Background Color Locate the 6-character code of the color you wish to use
Background color code goesat the end of the BODY tag Adding Background Color
Centering the Heading • Text can be aligned differently on the page • ALIGN = “LEFT” • ALIGN = “RIGHT” • ALIGN = “CENTER” • The default alignment for headings is left-alignment
center-alignment code Centering the Heading
Adding a Horizontal Rule • Horizontal Rules are graphical images that act as dividers • The tag used to insert a Horizontal Rule is <HR> • Horizontal Rules are easy to insert
Adding a Horizontal Rule <HTML> <HEAD><TITLE>Horizontal Rules</TITLE></HEAD> <BODY BGCOLOR=#94D6E7> <P>Default HR</P> <HR> <P>HR with size=1</P> <HR SIZE=1> <P>HR with size=5</P> <HR SIZE=5> <P>HR with size=10</P> <HR SIZE=10> <P>HR with size=10 and noshade</P> <HR SIZE=10 NOSHADE> </BODY></HTML>
Adding a Horizontal Rule horizontalrule tag
after saving the modified file, click the Refresh button in your browser Viewing the Modified File in Your Browser
Viewing Your Web Page Source • You can view the HTML code on any Web page from within your browser • This allows you to see how others created their Web pages
Click Source in the View menu Viewing Your Web Page Source
HTML sourcecode Viewing Your Web Page Source