Download
1 / 24
240 likes | 559 Vues
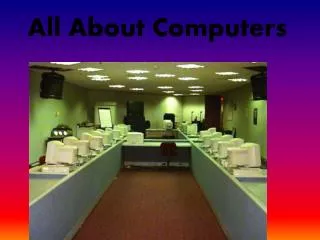
Learning About Computers This program will tell you about the parts of the computer and how to use them. Parts of a Computer Here is a picture of a computer like the ones we use in our lab. The Desktop Case

E N D
Learning About Computers This program will tell you about the parts of the computer and how to use them.
Parts of a Computer Here is a picture of a computer like the ones we use in our lab.
The Desktop Case All of the work takes place inside the desktop case. It is also the place where you can put in disks.
The monitor The monitor looks like a TV set. It shows what the computer is doing. You are seeing this information on the monitor’s screen now.
Icons Icons are small pictures on the computer’s desktop. They are linked to programs. Double-clicking on the icon runs the program.
The Mouse - 1 The mouse is like a TV remote. We use it to tell the computer what to do. The mouse usually has three buttons on it.
The Mouse - 2 When you point the mouse over an icon, it will tell you information.
The Mouse - 3 You click the left button to tell the computer what to do. This is called left click. When you double click on an icon, you tell the computer to start this program.
The Mouse - 4 You click the right button to learn what you can do with an icon. This is called right click.
The Mouse - 5 The button between the left and the right buttons is the scroll wheel. You can move up and down a page shown on the screen.
The Keyboard You use the keyboard to type information into the computer. You can type letters, numbers, other characters (&, %, ®, , ), and commands.
The Earphones The earphones let you hear sounds. You can make the sound louder or quieter.
The Speakers The speakers also let you hear sounds. You can hear these words through the speakers.
The Printer The printer prints what you see on the screen. If you type some sentences, you could print them. You could also print a copy of information at a Web site.
Holding the Mouse • Place your thumb on the left side of the mouse. • Place your index finger on the left button. • Place your other fingers off to the right side. • DO NOT place any fingers on the right button.
The Cursor - 1 • When you move the mouse, the cursor moves on the screen.
The Cursor - 2 • The shape of the cursor will change as you move it. • It can be an arrow. • It can be a pointing finger. • It can be a big I.
The Cursor - 3 • The cursor will look like an arrow most of the time.
The Cursor - 4 • When the cursor looks like a pointing finger, it is telling you that you are on a link. A link will take you to a Web page. Click on the link and you will go to a new page.
The Cursor - 5 • The cursor looks like an I when you are ready to type.
Web Sites A Web site contains text, graphics, animation, video, and sound.
Links When the cursor looks like a pointing finger, you could click on the blue word machine. The computer will take you to a new Web site about machines.
Practice • Hold the mouse. • Move the cursor around the desktop. • Point to an icon on the desktop. • Right Click on the Internet Explorer icon. • Left Click twice on the Internet Explorer icon. • Move the cursor so that it changes to a pointing finger. • Scroll up and down the Web page. • Insert a disk into the desktop case. • Eject the disk.
Summary In this program, you learned a little about computers and the words that are used with them. We will use these words when you come into the lab. Don’t be afraid to ask questions. That’s how you learn. Good luck!