Download
1 / 41
410 likes | 595 Vues
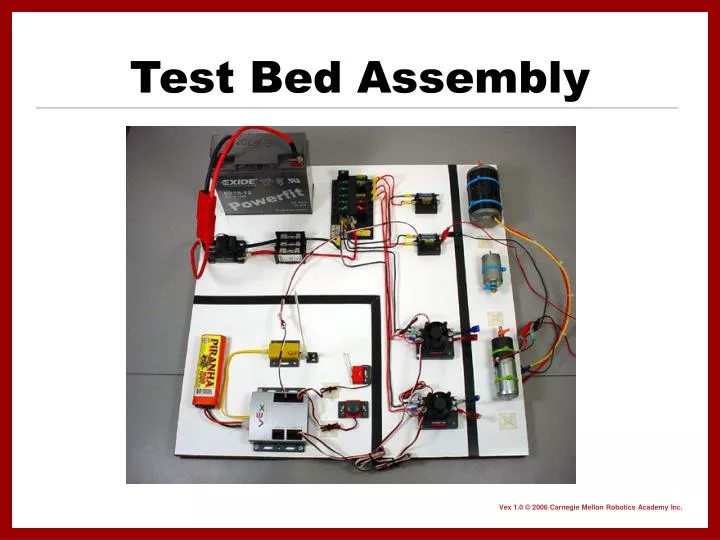
Test Bed Assembly. How do we teach the concepts?. What purpose does this TEST BED serve?. Teaches or refreshes electrical concepts Applies theoretical concepts Prepares the student for the future Competition – Motivates Students. Concepts Covered?.

E N D
What purpose does this TEST BED serve? • Teaches or refreshes electrical concepts • Applies theoretical concepts • Prepares the student for the future • Competition – Motivates Students
Concepts Covered? • Build a teaching tool capable of showing multiple theoretical principles. • Experience working with electrical and electronic controls • Help the instructor and students build a safe, uncluttered teaching tool.
Main Switch • Controls flow of current from battery • Mounted before the fuse panel • Provides an “Emergency Stop” control in the system • Schematic Symbol for “Single Pole, Single Throw” switch
Terminal Block • Allows multiple connection access. • Allows use of smaller wire to feed multiple accessories.
Fuse Panel NEGATIVE (-) = BLACK POSITIVE (+) = RED
Circuit Protection The most common types of circuit protection are fuses and circuit breakers.
Fuses Parts of a blade type fuse Why doesn’t it work?
Solid-State / Electro-Mechanical Relay • Spike is a 20 Amp, H-Bridge Relay Module that is small enough to be remotely mounted almost anywhere on your robot. Spike is designed for driving small motors in forward, reverse, or stop (brake). Spike is opto-isolated at the signal input to protect the Robot Controller against motor noise and return currents.
PWM • What is pulse width modulation? • What type of wave is produced? • What makes the PWM different from a Solid State electro-mechanical relay?
PWM • PWM’s work on the principle of square waves • Longer duty cycles increase the amount of time the motor runs • Result : more speed or braking power
Electron Flow For our purposes, we will use the conventional theory stating that current flows from negative (-) to positive (+).
Wires, called conductors, carry the current throughout the circuit Proper wire size (gauge) is important and may be determined at least 2 ways Mathematical Formula Charts Size and capacity is rated by professional organizations like AWG (American Wire Gauge). Electrical Wiring
How Do I Know What Wire to Use? • Wires come in different sizes. The maximum current each size can conduct safely is shown. • Make sure the wire is capable of carrying the current load. • Check what the supply Voltage be. NOTE: When it is critical that voltage reduction is minimal, use a larger diameter wire.
Batteries SAFETY Always make sure the battery is disconnected before working on any part of the circuit or components. Always make sure the battery is disconnected and removed from the testbed when it is not in use. Always store the battery in a secure, dry place.