Download
1 / 12
120 likes | 210 Vues
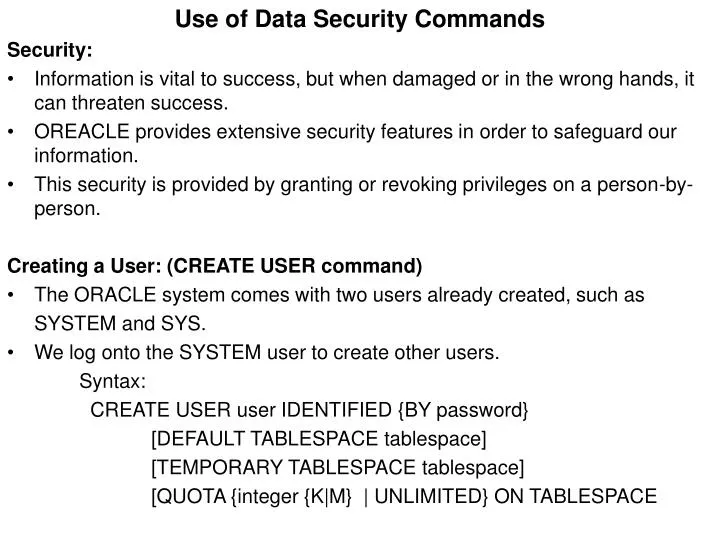
Use of Data Security Commands Security: Information is vital to success, but when damaged or in the wrong hands, it can threaten success. OREACLE provides extensive security features in order to safeguard our information.

E N D
Use of Data Security Commands Security: • Information is vital to success, but when damaged or in the wrong hands, it can threaten success. • OREACLE provides extensive security features in order to safeguard our information. • This security is provided by granting or revoking privileges on a person-by-person. Creating a User: (CREATE USER command) • The ORACLE system comes with two users already created, such as SYSTEM and SYS. • We log onto the SYSTEM user to create other users. Syntax: CREATE USER user IDENTIFIED {BY password} [DEFAULT TABLESPACE tablespace] [TEMPORARY TABLESPACE tablespace] [QUOTA {integer {K|M} | UNLIMITED} ON TABLESPACE
Example: SQL>CREATE USER james IDENTIFIED BY bond; Modifying Password and storage settings of an user: (ALTER USER) • To change the password and the storage settings of an user, use the ALTER USER command Syntax: ALTER USER user IDENTIFIED {BY password} [DEFAULT TABLESPACE tablespace] [TEMPORARY TABLESPACE tablespace] [QUOTA {integer {K|M} | UNLIMITED} ON TABLESPACE Ex: SQL>ALTER USER james INDENTIFIED BY bond007;
Privileges • Object level privileges control what a user can do with respect to a table and columns in the table. • The standard set of object level privileges are: • SELECT A user can perform SELECT operations on this table. • INSERT A user can INSERT rows into the table. • UPDATE A user can UPDATE rows of this table. If a list of columns is specified with the privilege, then the user can update values in those columns alone. • DELETE A user can DELETE rows from this table. • REFERENCES A user can define a foreign key that uses one or more columns of this table as a parent key. GRANT command: • Which is used to provide privileges ( data access) to users. • Syntax: GRANT <privilege specification> ON <table> TO <grantee list> [WITH GRANT OPTION]
Ex:1 SQL> GRANT INSERT ON emp TO james; -which allow james to add rows to the emp table. Ex:2 SQL> GRANT SELECT ON emp TO james; - which allow james to perform queries on the emp table. Ex:3 SQL> GRANT INSERT,SELECT,DELETE ON emp TO james; Ex:4 SQL> GRANT ALL PRIVILEGES ON emp TO james; or GRANT ALL ON emp TO james; Ex: 5 SQL> GRANT UPDATE(post,dept) ON emp TO james; - james can keep changing the data in the columns post and dept
Ex:6 SQL> GRANT SELECT ON emp TO james, kamal; Ex:7 SQL> GRANT ALL ON emp TO PUBLIC; WITH GRANT OPTION: -This clause passes this right to grant privileges on a table to other users. - Once a user has the right to grant a privilege, the user can further pass on the privilege to other users. Ex: SQL> GRANT SELECT ON emp TO james WITH GRATN OPTION; - not only allows james to SELECT from the table emp but also to GRANT the SELECT privilege to others.
REVOKE command: • It is just opposite of GRANT command. • Which is used to cancel (taken away) the existing provided privileges ( data access) from users. • Syntax: REVOKE <privilege specification> ON <table> FROM <grantee list> Ex:1 SQL> REVOKE INSERT ON emp FROM james; Ex:2 SQL> REVOKE INSERT,SELECT,DELETE ON emp FROM james; Ex:3 SQL> REVOKE ALL ON emp FROM james;
Creating Simple Reports COMMAND File: It is nothing but set of SQL commands saved as file-name.sql. Report Commands: START: - IT retrieves a command file and runs (executes) the commands it contains. Syntax: START file_name[.ext] Ex : START EMPREPORT.SQL REM : -Used to given a message (comment), such as aim of the program, author etc. Syntax: REM[ARK] Ex: 1 REM Report of Employee details 2 REM done by Stephen
CLEAR SCREEN: - If we want to clear the screen before displaying a report then use CLEAR SCREEN command. Syntax: CLEAR SCREEN EX: CLEAR SCREEN TTITLE: The TTITLE command defines the top title. Syntax: TTITLE [Printspec] [text | variable]…] Where Printspec represents one or more of the following clauses COL n SKIP n LEFT RIGHT CENTER BOLD Text - represents the title text
variable represents a user variable or the following system maintained values - SQL..LNO - SQL .PNO - SQL . USER Ex: 1 ttitle center ‘ Employees Reports’ Ex : 2 ttitle skip 5 center 'Employees Report' BTITLE: The TTITLE command defines the bottom title. Syntax: BTITLE [Printspec] [text | variable]…] Same Ex:1 btitle left 'From HCL‘ Ex 2: btitle center ‘As on 01/03/2008’
COLUMN: - we can change the column heading Syntax: COLUMN [column [HEADING text]] Ex: column eno heading 'Employee Number' column ename heading 'Employee Name' column dept heading 'Department‘ SET PAGESIZE - To set number of lines per page. Syntax: SET PAGESIZE number-of-lines Ex: SET PAGESIZE 20 SET LINESIZE - To change the line width (to set number of characters per line) Syntax: SET LINESIZE number-of-characters Ex: SET LINESIZE 80
Example : Create a report to display the HCL employee details. Step 1: Go to Notepad editor Step 2: Type the following SQL commands REM ‘Employee Report’ REM ‘Created by Stephen Raj’ CLEAR SCREEN TTILE SKIP 5 CENTER 'Employees Report' BTITLE LEFT ‘Dated : 01/03/2008’ RIGHT 'From HCL ' CENTER SQL.PNO COLUMN eno HEADING 'Employee Number' COLUMN ename HEADING 'Employee Name' COLUMN dept HEADING 'Department' COLUMN post HEADING 'Designation' COLUMN basic HEADING 'Salary' SET PAGESIZE 20 SET LINESIZE 70 SELECT eno,ename,dept,post,basic FROM emp1; Step 3: After typing the commands , save the above program with file-name.sql. ex : EMPREPORT.SQL
Step 4: Go to SQL editor Step 5: In SQL prompt , type SATRT file_name[.sql]; ex: SQL>START EMPREPORT.SQL; Output: Employees Report Employee Number Employee N Department Designation Salary --------------- ---------- --------------- --------------- --------- 111 kumar sales manager 15000 222 umar purchase account 7000 333 vino sales clerk 5000 444 raj marketing manager 15000 555 muniya purchase manager 15000 666 omna sales asst.manager 12000 Dated:01/03/2008 1 From HCL