Download

1 / 15
150 likes | 278 Vues
living with the lab. Fabrication of Fishtank Platform. EAS 199B. living with the lab. Materials. Eight 1.5 in drywall screws to fasten wooden pieces together . Six ¾ inch, #8 wood screws to attach bracket. Steel corner bracket (McMaster) (2.5 in sides, 1.5 in width).

E N D
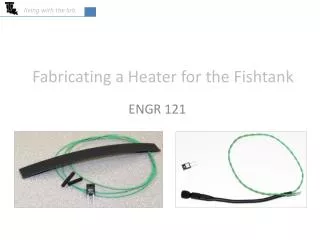
living with the lab Fabrication of Fishtank Platform EAS 199B
living with the lab Materials Eight 1.5 in drywall screws to fasten wooden pieces together Six ¾ inch, #8 wood screws to attach bracket Steel corner bracket (McMaster) (2.5 in sides, 1.5 in width)
living with the lab 2 in Dimensions 2 x 1-15/16 in 6 in 18 in 3.5 in 1.5 in 3.5 in ~1/8 in 0.75 in 2.75 in 3.5 in 10 in
living with the lab Safety Rules • Do not operate any machine unless authorized to do so by the instructor. • Do not attempt to oil, clean, adjust or repair any machine while it is in operation. • Wear appropriate clothing for the work to be done – loose clothing can be caught up in rotating equipment, pulling you into the equipment. • Nor “horse play” is allowed in the lab. • To prevent tripping or cutting a foot, keep floor clear of scraps, chips and supplies. • Turn off the equipment you are using before leaving it. • Safety glasses or a face shield must be worn when using tools or equipment. • Put tools away when not in use. • Do not use rags on rotating work. • Do not attempt to hold work with rags while using any rotating equipment. • Long hair must be tucked under a cap when you are operating rotating equipment. • Report any unsafe working conditions and/or practices to the instructor. • Take all common sense precautions. If you have an accident, report it immediately to the instructor. Do not begin to fabricate your platform until you have carefully read the operating and safety instructions above and agree to operate the equipment in a responsible manner.
living with the lab Additional Guidelines for Using the Hand Drill • Apply pressure in a straight line with the bit. Use enough pressure to keep the drill bit biting, but do not push hard enough to stall the motor or deflect the bit. • Hold the drill firmly with one hand on the grip and the other hand on the bottom of the battery pack to control its twisting action. • If the drill stalls, release the trigger immediately and determine the cause of stalling. • Keep the motor running when pulling the bit back out of a drilled hole to prevent jamming. • Be careful not to have hands or other items (such as the counter top) on the other side of the hole you are drilling. The drill can “break through” rapidly and other unexpected things may happen, such as the drill bit breaking, the person who is drilling may trip, . . .
living with the lab Mark Hole Locations for Top Shelf Draw center lines to help locate hole positions. Use the speed square and a ruler to assist with layout 1 15/16 inch
living with the lab Drill Reservoir Drain Holes into Top Shelf Drill your reservoir drainage holes in the top shelf (the 6-inch long piece). Use a ½ inch spade bit Be sure not to apply too much forward-drilling force both for safety and to prevent splintering of the wood as your bit breaks the back surface Also, try to keep the bit as perpendicular to the board as possible DO NOT DRILL INTO WORKPIECE UNLESS IT IS FIRMLY CLAMPED IN YOUR VISE
living with the lab Mark Pilot Hole Locations on Feet pilot hole locations ¾ in 2 ¾ in
living with the lab Drill Pilot Holes in Feet Drill holes using the #42 bit (0.0935 in). Pilot holes reduce the chance that the wood will split when installing the screws, and they make assembly easier DO NOT DRILL INTO WORKPIECE UNLESS IT IS FIRMLY CLAMPED IN YOUR VISE
living with the lab Countersink Pilot Holes Countersinking allows the screw head to better seat into the wood, producing a cleaner job. Countersinking also helps prevent splitting. The N bit works well (N=0.302 in) countersink receives tapered part of screw drill a very shallow hole using the larger bit DO NOT DRILL INTO WORKPIECE UNLESS IT IS FIRMLY CLAMPED IN YOUR VISE
living with the lab Attaching the Feet Attach the feet by installing screws through the pilot holes drilled earlier It is helpful if your partner holds the wood in place Use speed square to align foot with vertical riser before screwing in 2nd screw KEEP YOUR FINGERS (AND ANY BODY ELSE’S FINGERS) AWAY FROM THE SCREW. THE SCREWDRIVER BIT MAY SLIP OFF THE SCREW HEAD AND HIT HURT A FINGER.
living with the lab Attach 2nd Foot to Vertical Riser Attach 2nd foot with device standing to assure feet are parallel and fishtank doesn’t “rock” 2 ¾ inches KEEP YOUR FINGERS (AND ANY BODY ELSE’S FINGERS) AWAY FROM THE SCREW. THE SCREWDRIVER BIT MAY SLIP OFF THE SCREW HEAD AND HIT HURT A FINGER.
living with the lab Attach Fishtank Shelf drill pilot holes for screws use two screws on each side Orient the shelf to make the feet as parallel as possible; alert your instructor if your feet are significantly out of line with one another.
living with the lab Attach Shelf for Reservoirs Use the speed square to get the shelf straight. 2 inches use the ¾ inch long, #8 wood screws for the six holes in the mounting bracket
living with the lab Paint Fishtank (for homework) PLEASE be careful not to damage your room, the parking lot or any other property by dripping paint. Have fun . . . and be creative