Download
1 / 23
230 likes | 364 Vues
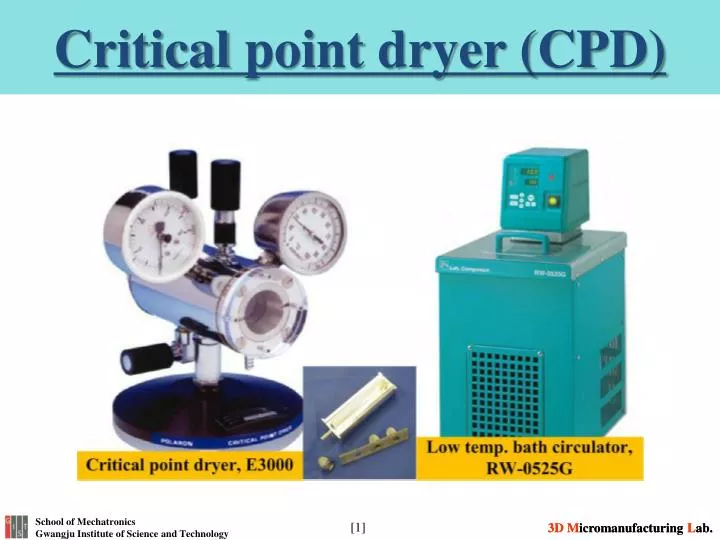
Critical point dryer (CPD). What is the critical temperature and pressure?.

E N D
What is the critical temperature and pressure? • The phase diagram shows the pressure to temperature ranges where solid, liquid and vapor exist. The boundaries between the phases meet at a point on the phase diagram called the triple point. Along the boundary between the liquid and vapor phases it is possible to choose a particular temperature, and corresponding pressure, where liquid and vapor can co-exist and hence have the same density. This is the critical temperature and pressure.
What is the critical point drying? • Critical Point Drying relies on this physical principle. The water in biological tissue is replaced with a suitable inert fluid whose critical temperature for a realizable pressure is just above ambient. The choice of fluids is severely limited and Carbon Dioxide (CO2) is universally used today despite early work with Freon 13 and Nitrous Oxide. With CO2, a critical point of approximately 35 °C can be achieved at a pressure of around 1200 psi. • Therefore, if the water is replaced with liquid CO2and the temperature then raised to above the critical temperature, the liquid CO2 changes to vapor without change of density and therefore without surface tension effects which distort morphology and ultra-structure. • Since liquid CO2 is not sufficiently miscible with water, it is necessary to use an intermediate fluid which is miscible with both water and liquid CO2. • In practice, intermediate fluids commonly used are methanol, ethanol, amyl acetate and acetone.
Composition of CPD cont. Pressure Vessel: The pressure vessel is machined from solid brass bar to form a cylindrical tube with a wall thickness of approximately 25 mm. The vessel wall acts as a water jacket, with a series of narrow bores, drilled lengthways, forming a water passageway for chamber heating and cooling. The ends of the water jacket are sealed with annular end plates and gaskets. Two hose connectors are screwed into the vessel wall, one at each end, for connection to a water supply. Each end of the vessel is internally threaded. A 25 mm thick, toughened glass, viewing window is held in one end by a retaining ring, and a specimen loading door screws into the other end. A 12.5 mm thick clear plastic shield is screwed over the viewing window and acts as a safety guard in the unlikely event of the glass cracking. Control Valves: There are three high pressure valves, of the right-angle type, fitted to the pressure vessel using 1/4" BSP threaded unions. The valves seal by contact between a ground steel cone and a brass knife edge. NOTE: That the efficiency of the valve will be impaired if this metal to metal contact is overtightened. The INLET and OUTLET valves are screwed directly into the top of the pressure vessel and seal against an O-ring. The O-rings are located on their seats by small stainless steel inserts. When the valves are initially fitted, they are adjusted so that the valves face the desired direction when they have been screwed into the vessel. Locking nuts ensure the valves do not rotate. The DRAIN valve screws into the bottom of the vessel horizontally via an adapter plug.
Composition of CPD cont. Gauges: The thermometer gauge is of the bi-metallic type and measures the temperature of the pressure vessel brass wall. It attaches to the vessel by means of a push-fit plug inserted in the vessel wall. The gauge screws into the plug such that the sensing head does not penetrate either the water flow in the jacket or the high pressure work chamber. The pressure gauge is a 0 ~ 2000 psi bronze Bourdon gauge which screws into a 1/4" BSP threaded port in the upper side of the vessel, and seals onto a fibred washer. NOTE: By special arrangement with the manufacturers, these gauges are calibrated using methylated spirit rather than the usual mineral oil. Safety Valve: the valve screws into the vessel and is sealed with a bonded seal. The valve exit is a small hole in the side of the pillar. The valve uses a nickel fuse (bursting disc), which is a thin diaphragm guaranteed to rupture at 1850 psi ± 5% at 20 ℃ . If the disc ruptures as a result of excess pressure, it has to be replaced. A spare bursting disc is included with the apparatus when shipped. All chambers and seals are pressure tested by an independent authority before shipment to the customer. Each chamber bears the serial number of that test and is supplied with the test certificate.
Composition of CPD cont. Specimen Holder Assembly: The standard specimen holder assembly, Figure consists of a liquid transfer boat, mesh specimen baskets and a stainless steel gauze cover. The transfer boat is an aluminum dish with an integral drain valve and holds the specimens, immersed in substitution fluid (acetone, amyl acetate, freon 113, etc.), during transfer to the pressure chamber. During transfer, a spigot on the end of the transfer boat locates into a drilled hole in the center of the inside face of the chamber door. In this way, the transfer boat can be carried by the door and loaded into the chamber. As the boat is loaded, the drain valve is activated by a locating pin embedded in the chamber floor. The valve aperture is sufficiently small (0.75 mm) to ensure the specimens remain covered until the chamber is filled with liquid CO2. The specimen baskets slide into channels formed by the gauze cover returned edges. The cover then fits over the liquid transfer boat, immersing the baskets into the substitution fluid. Various designs of transfer boat and specimen holder are available, with internal slots and cutouts to accommodate different specimen types and sizes (i.e. glass slides, coverslips and wire tissue baskets).
Installation of CPD Cut a suitable length of the 6 mm PVC tubing (supplied) and connect between the hot/cold water supply, and the water inlet connector on the CPDA. It will be convenient to attach a water mixer to the laboratory hot and cold water outlets, terminating with a 6mm (1/4") hose connection for the PVC tubing supplied, (a “Y” piece connected to the hot and cold water taps is suitable). The CPDA requires both hot and cold water during the operating cycle. Cooling facilitates filling of the work chamber with liquid CO2and heating is required to take the liquid above its critical point. Similarly, connect a length of PVC tubing between the water outlet connector on the CPDA and a convenient drain. NOTE: Running mains water to waste may contravene local regulations. If in doubt, the user is advised to seek advice from the local water authority. Connect the transfer pipe to the INLET valve on the CPDA. A fibred washer is provided to ensure a good seal. Using a 3/4" AF spanner, tighten the union to approximately 20 ft lb. Connect the other end of the transfer pipe to the gas cylinder. No gasket is required. Cylinder connection threads vary from country to country and even between manufacturers in the same country. For example, the transfer pipe supplied is fitted with 1/4" British Standard Pipe (BSP) and 0.860” x 14 tpi. unions. Standard threads for the UK, but will not fit cylinders in the USA. An E3000-US kit should be specified for use within the USA, this includes a transfer pipe adaptor which will fit USA cylinders. If it is found necessary to fabricate another transfer pipe, advice should be sought from a local supplier of high pressure fittings.
Installation of CPD cont. • Tighten the securing nut with a 1 1/8"AF spanner taking care not to twist the transfer pipe. • Check the transfer pipe connections for leaks by first ensuring the INLET valve is closed and then gradually opening the control valve on the gas cylinder. Any leaks will be audible, or visual if severe. A leak from either of the transfer pipe connections can be cured by re-tightening the union. • CAUTION:Before attempting to re-tighten a transfer pipe union, close the cylinder control valve and release any gas pressure in the pipe by opening the CPDA inlet and drain valves. • WARNING, HAZARD TO HEALTH!: Risk of asphyxiation in poorly ventilated rooms. As carbon dioxide is heavier than air, the concentration of exhaust gas will be greater at ground level and the oxygen concentration correspondingly reduced.
CPD operation instruction • Close all valves on the pressure vessel. Do not over-tighten as this will damage the sealing seats. • Open the CO2 cylinder control valve. • Open the INLET valve on the pressure vessel and listen for any slight leak. If any of the valves have loosened during transit they should be tightened. With the INLET valve open, and the VENT and DRAIN valves closed, the pressure vessel will partially fill with liquid CO2. The rate and extent of filling can be increased by slowly opening the VENT valve on the top of the unit. This will flush through any trapped air in the system. • CAUTION: Before attempting to re-tighten a transfer pipe union, close the cylinder control valve and release any gas pressure in the pipe by opening the CPDA inlet and drain valves. • It is useful at this stage to experiment with the manipulation of the control valves. It will be seen that if the INLET and DRAIN valves are both opened, a constant level of liquid can be maintained, as seen through the viewing window. This is the FLUSHINGaction. It is sometimes necessary to open the VENT valve as well to prevent the liquid level from falling • NOTE: The pressure vessel will be difficult to fill if it is warmer than the cylinder. Although a constant throughput of liquid gas will adiabatically cool the vessel by expansion through the DRAIN valve, additional water cooling is still recommended.
CPD operation instruction cont. • Having experimented with filling and flushing the work chamber, fill the chamber half full and close all valves. • Turn on the hot water supply (at 35- 40 ℃) to slowly raise the chamber temperature. At first some turbulence will be observed in the liquid CO2. If the turbulence is violent, this indicates the heating rate is excessive. • Observe the liquid CO2 through the viewing window and at the same time monitor the TEMPERATUREand PRESSUREgauges. As the temperature of the vessel approaches 30 ℃, the pressure will have risen to approx. 1100 psi. As this point is reached, the surface of the liquid will start to dissolve. When the pressure is greater than 1200 psi, the liquid meniscus will have disappeared and the CO2will have passed through the CRITICAL POINT. • There are 3 indications that the critical point has been exceeded: • The visible effect • The pressure is above 1200 psi • The temperature is above 32 ℃ • The temperature is the least reliable of the indications because of the possibility of thermal lag.
CPD operation instruction cont. • Repeat the above experiment a number of times to become experienced with the critical point effect. • NOTE: Unreliable pressure readings will be obtained if the liquid level is above the inlet to the PRESSUREgauge during the heating process. • When the chamber contains gas at a temperature above the critical point (36 ℃ gives a suitable margin), experiment with the release of pressure from the chamber by gradually opening the VENT valve. If the pressure is released too quickly, re-condensation of the gas will occur by adiabatic cooling. The VENT valve should be controlled to give a venting time of between 3 and 4 minutes. • After a critical point run, cool the chamber to below 20 ℃before attempting to re-use.
Composition of low temp. bath circulator (LTBC) Display Over-Temp. Protector Communication Port Main Power Switch Fuse Drain Valve Ref. system Condenser Cover
Display of LTBC cont. RUN LED: This LED indicates Work/Stop state of unit. It turns on when the unit runs and turns down when the unit stops HEATER LED: This LED indicates heater is activated. Auto Tuning LED: This LED indicates Auto Tuning is proceed Wait On Timer LED: This LED indicates state of timer, which makes the unit begin to run on programmed time. The LED is blinking when the timer is activated and turns off when the timer is deactivated Wait Off Timer LED: This LED indicates state of timer, which makes the unit stop on programmed time interval since the PV and SV meet each other. The LED is blinking when the timer is activated and turns off when the timer is deactivated. Low-level alarm LED: This is device monitoring low level of heat transfer media such as water, alcohol, oil etc. inside of the bath. This can be used in high temperature environment and has good durability by using unique Jeiotech. made sus-ball. This stops instrument and alarm buzzer when it monitor low level. You have to refill liquid and resume operation by pressing Start/Stop button. Over heating alarm LED: It stops instrument, alarm buzzer and over heating alarm LED is blinking when the temperature of media liquid inside of the bath is higher than set value of mechanical over heating prohibit device on the front panel. In this case the instrument halted because of some unstable factor (over heating) therefore remove over heating factor and press Start/Stop button once then the Buzzer and blinking LED set normal state.
Display of LTBC cont. Temp button: This button is for temperature setting. Timer button: This button is for setting the timer, Auto Run function, and pump circulating capacity Up button: This button is for increasing set value. Enter button: This button is for saving value after varying set value. Down button: This button is for decreasing set value. Lock button: This is to lock the controller buttons. Auto Tuning button: A function operates if it presses this button for three seconds when it practices Auto Tuning. Start/Stop button: This button is for start/stop of unit and for resuming operation after removing some unstable factors when operation is terminated because of it. SV button: This button is for showing set temperature and showing remaining time when the timer function is activated. PV button: This button is for showing present temperature.
LTBC operation instruction • Basic operation • Fill with water or transfer media before connecting to the mains power supply. • Please check main power is correct. • Set the Over Temp. Protector Knob higher than operating temperature (about 10%). • Connect mains power, turn on Main Power Switch and input desired temperature. • Temperature setting method • Press button. Set temperature value (SV) should blink. This means you can vary set value. • Press button to change value then press button to save the value. • It reverts to the previous value without saving if you don’t touch any button for 10 seconds. • Press button again when it is in SV set state then following additional functions are activated.
LTBC operation instruction cont. • Additional function of button • SV storing function. • Press button 2 times. This function is to store a favorite value at SV.1 and load it. Press button and button to vary temperature and press button to store. • Press button 3 times. This function is to store a favorite value at SV.2 and load it. Press button and button to vary temperature and press button to store. • Press button 4 times. This function is to store a favorite value at SV.3 and load it. Press button and button to vary temperature and press button to store. • Unit change. • Press button 5 times. This is a function vary the unit of temperature display. Initial display is ℃ and it can be varied ℃ and ℉ by pressing button. Press button to store. • Bias Function. • Press button 6 times. This is a temperature deviation compensation function. PV shows BAIS compensation values and SV shows BIAS condition. Move to ADJUST mode by pressing or button. Change the value on PV display the same as the thermometer in the chamber by pressing and . Conclude the setting by pressing .
LTBC operation instruction cont. • Timer set way • Wait on Timer. • Press button one time. Timer (On Timer / Off Timer) is shown on PV and time is shown on SV. Set time by pressing button and Save and finish by pressing button. • W/ON LED turns on with a Beep sound after finishing the wait on timer setting. • Wait off Timer. • Press button two times. You can now set the wait off timer. Set time by pressing button and save and finish by pressing button. • W/OFF LED turns on with a Beep sound after finishing the wait on timer setting. • The timer function is shown below.
LTBC operation instruction cont. • Wait On Timer • The unit begins to work when the time programmed into ‘Wait On’ is attained. • Maximum is 99 hr. 59 min. and minimum is 1min.. • Wait Off Timer • The unit stops when the time programmed into ‘Wait Off’ is attained. • Combination of Wait On Timer & Wait Off Timer. • The unit works as picture. • Timer set deactivation: Press button to deactivate the timer function (LED and timer turns off). If you want only one timer mode, set the value of the timer for 0, the timer is then deactivated. • Additional function of button • Auto Run function. • Press button 4 times. This is to select the machine mode after power failure. If you set ‘yes’ the unit will run after power failure situation. If ‘no’ is selected it will not resume after any power failure. • Pump circulating capacity control. • Press button 5 times. This is to control motor speed. Control range: 1~5 by pressing and . Press button to finish setting. (Motor speed is set at 5 as factory default.)