Download

1 / 28
300 likes | 439 Vues
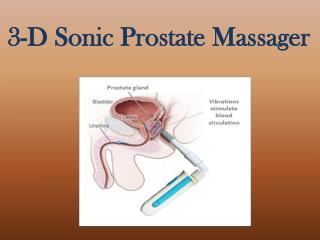
Assignment: Prostate Cancer Diagnosis. Prostate Cancer Diagnosis. 32,000 men die every year. Methods of diagnosis Prostate specific antigen (PSA) blood test. Needle biopsy. Tissue sample mounted on a slide Analysed under microscope by a pathologist. Biopsy Analysis.

E N D
Prostate Cancer Diagnosis • 32,000 men die every year. • Methods of diagnosis • Prostate specific antigen (PSA) blood test. • Needle biopsy. • Tissue sample mounted on a slide • Analysed under microscope by a pathologist
Biopsy Analysis • Pathologist classifies each slide into three classes indicating the following conditions: • normal muscular tissue, Stroma (St) • intermediate stage, Benign Prostatic Hyperplasia (BPH) • abnormal tissue development , Cancer (Ca)
Stroma • Grey nuclei in a lighter grey tissue background • No black pixels or white pixels • No large scale structures • Texture like
BPH • Large white glandular areas • Lots of white pixels
Biopsy Analysis • Very dark nuclei congregate in prominent clusters • Lots of dark or black pixels • White glandular area is much small
Training Images • Training images 1, 2 and 3 are for BPH class • Training images 4, 5 and 6 are for Cancer class • Training images 7, 8 and 9 are for Stroma class • Images are in directory S:\Library\Level3\CSC312\VisionSystem • assign_04_1.jpg …. assign_04_9.jpg • Copy to your Usernumber directory
Aim • Use nine training images to design an automatic image classification system that will diagnose biopsy tissue sample images correctly
Learning Outcomes • Be able to describe the underlying mathematical framework and explain the concepts of these operations. • Be able to develop an automated image processing system. • Be proficient in VisionSystem. • Be able to write an image processing report.
Level 3 Learning Outcomes • Less emphasis on knowledge and more on critical thinking skills • Be able to develop an automated image processing system. • Apply • Analysis • Evaluation • Synthesis
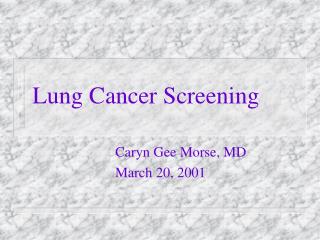
Image Data Image Data Image Acquisition Pre- processing Segmentation Image Data Feature Descriptions Classification and/or interpretation Feature Extraction Information Generic automated system
At each stage…. • Experiment with applying the different techniques at your disposal • Analyse the results and evaluate them • Select the technique that gives the best result
Preprocessing • No communication noise removal required. • Linear stretching • Same values of I1 and I2 must be used fro all training images • Or, write method that automatically calculates optimal I1 and I2 for each image • Same value of gamma must be used for power law • You cannot evaluate the preprocessing until you have performed thresholding during segmentation
Discussion Forum • Will answer questions for each stage only the week after the lecture • Promote continual working at the assignment • Next week will answer questions related to preprocessing and binarisation stage of brightness based segmentation
Segmentation • Segmentation threshold: • Analyse histograms of preprocessed training images • From analysis select best threshold overall, but must use this same value for all training images • Or use automatic technique
Deadline • 3:00pm Mon 3rd May • Hand in at general office SARC • Sign your name on list • Must be witnessed by one of the secretarial staff • Plan appropriately, set target date 2-3 days before deadline.
Deadline • Assessed work submitted after the deadline will be penalised at the rate of 5% of the 40 marks available for each working day late up to a maximum of five working days, after which a mark of zero shall be awarded.
Exemptions • Exemptions shall be granted only if there are extenuating circumstances, and where the student has made a case in writing to the member(s) of staff designated by the School within three days of the deadline for submission. • Send me a completed Application for Exemption for Penalty form with supporting documentation, • e.g., doctor’s note specifying days you were unable to work. • copy of what you have done so far.
Exemptions • As soon as you know you will need an exemption inform me. Do not wait until after you are better, etc, and then ask. • No applications for exemption will be given on the week before the deadline without a draft report showing the preprocessing, segmentation and feature extraction have been completed.
Report • Introduction • Preprocessing • Binarisation • Postprocessing • Feature Extracture • Classification and Testing • Conclusion • Appendix
Each Section • Explain how you applied the various techniques to this particular problem • Present results • Images, tables and graphs • Describe your analysis of the results. • Evaluate the different techniques. • The more techniques you experiment with the greater the marks
Example - Classification • Describe how you applied linear discriminant to this particular case • Analyse results • Describe how you applied nearest-neighbour to this particular case • Analyse results • Compare and evaluate
Presenting Results • Image, table or graphics • Concise as possible • Nine training images means you cannot present all training image results at all stages • Only present images you really need to make your point • Do not make a point and present no supporting evidence!
Inserting Images • Run VisionSystem to display what images you want • Press PrtSc key to capture a screenshot • Open Microsoft PhotoEditor • Select Paste as New Image under Edit • Press select button on Toolbar • Cut portion of image you want • Paste into Word document
Style • Number different sections and pages • Label figures, and give each figure a caption describing what it is: • Figure 1: Binary training image with a threshold of x. • Must refer to figures in your text. • Number equations • No pseudo-code in main document! • Maximum of ten pages (not including appendix)
Appendix • Include only the code you have written.
Assessment • Understanding of how techniques work. • Evidence of your ability to apply them appropriately. • Your ability to analyse and evaluate the results. • Effectiveness of your final solution. • Your proficiency with VisionSystem • Quality of report.
Test Images • Five test images • Images will be in directory S:\Level3\Csc312\ VisionSystem on your return from the Easter break. • assign_04_10.jpg …. assign_04_14.jpg • Copy to your Usernumber directory