Download
1 / 31
6.53k likes | 26.01k Vues
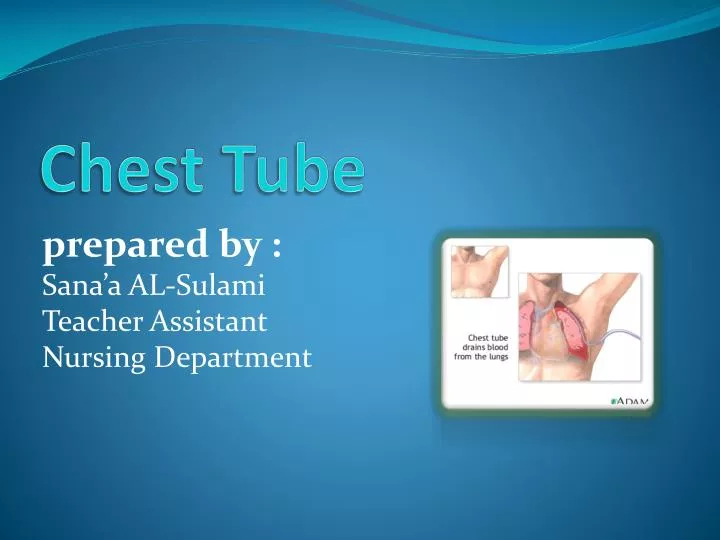
Chest Tube. prepared by : Sana’a AL-Sulami Teacher Assistant Nursing Department. Outlines:. Definition Chest tube indication Purpose of chest insertion Sites for tube insertion types of drainage system Prepare the patient for chest tube insertion Performance chest tube procedure

E N D
Chest Tube prepared by : Sana’a AL-Sulami Teacher Assistant Nursing Department
Outlines: • Definition • Chest tube indication • Purpose of chest insertion • Sites for tube insertion • types of drainage system • Prepare the patient for chest tube insertion • Performance chest tube procedure • Risks and complications
Learning objectives: At the end of this procedure , the students must be able to : • Define the chest tube. • List of Chest tube indication • List of the Purpose of chest insertion • Describe the Sites for tube insertion • Discuss the types of drainage system • Describe how to Prepare the patient for chest tube insertion • Performance chest tube procedure • List of the Risks and complications
Definition: • A chest tube insertion is a procedure to place a flexible, hollow drainage tube into the chest in order to remove an abnormal collection of air ,blood or fluid from the pleural space (located between the inner and outer lining of the lung).
Definition: • Traditional chest drainage unit consists of a collection chamber, water seal chamber, and suction control chamber. • Depending on circumstances, the practitioner may insert a chest tube at the bed side or send the patient to the operating room.
Chest tube indication: • Pneumothorax. • Hemothorax. • Pleural effusion. • Chylothorax. • Empyema. • Hemopnemothorax.
Purpose of chest tube: • To return negative pressure to the intra pleural space. • To drain air from intra pleural space. • To drain blood and fluid from intra pleural space. • Chest tube can administer therapy. • Relieve respiratory distress.
Sites for chest tube insertion: • In the lung apex at the second or third inter-costal space, mid-clavicular line to drain air. • In the lateral chest area at the lower site, usually the eighth or ninth inter-costal space to drain blood or fluid. • In the anterior media-stinal beneath the sternum, which called retro-sternal tube in case of cardiac surgery.
Types of drainage system: • Thoracentesis is insertion of the needle into the pleural space to drain air or fluid. • The single bottle system is used to drain air or small amounts of fluid from the pleural space. • Two chamber system work as a single-bottle chest drainage system, but it decrease the workload of breath.
Types of drainage system: • Three chamber system set up uses a drainage-collection chamber connected to a water-seal chamber that is attached to a vacuum-control chamber.
Prepare the patient for chest tube insertion: • Make sure your patient has given informed consent. • Reinforce the practitioner’s explanation of the procedure with him and his family. • Explain that his breathing will be easier once the tube is inserted and his lung starts to re-expand. • Tell him he will receive a local anesthetic to reduce discomfort.
Performance chest tube procedure: • Assessment: • Obtain vital signs • Observe any changes in heart rate, blood pressure, respiratory pattern, increased apprehension, and chest pain. • Assess patient for knowing allergies. • Review patient’s medication record for anticoagulant.
Performance chest tube procedure: • Planning: • Wash hands. • Prepare the equipment: • Injectablelidocaine • An antiseptic • Sterile gloves • Sutures • Sterile water • Suction control chambers • Suture scissors • 4*4 inch sterile gauze • Petroleum gauze • Adhesive tapeH • Dressing • Two clamps • Obtain the appropriate CDU • Knife handle • Knife blade • 3.0 silk suture • 3 hand towels • Head cover • Mask • Needle holder • 20 ml syringe
Implementation: • Explain procedure to the patient. • Set up the CDU to the manufacturer’s structure. • Fill the suction control chamber with sterile water to the 20 cm H2O level, or as prescribed. • To start suction, connect the tubing on the suction control chamber to a suction source and turn up the pressure until you see gentle, steady bubbling in the chamber. • Monitor the CDU water levels and add sterile water as necessary.
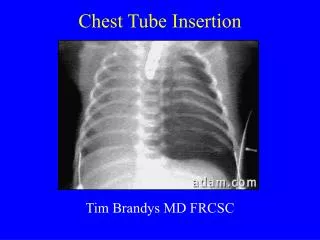
Inserting the chest tube: • Help position the patient for the procedure. • The practitioner cleans the patient’s skin with iodine or other antiseptic solution and drapes the area. • The practitioners anesthetizes the skin. • Through a small skin incision, the practitioner penetrate the pleural space with a hemostat and creates a tract that she can use to insert the catheter.
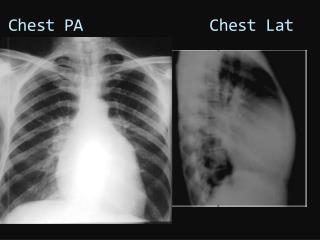
After inserting the chest tube: • Connects its distal end to the CDU. • Uses suture to fix the tube at the insertion site. • Applies 4*4 inch piece of sterile gauze with a slit over the tube and places an occlusive dressing over the gauze on the chest wall. • Chest x-ray must be done. • Assess his breath sounds bilaterally. • Encourage the patient to cough and coach him in deep breathing.
After inserting the chest tube: • Keeps all tubes free from kinks. • Keep the collection apparatus below the patient’s chest level • Add water to maintain the manufacturer's recommended level. • The water seal level should fluctuate with respiratory effort. • Assess the color of drainage in the drainage tubing as well as the collection chamber. • Measure the drainage level every 8 hours.
Recording and Reporting: • Document the amount of drainage and its characteristics in your patient’s medical record. • Immediately report more than 70 ml/hour of bright red blood or red free – flowing drainage. • Record baseline vital signs.(record vital signs every 15 min. for at least 2 hours after procedure). • Record and report stated allergies or anticoagulant medications the patient is taking.
General principles for management of chest tube: • Ensure the tubing is not kinked. • Gently milk the tubing in the direction of the drainage system. • Maintain drainage system below the level of the chest. • Turn the client frequently. • Report drainage on the dressing immediately . • Observe for fluctuation of the fluid in tube . • Palpate the area around the chest tube insertion site.
General principles for management of chest tube: • situate the drainage system to avoid breakage. • Place tow clamps at the bedside . • Encourage the client to coughing and deep breathing every 2 hours. • Instruct the client to exhale or strain as the tube withdrawn by the physician. • Encourage movement of the arm on the affected side. • Evaluation the client.
Evaluation: Practitioner will remove patient’s chest tube according to: • The drainage has decreased to little amount or none. • The patient is breathing normally without respiratory distress. • Breath sounds are at baseline. • Fluctuations in the water seal have stopped. • Chest x-ray shows lung re-expansion with no residual air or fluid in the pleural space.
Place the patient in semi-fowler’s position or on his unaffected side. • Place a linen saver pad under the affected side . • Put on clean gloves and remove the chest tube dressings. discard the soiled linen. • The physician puts on sterile gloves holds the chest tube in place with sterile forceps , and cuts suture anchoring the tube. Removing a chest tube:
Make sure the chest tube is securely clamped, and instruct the patient to perform Valsalv’s maneuver The physician holds airtight dressing, usually petroleum gauze , he can cover the insertion site immediately after removing the tube. Dispose the chest tube, soiled gloves, and equipment according to your facility’s policy. Take the vital signs as ordered and assess the depth and quality of the patient’s respiration. Removing a cheat tube:
Risks and Complications: • Bleeding. • Infection. • Subcutaneous emphysema. • Other rare potential include lung trauma, broncho-pleural fistula.
THAN YOU FOR YOUR LISTENING