Download
1 / 11
110 likes | 118 Vues
CS 380 Switch/Router Lab Project Introduction. PC 2 220.163.57.2. Network Diagram. 212.163.60.1. 212.163.60.2. RIP. 0/1 Router 1 0/0. 0/1 Router 2 0/0. 212.163.59.1. 220.163.57.1. Switch 1 212.163.59.10. Switch 2 220.163.57.10. Console. Console. PC 1 212.163.59.2.

E N D
CS 380 Switch/Router Lab ProjectIntroduction Switch/Router Lab Project Intro.
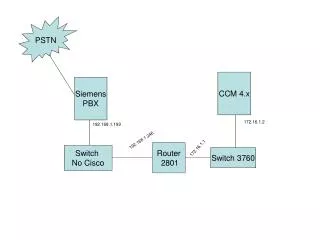
PC 2 220.163.57.2 Network Diagram 212.163.60.1 212.163.60.2 RIP 0/1 Router 1 0/0 0/1 Router 2 0/0 212.163.59.1 220.163.57.1 Switch 1 212.163.59.10 Switch 2 220.163.57.10 Console Console PC 1 212.163.59.2 Password for Router 1 & Router 2: router Password for Switch 1 & Switch 2: switch Switch/Router Lab Project Intro.
IOS Basics IOS (Cisco’s Internetwork Operation System) - for all Cisco routers and the Cisco 1900 Series Switches - second most used OS in the world - covered about 70% of the InternetTwo main modes of operations1. USER EXEC - access only a limited # of basic monitoring command2. PRIVILEDGED EXEC - access all router commands (e.g. configuration and management) - allow only authorized users (Password protected) Switch/Router Lab Project Intro.
IOS Functionality “ENABLE” “Configure <something>” “USER EXEC”“PRIVILEDGED EXEC”“CONFIGURATION” ModeMode Mode IP SHOW SHOW “EXIT” Or “CNTRL-Z” “EXIT” Or “DISABLE” IP CDP NEIGHBOR INTERFACE Switch/Router Lab Project Intro.
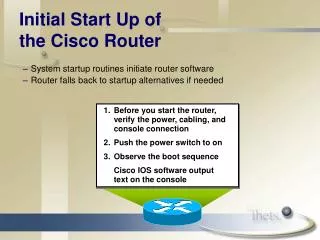
Understanding Cisco Hardware FLASH serves like the Hard Drive in the PCTurn on the Cisco Router POST (power on self-test) FLASH (IOS with startup_config) Decompress IOS from Flash and load it to RAM You will see “###### ……. ” on your screen Switch/Router Lab Project Intro.
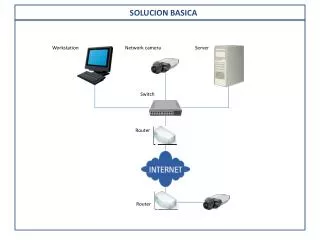
Access to the Router/Switch Method 11. Use a “rollover” cable to connect the PC directly to the “Console” port of the Router/Switch 2. Use HyperTerminal to login Method 21. Use telnet to login (You need to have the password to login) Switch/Router Lab Project Intro.
Back of the Router 2nd Slot: Slot#1 1st Slot: Slot#0 E 0/1 CONSOLE AUX E 0/0 S 0/0 S 0/1 Ethernet 0/0 Modem Connected To AUX • Serial Interface • might connect to • a leased line • or WAN connection Ethernet 0/1 Connect To PC As “Console” Switch/Router Lab Project Intro.
Useful Keys < prefix> ? Context sensitive HELP will tell you all possible commands with the given <prefix>en TAB enableShorthand: e.g. en – “enable” conf t – “configure terminal” Switch/Router Lab Project Intro.
Project#2: Switch Lab (Individual work) The purpose of this lab is to acquaint you with the CISCO switch family and the IOS software by having you perform a few tasks with the switches in the lab. By the end of this lab you should know how to : - Log into a CISCO switch using Telnet. - Look up the configuration. - Use basic IOS functionality. - Change modes in IOS. - Reconfigure a CISCO switch. Switch/Router Lab Project Intro.
Project#3: Router Lab (Team work, 2 students per team) The purpose of this lab is to give you some basic experience configuring a routing protocol between two routers, and also to familiarize you with the router version of the CISCO IOS software.By the end of this lab you should be able to:- Navigate through the IOS software on a CISCO router.- Look up basic connection information on a router.- Configure different interfaces of a router.- Disable and Configure the RIP protocol on a CISCO Router. Switch/Router Lab Project Intro.
Lab Hour Reservation Project#2: 75-minute (on your own) There are multiple seats (Switches) in the CS Network Lab, located at 3-2642. Should be done before the Router Lab Day. Just walk-in to work on your project during CS Network Lab opening hours (Check it out). FCFS policy.Project#3: 75-minute (with your teammate) Form teams. Pick time slots from the Router Lab Day.Project#3 Schedule will be posted @ the CS Network Lab. Switch/Router Lab Project Intro.