Download
1 / 26
290 likes | 619 Vues
CISCO router introduction for Labs WAN/ OSPF-RIP. Hervé TREMEUR AT&T Global Network AT&T Labs tremeur@att.com. CISCO Router introduction. Agenda. Router Quick Start CLI (Command Line Interface) Routing Protocols IP Addressing IP Routing configuration

E N D
CISCO router introductionfor Labs WAN/ OSPF-RIP Hervé TREMEUR AT&T Global Network AT&T Labs tremeur@att.com CISCO Router introduction
Agenda • Router Quick Start • CLI (Command Line Interface) • Routing Protocols • IP Addressing • IP Routing configuration • RIP Routing Protocol configuration • OSPF Routing Protocol configuration • Main Show and Debug commands used • CATALYST 2950 configuration • Lab presentation • Conclusion
Router quick start • If an enable password has not been set, enable mode only can be accessed from the router console. • Router> enable • Password: • Router#Disable • Router>Exit • Router> ? <----- User Mode Commands list • Router>en • Router# ? <----- Privileged-Mode command list • Router#Show ? • Router#
Command Line Interface Global Configuration Mode • Router# configure terminal • Router(config)#? --- Global configuration command list To exit global configuration command mode and return to privileged EXEC mode, use one of the following commands: • Router(config)# exit • Router(config)# end • Router(config)# Ctrl-Z • Router# Interface Configuration Mode • Router(config)# interface serial 0/0 • Router(config-if)# ? ------Interface configuration command list Subinterface Configuration SubmodeRouter • Router(config)# interface serial 0/0 • Router(config)# encapsulation frame-relay • Router(config)# interface serial 0/0.1 • Router(config-subif)#
Command Line Interface Startup configuration recommanded Router# conf t hostname R1 enable password c no ip domain-lookup line con 0 exec-timeout 0 0 password c logging synchronous line aux 0 exec-timeout 0 0 password c logging synchronous line vty 0 4 exec-timeout 0 0 password c logging synchronous
Command Line Interface Moving Around on the Command Line • Use the following commands to move the cursor around on the command line to make corrections or changes: • Press Ctrl-B : Move the cursor back one character. • Press Ctrl-F : Move the cursor forward one character. • Press Ctrl-A : Move the cursor to the beginning of the command line. • Press Ctrl-E : Move the cursor to the end of the command line. • Press Esc B : Move the cursor back one word. • Press Esc F : Move the cursor forward one word. Completing a Partial Command Name • Router# conf<Tab> • Router# configure Recalling Commands • Ctrl-P or the up arrow key --- Recall commands. • Ctrl-N or the down arrow key --- Return to more recent commands
Routing Protocols Interior Gateway Protocols • Interior protocols are used for routing networks that are under a common network administration. Cisco IOS software supports the following interior routing protocols: • Routing Information Protocol (RIP) • Internet Gateway Routing Protocol (IGRP) • OSPF • IP Enhanced IGRP • Integrated IS-IS
Routing Protocols Exterior Gateway Protocols Exterior protocols are used to exchange routing information between networks that do not share a common administration. IP Exterior Gateway Protocols require the following three sets of information before routing can begin: • A list of neighbor (or peer) routers with which to exchange routing information • A list of networks to advertise as directly reachable • The autonomous system number of the local router • The supported exterior gateway protocol is Border Gateway Protocol (BGP). • Multicast BGP (MBGP) adds capabilities to BGP to enable multicast routing policy throughout the Internet and to connect multicast topologies within and between BGP autonomous systems. That is, MBGP is an enhanced BGP that carries IP multicast routes. BGP carries two sets of routes, one set for unicast routing and one set for multicast routing.
IP Addressing Class A 1.0.0.0 to 126.0.0.0 Class B 128.0.0.0 to 191.254.0.0 Class C 192.0.1.0 to 223.255.254 Class D 224.0.0.0 to 239.255.255.255 Multicast group addresses Class E 240.0.0.0 to 255.255.255.254 Assigning IP Addresses to Network Interfaces ip address ip-address mask< ------ Set a primary IP address for an interface
VLSM (Variable length Subnet Mask) Class B 156.26.0.0 /16 ---------- 156.26.1.0 /24 156.26.2.0/24--------156.26.2.0/30 156.26.2.4/30 156.26.2.8/30 ……………… 156.26.2.252/30 ------------------------------------------------------------------------ • 62 30 14 6 2 I N Hosts -------------------------------------------------------I----------------- • 64 32 16 8 4 2 1 I ------------------------------------------------------- I------------------ • 26 27 28 29 30 32 I N Bits in mask --------------------------------------------------------I--- -------------- 128 192 224 240 248 252 I Mask ------------------------------------------- -i--------------
FRAME-RELAY Configuration Basic Frame-relay configuration (hub/spoke) Router A# interface Serial0/0 Ip address 132.1.12.1 encapsulation frame-relay no frame-relay inverse-arp frame-relay lmi-type ansi frame-relay map ip 132.1.12.2 111 broadcast Router B# interface Serial3/1 Ip address 132.1.12.2 encapsulation frame-relay no frame-relay inverse-arp frame-relay lmi-type ansi ! interface Serial3/1.1 point-to-point frame-relay interface-dlci 114
RIP Configuration Basic RIP configuration commands needed for the lab01 are presented Interface Ethernet0/0 ip address 10.1.1.1 255.255.255.0 Router(config)# router rip Router(config-router)# network 10.0.0.0< --- specifies what interfaces will receive and send RIP routing updates. It also specifies what network will be advertised router rip passive-interface Ethernet0/0< --- disables the sending of RIP updates on interface distribute-list 1 out Ethernet0/0< --- filter the advertised networks Router(config)#access-list 1 permit 131.1.0.0 0.0.255.255
RIP Configuration Monitoring and testing the configuration Router# debug ip rip < ---- displays received v1 updates displays sending v1 updates Router#show ip route Codes: C - connected, S - static, I - IGRP, R - RIP, M - mobile, B - BGP D - EIGRP, EX - EIGRP external, O - OSPF, IA - OSPF inter area N1 - OSPF NSSA external type 1, N2 - OSPF NSSA external type 2 E1 - OSPF external type 1, E2 - OSPF external type 2, E - EGP i - IS-IS, L1 - IS-IS level-1, L2 - IS-IS level-2, * - candidate default U - per-user static route, o - ODR Gateway of last resort is not set R 192.168.107.0/24 [120/1] via 150.100.1.254, 00:00:22, Ethernet0/0
OSPF Configuration commands needed for the lab are presented Basic OSPF configuration Interface loopback 0 ip address 132.1.1.1 255.255.255.255 Interface serial 0/0 ip address 132.1.2.1 255.255.255.0 Router(config)# router ospf 64 Router(config-router)# network 132.1.1.1 0.0.0.0 area 0 Router(config-router)# network 132.1.2.0 0.0.0.255 area 1
OSPF Configuration OSPF Priority “ DR election” configuration The router A with highest priority on the network will be elected DR The router B with second highest priority will be elected BDR RouterA# Interface Ethernet0/0 ip address 132.1.1.2 255.255.255.0 Ip ospf priority 100 router ospf 64 network 132.1.1.0 0.0.0.255 area 2 -------------------------------------------------- Router with priority 0 will not participate to the election RouterB# Interface Ethernet0/0 ip address 132.1.1.3 255.255.255.0 Ip ospf priority 50 router ospf 64 network 132.1.1.0 0.0.0.255 area 2
OSPF Configuration OSPF on an NBMA Network ” Non-Broadcast ‘” Model RouterA# interface Serial3/1 no ip directed-broadcast encapsulation frame-relay Split horizon is enabled on a frame relay encapsulated interface if subinterfaces have been configured no frame-relay inverse-arp frame-relay lmi-type ansi ! interface Serial3/1.1 point-to-point ip address 132.1.12.1 255.255.255.224 no ip directed-broadcast ip ospf network non-broadcast ip ospf priority 0 frame-relay interface-dlci 114 inform which DLCI goes with which subinterfaces router ospf 64 network 132.1.12.0 0.0.0.31 area 2 Split horizon is enabled on a frame relay encapsulated interface if subinterfaces Have been configured
OSPF Configuration OSPF on an NBMA Network ” Broadcast ‘” Model RouterA# interface Serial3/1 ip address 132.1.12.1 255.255.255.224 no ip directed-broadcast encapsulation frame-relay no frame-relay inverse-arp frame-relay lmi-type ansi ip ospf network broadcast ip ospf priority 0 frame-relay map ip 132.1.12.2 115 broadcast router ospf 64 network 132.1.12.0 0.0.0.31 area 2
OSPF Configuration OSPF on an NBMA Network ” Point-to-Multipoint ‘” Model RouterA# interface Serial3/1 ip address 132.1.12.1 255.255.255.224 no ip directed-broadcast encapsulation frame-relay no frame-relay inverse-arp frame-relay lmi-type ansi ip ospf network point-to-multipoint frame-relay map ip 132.1.12.2 115 broadcast router ospf 64 network 132.1.12.0 0.0.0.31 area 2 Changing the encapsulation on a serial interface disables split horizon Don’t need DR BDR election
OSPF Configuration OSPF Interface parameters Hello interval will vary based on the Interface Network Type : Broadcast=10 Non-Broadcast =30 Point-to-point=10 Point-to-Multipoint=30 Dead interval will vary based on the Interface Network Type : Broadcast=40 Non-Broadcast =120 Point-to-point=40 Point-to-Multipoint =30
OSPF Configuration OSPF Virtual-Links Needed when area not adjacent to area 0 (backbone area) Example : area 0---RouterA--area3--RouterB--area4 RouterA# router ospf 64 area 3 virtual-link 132.1.2.2 RouterB# router ospf 64 area 3 virtual-link 132.1.1.1 show ip ospf virtual-link
OSPF Configuration OSPF configuration monitoring and testing Show ip ospf interface Show ip ospf neighbor Show ip route Debug ip ospf events Debug ip ospf adjacency
Route redistribution Redistribute RIP into OSPF router ospf 1 redistribute rip subnets Redistribute OSPF to RIP router rip redistribute ospf 1 metric 1 route-map OSPF-RIP route-map OSPF-RIP permit 10 match ip address 2 access-list 2 permit 139.1.0.0 0.0.255.255 Redistribute CONNECTED into OSPF router ospf 1 redistribute connected subnets route-map xxxx
Catalyst 2950 configuration Create VLANA (10) and VLANB(20) interface FastEthernet0/1 duplex full speed 100 switchport access vlan 10 ! interface FastEthernet0/1 duplex full speed 100 switchport access vlan 10 ! interface FastEthernet0/2 switchport access vlan 20 Interface VLAN 10 Interface VLAN 20
Catalyst 2950 configuration Check VLAN interface FastEthernet0/1 TK-VLAN#sh vlan VLAN Name Status Ports ---- -------------------------------- --------- ------------------------------- 1 default active Fa0/2, Fa0/3, Fa0/4, Fa0/6, Fa0/7, Fa0/8, Fa0/9, Fa0/10, Fa0/11, Fa0/12, Fa0/13, Fa0/14, Fa0/15, Fa0/16, Fa0/17, Fa0/18, Fa0/19, Fa0/20, Fa0/21, Fa0/22, Fa0/23, Fa0/24 10 VLAN0010 active Fa0/1, • VLAN0020 active Fa0/5,
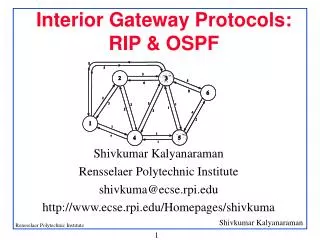
Lab EPUNSA presentation Topology R1 : ASBR R2 : ABR R4 :ABR