Download
1 / 81
830 likes | 1.14k Vues
Microsoft Access 2000. Relational Database Software. Note before we begin: Converting a database. You CAN convert Access 95, 97 directly to 2000 You CANNOT convert Access 2000 directly to 95 or 97 Save it down > Tools/Database Utilities/Convert Database/to Prior Access Version.

E N D
Microsoft Access 2000 Relational Database Software
Note before we begin: Converting a database • You CAN convert Access 95, 97 directly to 2000 • You CANNOT convert Access 2000 directly to 95 or 97 • Save it down > Tools/Database Utilities/Convert Database/to Prior Access Version
What is a Database and what is it used for? • A database is an organized collection of data related to a particular topic or purpose. • The primary function of a database is to enable the user to organize and retrieve information in a manner defined by the user.
Access • Relational database software with a graphical user interface. • Access integrates easily with Excel & Word. • Easy to get started with pre-made tables, forms, queries & reports. • Can use to create database applications by incorporating macros & modules (Visual Basic).
Flat-File vs. Relational • A Flat-file database consists of a single database file or table which contains all the information about a topic. It does not physically link or point to other files. • A Relational database consists of multiple tables linked together by at least one common field.
Products Table Supplier Table
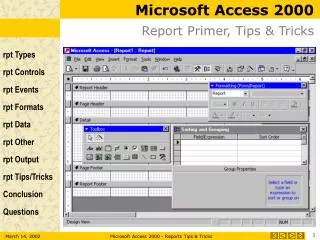
The Database window • Menus and toolbars • Command Center – all operations start here • Categories of objects on left • Objects and creation icons on right • Status bar
Access Database Objects • Tables • Forms • Reports • Queries • Macros • Modules • Pages
Tables • Tables are the heart of Access. • All data stored in tables. Fields (columns) and records (rows) intersect to form cells. • Each table should contain information about one subject only. • Each field contains a specific type of information such as text, number, currency, dates, etc.
Tables (cont.) • Two or more tables are linked together through fields they have in common. This is done by defining relationships. • Access creates relationships between different tables, about different but related subjects • A table should contain data about 1 topic only, e.g., not students and faculty in one.
Queries • Create a subset (dynaset) of data. • Means for obtaining data from 1 or more related tables. • Used to sort and/or select records according to your criteria. • Used as the basis for reports. • Action queries can be used to update, archive, delete, append records, etc.
Forms • Used to view, edit, and enter data. You can also enter data directly into a table. They can be customized for convenience. Best for on-screen viewing. • Forms may be designed to simplify data entry and data editing. • Can use controls to make data entry easier and more consistent such as drop-down lists, radio buttons, etc.
Reports • Sorted and summarized data. They can be designed to show only the data you want to show. Best for printed materials. • Used for printing data in an organized, professional looking manner. • Can add subtotals, groupings, etc. to reports.
Macros • Automatically carry out one or more tasks. Best for tasks that you perform often.
Modules • A set of procedures stored as a unit to perform an action. Written in Visual Basic.
Pages • A data access page for viewing on the Internet, or an intranet.
Table Design vs. Table datasheet view • Toggle in the upper right corner. Flips between the data itself (table) and the underlying structure (design) of the data. • Datasheet allows you to enter data, sort and filter data, hide and freeze columns, etc. • Design allows you to create tables, add fields, and set and modify field properties.
Navigating the datasheet • Navigation buttons in lower right hand corner – one record at a time, beginning, end, new record, or type the number in. • PgUp or PgDn for page at a time • CTRL + Home for beginning, CTRL + End for end • F5 moves you to record box, type record number, enter
Resizing rows and columns • Similar to Excel • Click and drag border • D-click right border for autofit
Sorting • Automatically sorted by primary key (unique identifier assigned to every table) • Select sort column, hit ascending or descending sort button • Can select multiple adjacent columns – will sort left to right • Very simple – filters and queries for more flexibility
Selecting data in datasheet mode • Part of cell - Click and drag • Entire cell – Click left edge (+ mark) • Adjacent fields – Click left edge and drag • Column – Click top of column (black arrow) • Row – Click side of row (black arrow) • Multiple columns – Click and drag black arrow • Multiple rows – Click and drag black arrow • All – CTRL + A or upper left box
Rearranging, hiding, freezing • To move a column, select, then drag • To hide a column, select it, Format/Hide • For confidential information • Format/Unhide to restore • To freeze a column, select it, Format/Freeze • Will go to left side • To keep it in view as you scroll • Format/Unfreeze to restore
Printing datasheets • Hide and/or size columns for best view • Change formats, fill colors • File/Page setup for orientation and columns • Landscape is often best orientation • Preview before printing
Adding records • ►* for new record • Always add to bottom – Access will resort when table is closed • No need to save – when you leave record, Access will save • Records/Data entry for data entry mode • Current record only – less distracting • To remove – Records/Remove Filter
Editing records • Click inside field (pencil will appear on left) • Saves when you leave row or close table • Can only “Undo” last record, so BE CAREFUL • Within same record – hit escape to Undo
Deleting data • Within a single field, select and hit Del • Select records or multiple records from left, hit Del • It will warn you once – no Undo, no exiting without saving changes • Large groups of deletes – use delete query (Voter records purge)
Copying, moving data • Edit/Copy, Edit/Cut, Edit/Paste • CTRL + C, CTRL + X, CTRL + V • Use toolbar buttons • You must select the same number of fields to paste into that you copied from • CTRL + ; - current date (doesn’t always work) • CTRL + ‘ - copies data immediately above
Finding data • Edit/Find • Choice of column or table • Choice of all or part of text • Shift + F4 for future searches
Filtering Data • By Selection • Simplest; cannot sort at the same time • Can also filter “excluding” selection • By Form • Can use ‘and’ ‘or’ statements; cannot sort at the same time • Advanced Filter • Use a filtering grid to enter expressions and sort criteria; most like query grid; can sort simultaneously, offers most flexibility.
Filter by selection • Select data you wish to look for • Hit Filter by selection button • All records that match will appear • Multi-filter, by adding criteria • Remove filter button when finished
Filter by form • Best for simple multi-criteria • Data entry form will appear • Type in criteria, hit filter by form button • Remove filter button when finished
Advanced Filter/Sort • Records/Filter/Advancrd filter-Sort • Most versatile of three • Can sort and filter in one step • Only kind that can be saved (as a query) • File/Save as Query
Advanced Filter/Sort Operators • > greater than • >= greater than or equal to • < less than • <= less than or equal to • <> not equal to • * wildcard
Advanced Filter/Sort Operators (con’t) • Not - eliminates criteria from evaluation • Between – finds criteria within a range • Like – used with wildcard (*) • Null – no value
Examples of Advanced Filter/Sort Operators • =CA - value is equal to “CA” • >=T - value begin with letter T, through Z • Is not Null - there is some value • <>CA, Not CA - All values but “CA” • >=1/1/91 - Date is on or after 1/1/91 • Like G* - Values that start with G • Not like *oak* - All words that don’t have “oak” in them
Advanced Filter/Sort criteria • Records/Filter/Advanced Filter-Sort • Drag or D-click or pulldown fields that are involved • “Specify sort (ascending, descending, neither) • Specify criteria using operators, text, numbers • Hit Apply Filter
Multiple criteria – “and” vs. “or” • If you are looking for an “and” relationship, place both criteria on same line • Vertical lines between boxes are “and” relationships • If you are looking for an “or” relationship, place criteria on different lines • Horizontal lines below “criteria” are “or” relationships • “Or” statements can be typed together in same box (R-click for “zoom”)
Practice session • “X” to clear grid • A list of orders sent to Switzerland sorted by shipping date (18 records) • A list of orders shipped outside the USA in 1996 (123 records) • A list of orders with freight $50 or over to Germany or Brazil sorted by amount (90 records)
Figuring out what you need • Determine the purpose of the database. The subjects that need to be included and the facts you need about each subject. • Determine the tables you need. Divide information into separate subjects, and have a different table for each subject. • Determine the fields you need. Decide what information will be stored in each table. Break the information down to its smallest logical parts
Figuring out what you need (con’t) • Determine which field will be the unique identifier (key field). If there isn’t one (i.e. – SS#), Access will supply one. Names are not unique, and addresses and phone numbers can change. • Determine the relationships. Decide how the tables relate to each other. Add fields and/or tables to help clarify these relationships.
Sample database design • You have a list of workshops, people who came, people who presented, how much they spent • You want expenses by person, by workshop, by category, various sub-totals • You want lists of attendees by workshop, by location, by interests • You want to create mailing lists for future workshops, based on interests and/or location
4 interrelated tables • Table of workshops • Table of attendees • Table of presenters • Table of presenter expenses
Workshop index • W# - key field • Name of workshop (subject/city) • Facility • Address 1 • Address 2 • City • State • Zip • Date of workshop • General Subject of workshop
Attendee listings • A# - key field • W# - (pulldown menu of subject/city) • Prefix • FName • LName • Phone number • Address 1 • Address 2 • City • State • Zip
Presenter listings • P# - key field • Prefix • FName • LName • Phone number • Address 1 • Address 2 • City • State • Zip • Yes/no field for each workshop subject