Download
1 / 20
200 likes | 201 Vues
OneOffice is a web-based system for recording and documenting pay quantities. It allows multiple users to work simultaneously within a project, updating entries, making changes, and making payments without overwriting each other's work. Accessible offline with syncing capabilities.

E N D
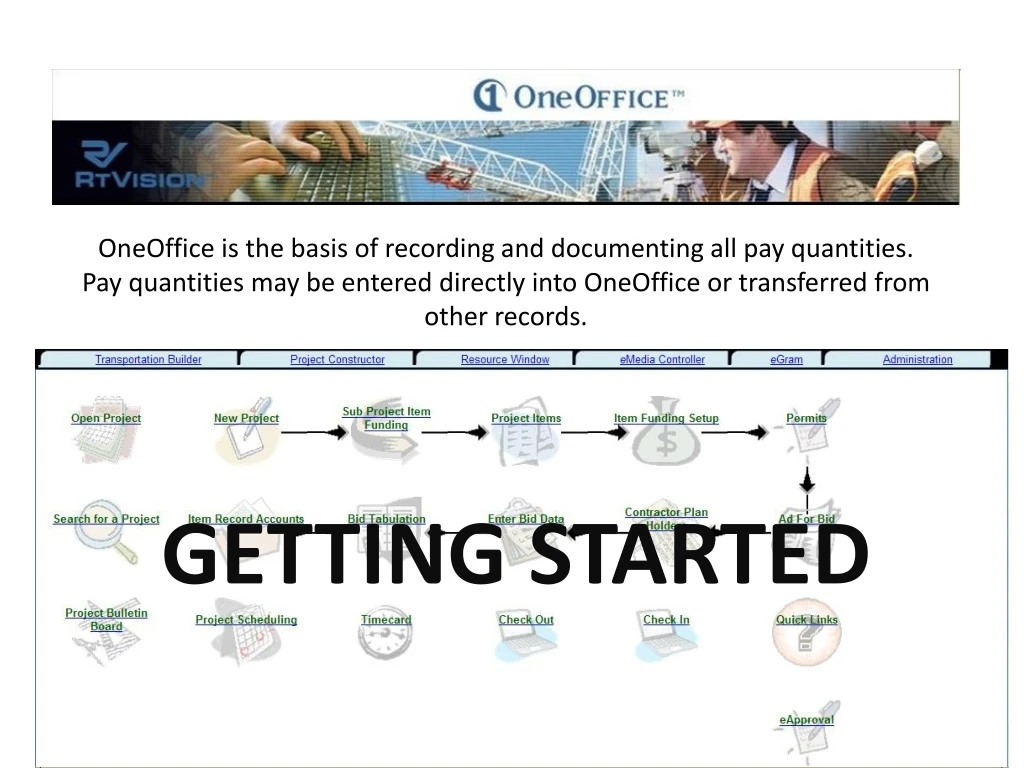
OneOffice is the basis of recording and documenting all pay quantities. Pay quantities may be entered directly into OneOffice or transferred from other records. GETTING STARTED
OneOffice is a web based system of contract record keeping. Which enables multiple users, from various locations, to simultaneously work within a project, updating IRA entries, making changes to the contract, and making payments all without over writing the other users work.
OneOffice also has an offline version of the IRA. This allows inspectors to take their laptops out on the project and directly enter documentation. This requires “Checking out” and “Checking in” the project. This process also updates entries into the IRA without over writing others.
Getting Started Access your OneOffice.url on your Internet Browser by typing its address.
MAIN MENU Getting Started From this window you can navigate to any of the OneOffice features. Construction personnel will spend most of their time in just a few of these areas. We will focus on these in this presentation.
MAIN MENU Getting Started eGram tab opens a server where you can access electronic project documents. They include pdf file copies of the Plans, Special Provisions, Addendums and Attachments to the Special Provisions.
MAIN MENU Getting Started By selecting the “Check Out” or “Check In” option the program synchronizes the information on your laptop with the Web based OneOffice project records, for working offline.
MAIN MENU Getting Started “Open Project” and “Item Record Accounts” are both portals to activate your project.
Getting Started Select “Open Project” 9991123
Getting Started Your Project is now open and “ON LINE” A pop up “Navigation Window” on the left appears when curser is moved over window area, then will collapse again once curser is moved away.
Getting around the System The blue colored buttons navigate the active project. Active project. The first two buttons are used by Design Squad. The Construction Data and eMedia are two areas we will become familiar. Select “Construction Data” to begin Item Record Keeping.
Item Record Account (ON LINE) Assuming you are listed as a Project Employee in the “Construction” information form, begin with “Item Record Accounts” If not see your System Administrator or Supervisor.
Item Record Account (ON LINE) Take time to review previous entries to avoid double payments. Also review naming convention in Stn-to-Stn. We will discuss this more later with using Sorting functions.
Item Record Account (ON LINE) To make additional entries select “Add Transaction”
Item Record Account (ON LINE) Take special note of the Notice: this does not always appear. When it does any transactions or revisions you make can affect the Partial Estimate in progress. Shaded fields are required to be filled in. Date defaults to present date but a calendar will appear when the “Date” box is selected. You may select any date such as the date work was performed. If there are more than one group on your project be sure to select a Group for each entry or entry will be not funded and it will cause problems with the estimate. Non-shaded fields are Optional for OneOffice to process transaction, however Documentation Manual requires “Location of work” and “Type of Documentation”. Once you have information entered select “Add Transaction” Caution, once transaction is processed it can not be deleted, only edited. Shaded fields become locked once transaction is included in a Partial Estimate.
Item Record Account (ON LINE) Again see Notice. Once corrections have been made select Modify Transaction. To make corrections to a previous entry, highlight entry line and select Edit Transaction.
Item Record Account (ON LINE) To continue entering quantities for the same item select the “Add Transaction” button at the bottom of screen. If you wish to work with a different item there are a number of ways to navigate. - Use the “Item Record Accounts” selection at the top of page. Use the drop down window by selecting the Drop Down Arrow right of Item Description line. Finally use the Navigation tool bar by moving the curser to the far left of screen and selecting Item Record Accounts
Tips / Suggestions Adopting a naming convention in the Sta to Sta column to describe your entry will be very beneficial in determining what work has been accounted. OneOffice has a A>Z / Z<A sorting function associated with each column. A little time while making the entry can pay dividends when reconciling payment.
Tips / Suggestions Before entering a Alpha Numeric description in Stn-to-Stn column consider the sort-ability of that entry. OneOffice sorts based on the value of the first digit, reading left-right, numerical first. By adding zeroes to smaller numbers to keep number of digits of every entry the same OneOffice sorts in a more desirable order.