Download

1 / 17
170 likes | 329 Vues
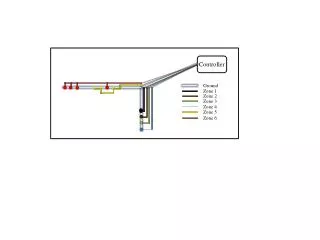
Segway Controller Notes. Ground Plane: Areas enclosed by the outer rectangle that aren’t occupied by anything else are filled with copper. All “ground” pins are connected to this. = connection on top layer of circuit board = connection on bottom layer of circuit board.

E N D
Ground Plane: Areas enclosed by the outer rectangle that aren’t occupied by anything else are filled with copper. All “ground” pins are connected to this. = connection on top layer of circuit board = connection on bottom layer of circuit board
Power Entry: +V could be virtually any DC power source, 7.2V - 24V. For our Segway, power comes from a 12V sealed lead-acid battery.
Reverse Polarity Protection: A diode only allows current to flow in one direction, protecting the circuit in case the battery is plugged in backwards.
Power Filters: A large capacitor between the power supply positive circuit and ground filters out noise from power electronics that control the large motors. Other smaller capacitors provide additional filtering for individual components.
3.3V 12V 5V Voltage Regulators: A 5V regulator (VR1) takes whatever voltage the battery supplies as its input and outputs a smooth 5V for running the microcontroller and sensors. A separate 3.3V regulator (VR2) outputs a smooth 3.3V for the radio.
Microcontroller: A PIC16F877 microcontroller handles all of the control tasks based on a program (written in C) that we write and download onto it. This is the same microcontroller setup used on the Machine Science XBoard.
Oscillator: A small device that keeps time for the microcontroller. It can run at up to 20MHz, 20 million “ticks” per second.
Reset: A button that connects the reset pin of the microcontroller to ground when pushed, causing a reset. Otherwise, the “pull-up” resistor R1 connects the reset pin to 5V, causing it to do nothing.
PWM Outputs: PWM (Pulse Width Modulation) is the type of signal used to control the motors. These two outputs are connected to specific pins on the microcontroller that can generate 5V pulses with accurately-timed duration (width) of 1-2 milliseconds.
Analog Inputs: Four inputs can be used to read in the value of analog sensors (sensors that provide a range of information, not just “on” or “off”). These could be used for steering, additional gyroscopes/accelerometers, or potentiometers.
Digital Input/Outputs: Four digital connections provide a way to read in on/off sensors (switches) or to control on/off devices (LEDs, cold-cathode lights, relays).
Digital Radio: A digital ZigBee radio allows two-way wireless communication to the microcontroller. The white arrows indicated the direction of signal flow. Resistor R2 protects the 3.3V radio from the 5V microcontroller signals.
Serial Connection: A regular Machine Science serial connection can be used to program and talk to the microcontroller instead of the radio.
Inertial Sensor Connection: A special set of connectors used to connect the Analog Devices 6-way inertial sensor to the microcontroller. The sensor is entirely digital, so all of its information can be retrieved over a simple four wire interface.
Mounting Holes: Six mounting holes sized for 10-32 bolts. The metal plating is not connected to any part of the main circuit, so the chassis will necessarily be grounded. The holes are at spaced out at 0”, 4”, and 6” horizontally, 0” and 3” vertically.
Silk Screening: A place to put instructions, customized designs, etc.