Download
1 / 13
130 likes | 331 Vues
Track Changes and Comments: The basics. You’re reviewing a document for your manager before it’s sent to your entire organization. You notice changes you want to make, which you also want your manager to see. .

E N D
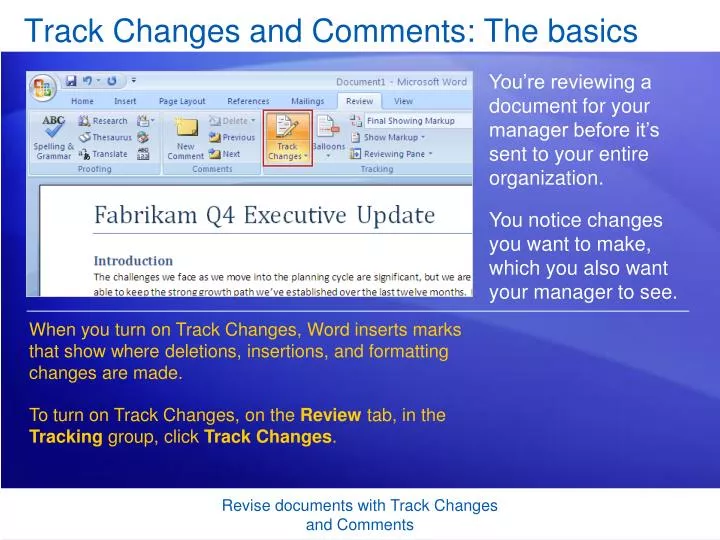
Track Changes and Comments: The basics You’re reviewing a document for your manager before it’s sent to your entire organization. You notice changes you want to make, which you also want your manager to see. When you turn on Track Changes, Word inserts marks that show where deletions, insertions, and formatting changes are made. To turn on Track Changes, on the Review tab, in the Tracking group, click Track Changes. Revise documents with Track Changes and Comments
See revisions After you turn Track Changes on, work in Word as you normally do. As you insert or delete text, or move text or graphics around, each change appears with markup — marks such as colors and lines that show where each revision is and what it is. Revise documents with Track Changes and Comments
See revisions The picture shows how markup looks when you make changes in your document. When you delete the text “with hard work and clear thinking,” the deleted text is put in a balloon in the document margin. To replace “twelve” with “nine,” you select “twelve” and type “nine” over it. “Twelve” goes into a balloon in the document margin; the newly inserted “nine” is underlined. Revise documents with Track Changes and Comments
See revisions The picture shows how markup looks when you make changes in your document. A vertical line appears in the left margin next to each sentence with tracked changes. This is an additional signal that there are changes in some sentences. Revise documents with Track Changes and Comments
Insert a comment You made some revisions, but you’d also like to explain why you deleted “twelve” in the first sentence. No problem: Insert a comment, which is an annotation that you can add to the document. To do that, place the cursor at the end of the text you want to comment on, “nine” in this example. On the Review tab, in the Comments group, click New Comment. Revise documents with Track Changes and Comments
Insert a comment A comment balloon appears in the document margin. The text you are commenting on, “nine,” is highlighted with your review color. You type your text in the comment balloon. Here’s how to tell the difference between a comment balloon and a deleted text balloon: • The solid color background in the comment balloon. A deleted text balloon has color only around its outside border. Revise documents with Track Changes and Comments
Insert a comment A comment balloon appears in the document margin. The text you are commenting on, “nine,” is highlighted with your review color. You type your text in the comment balloon. Here’s how to tell the difference between a comment balloon and a deleted text balloon: • The “Comment” label in the balloon. • The reviewer’s initials in the balloon. Revise documents with Track Changes and Comments
How to tell which reviewer has done what When more than one person reviews a document, you might want to know what changes were made by which reviewer. Here are some ways to tell who did what. See who made a comment by moving the mouse pointer over it in the document. Look at the color of the revision. Pilar Pinilla’s comments (PP) appear in one color… …while Richard Bready’s comments (RB) appear in another. Revise documents with Track Changes and Comments
Turning off doesn’t mean deletion In case you wondered, turning Track Changes off does NOT delete tracked changes — or comments. Here’s what it does do. All tracked changes already made up to that point remain in your document, even though Track Changes is turned off. Any revisions you go on to make will not be marked as revisions. Revise documents with Track Changes and Comments
Accept or reject changes, and delete comments When the revisions are done, someone must review them and then accept or reject them. The reviewer can deal with revisions one at a time or all at once, and can read the comments and then delete them. Revise documents with Track Changes and Comments
Accept or reject changes, and delete comments The picture shows the options. On the Review tab, in the Changes group, use the Accept button to accept changes one at a time or in sequence, or to accept all changes at once. Use the Reject button to reject changes one at a time or in sequence, or to reject all changes at once. Revise documents with Track Changes and Comments
Accept or reject changes, and delete comments The picture shows the options. Use the Previous button to review each item going toward the beginning of the document. Use the Next button to review each item going toward the end of the document. Revise documents with Track Changes and Comments
Accept or reject changes, and delete comments The picture shows the options. If you want to accept and reject changes and delete comments all at once rather than one at a time, right-click in the document. Revise documents with Track Changes and Comments