Download
1 / 48
480 likes | 641 Vues
AUSTSWIM Database. Operation Overview. Help The system is supported by the existing FileMaker Help database. This can be accessed from the Status bar or by choosing F1. All standard functions such as Export, Sort, Find and printing issues can be addressed here.

E N D
AUSTSWIM Database Operation Overview
Help The system is supported by the existing FileMaker Help database. This can be accessed from the Status bar or by choosing F1. All standard functions such as Export, Sort, Find and printing issues can be addressed here.
Home– brings you back to Customers from any database file. New– creates a new record. Delete– to remove a record and place it in the archive file, admin can monitor and undo this function. Find– to do a search on any field. If there is a match it will result in a found set. The function automatically takes you from the non-edit pages to refresh/edit pages in the files. Show All– shows all records not just the found set. Print– you can choose to print current record, blank record or all records being browsed by making a selection from this drop down box. Sort– you can sort by specifying a particular field and choosing ascending or descending order. Exit database
Forms– takes you to the layout that shows all the forms which are in the File. Envelopes– to print envelopes. Labels– to print A7161 Avery labels. Reports– takes you to the layout that shows all the reports available for you to choose from. History– takes you to the history layout. Notes– allows you to add a note and follow up date to the current record you are browsing. It is recorded in the contact history of the record. Booking– click here to make a booking.
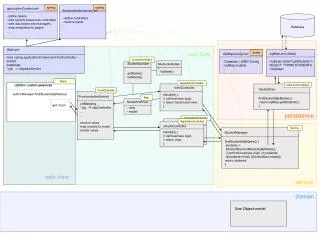
The item highlighted is the File that you are currently operating in. Navigation Around CMS These are submenus within the Registrations File, click on the page you want to navigate to. You can move to other files by just clicking on the appropriate heading.
Linking CMS As well as the Record ID number that each record has issued by the database, the system issues a Unique Customer ID number each time a record is added to any file. This number links all data across all files and cannot be changed.
Choose the Output Required– the database has its own word processing, email client and fax interface. When a client or customer is entered into the database you can nominate their desired communication method, the database will then send and record the correct nominated contact type against both the sender and recipient in the History File and link back to the Recent Contact Portals of both records.
To Make a Booking– Click the Booking button and you will be taken to the Course Enrolment Form. Complete the personal, statistical and medical information, then click on the Create Booking button.
To Make a Booking– Here you will complete the Course preferences by choosing a course code from the drop down list, then click on Accept Booking.
To Make a Booking– This message will appear when the booking is accepted and the payment details can be completed. To enter the person into another course click on the Clone button or here and complete the next Course preference.
Reports– Accessed from the Reports button, each file has up to 24 reports available which can perform statistics on any data and be sorted as required. In this instance by finding the required records in advance and running the Interview template the appropriate data for that BDM will be displayed.
Different Relationships–Every company maintains different relationships with differing target markets. CMS caters for these in the AUSTSWIM solution by including four core relationship files. Registrations, Venues, Groups and Course Set-Up. The name of these files can easily be changed to reflect the nature of each business.
Adding a New Registration, Venue, Group or Course– Click which category you wish to add a new record e.g. Registration. Click on the NEW button. Enter all details as required. A Record ID number will automatically be created.
Finding Data When in Find mode all fields that are specified to be open can be used to find data. By right clicking in the chosen field a number of options will be given to choose a range, date, >,<, etc. • . Finding a Venue– Firstly make sure you are in the area which you want to search. Click on the FIND button.You can search on any field eg. Venue Name. Enter details in the field you wish to search then click on the CONTINUE button to the left.
You can scroll through the records by clicking on the PAGE icon. Finding Data– In this case a found set of 2 records matched the given criteria out of 662 which are unsorted. To return to all records click on the SHOW ALL button. Once you have a found set any subsequent actions such as going to forms and printing will only be for that found set of records.
Delete a Record- To delete a record click on the DELETE button. To confirm click the DELETE button on the prompt to permanently delete the record/s displayed. You cannot undo a delete so be sure you wish to remove the selected record/s.
Forms– Click on the forms button and all the forms will be displayed for that File eg. ENQUIRY Select the form you wish to work with and it will be displayed with the material that relates to the individual record/s that you are viewing.
Forms & Letters–All paper work that is utilised in your business can be incorporated in the database. Once the original data is entered it will be transferred to all appropriate fields and forms throughout the system. You can navigate between forms and letters via the BACK and NEXT arrows. The HOME button will take you back to the Forms page. FIND and SHOW ALL work on Forms rather than Letters.
Letters– The PRINT ONE button will print and record the details for the current record sending the communication by the nominated means email, fax or letter and recording the details in the History File. If email is the selected means of communication, a pdf file of the letter will be sent to the email address nominated.
Letters– The PRINT ALL button will print and record the details for all of the records in the current found set sending the communications by the nominated means email, fax or letter and recording the details in the History File. If email is the selected means of communication, a pdf file of the letter will be sent to the email address nominated.
Letters & Forms– If Envelopes or Labels (Avery 7161) are required these can be accessed from the appropriate buttons. This number refers to the Form that you are on. Enter details in these fields to complete the letter with current information.
Customised Letters– The System will automaticallyadd today’s date and add the correct addressing details. There are a number of Blank forms in each database which will allow you to incorporate your own standard letters. Select the blank form, insert text as required, if you require the letter for regular use the administrator will need to add the letter to the system, a copy is saved in the History File.
Customised Forms The forms can be set up by the Administrator to contain graphics and personalised letters for service, sales or marketing to current Registrations, Venues, Groups or Courses.
Customised Forms–The Administrator can rename Forms, by going back to the forms screen and click just below the box which will allow them to type in the name of the letter for future reference.
Reports–click on the REPORTS button and this screen will appear. Select the pre-formatted Report required and the details will be displayed.
Reports–Reports can be listings, sub totals, grand totals, summaries and a range of formats, the scripting behind each report finds the correct group and the sorts and presents the data accordingly.
Postal Address– If the postal address is the same as the business address, click here and the details will be copied over to the postal address fields.Where this is present the address areas of letters and documents will default to this detail. Click on Back to Members Details to return to the original screen.
More Member Info– There are more fields to complete on this screen such as emergency contact and CPR details. Click on Back to Members Details to return to the original screen.
REGISTRATIONS- Individual Registration details must be maintained here. The top row of this field is for the email address and the lower for the Web Address ensure that this is correct in order for the system to be able to forward emails in addition the Contact Type field must be set to email.
REGISTRATIONS HISTORY– The history file records each communication from the database recording the details and where entered a follow up date that needs to be actioned.
REGISTRATIONS PROGRAMS– If the business has a service arm these details can be entered from the service database to create a complete sales/service history for each customer in the system.
REGISTRATION SALES– This data is derived from the imported data from SBS IMPRT_CRD_INVITEM file. The data is linked to each customer automatically from by the SBS Customer No. You can search on the data here by date product etc.
VENUES– You can also maintain venue data in the data base once again data can be imported separately from other systems and sales aggregated to the supplier based upon the Supplier code or product number.
VENUE HISTORY– The history file records each communication from the database recording the details and where entered a follow up date that needs to be actioned.
VENUE PROGRAMS– If the Venue has a programs these details can be entered from the program database to create a complete program history for each venue in the system.
VENUE SALES– This data is derived from the imported data from SBS IMPRT_CRD_INVITEM file. The data is linked to each Venue automatically from by the SBS Supplier No. You can search on the data here by date product etc.
GROUPS– The Group details can be maintained here with sales, history, program details maintained in a similar fashion to the Registration/Venue databases.
COURSE SET-UP– Data can be loaded from any source into the system or manually entered. Variable information can be entered into the Comments field. The history file is linked as per other files.
COURSE SET-UP HISTORY– The history file records each communication from the database recording the details and where entered a follow up date that needs to be actioned.
Making a Note Throughout the solution you will find NOTE buttons on the header. Clicking on the button will bring up this screen. The system will register the action against the person who is responsible or who created the note. To exit click on the this button. The Current Users Name is entered into the Staff Details Field you can change by clicking in the Field and choosing another name from the Pick List. Enter the Follow Up Date and then the content of the note or action to be taken.
Finding Diary Items– Once you have clicked the Diary button the search screen comes up. It Identifies the Current Users Name, you can then enter the date/s you wish to search, UniqueID of the person you are looking for, or change the User Name. Diary Functions– You can also choose to find Diary functions that have not been completed or those that have for any given period. To execute the Find click the FIND DIARY TASKS button.
THIS IS THE SCREEN THAT APPEARED WHEN I DID FIND DIARY ITEMS Finding Diary Items A found set of Diaries events for the Current User is shown in print layout mode. To print click Continue and nominate the correct printer. If you choose Cancel a small RED button will appear in the top left corner click on it to return to History.
Administrator– As each new user is added to the network the Users Name must be entered into the User Name Field. It is accessed from the Edit / Preferences / Application Menu. You must also ensure that the Plug-Ins are installed and that the Network Protocol is set to TCP/IP click OK to close.
Postcodes– This database stores all of the Australia Post Postcodes. It is linked to the Suburb and State fields in each related database. Once these two details are entered the postcode will automatically be entered in the appropriate record. You can also use this database to find suburbs or postcodes.
Profiles– This database stores ABS data and links to the prospects file it can be used for profiling postcodes by income levels or age categories.
Sales DB– This database stores all of the data that is Imported from SBS. You can search for sales information in this file as per the customer file.
Email File Once in the email File all appropriate fields will be populated you simply need to enter the subject and body of the communication. If an attachment is required add it through the attachment field. To send click email.