Download
1 / 55
550 likes | 558 Vues
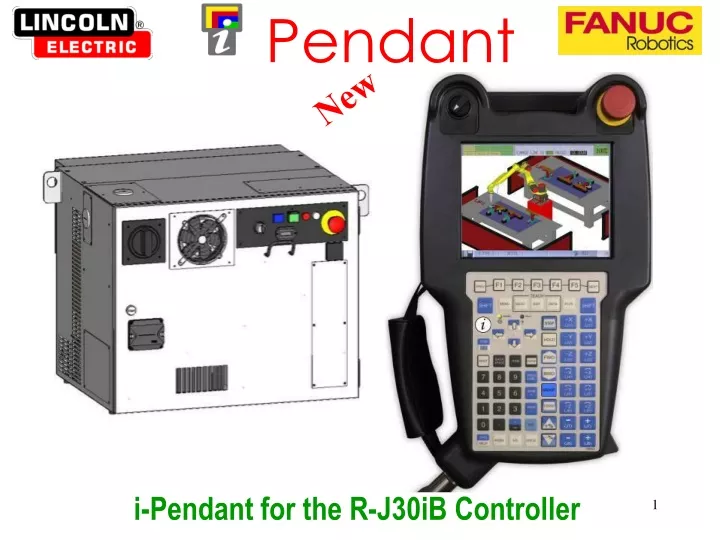
Pendant. New. i-Pendant for the R-J30iB Controller. i Pendant. Earlier Versions. RJ3-iB Controller R-30iA Controller. New R-30iB i - Pendant. No change in key arrangement. Built-in hanger. Large Color display. Light weight ergonomically comfortable body.

E N D
Pendant New i-Pendant for the R-J30iB Controller
iPendant Earlier Versions RJ3-iB Controller R-30iA Controller
New R-30iBi - Pendant No change in key arrangement Built-in hanger Large Color display Light weight ergonomically comfortable body 20% lighter than its predecessor
New R-30iBi - Pendant Angled for better ergonomic feel More comfortable 3-way “Live-Man” grips
Screen: Displays the ArcTool information and graphics. NEW: serves as a touch screen.
ON/OFF Switch: Enables teach pendant control and programming when turned “ON”. Must be in the “OFF” position when in AUTO Mode.
EMERGENCY STOP BUTTON: Use this button to stop a running program, turn off drive power to the robot servo system & apply the brakes to the servo system.
RESET key: Use this key to clear alarms.
SHIFT keys: Together with the other keys performs specific functions.
Jog keys: Use these keys to jog (move) the robot manually. J3 J3 J2 J2 J1 J1 J6 J6 J5 J5 J4 J4
Jog Speed keys: Use these keys to adjust the jog speed of the robot. The Speed Override Display will change: 100% 50% 5% 10%
TEACH keys: Use these keys to select menu options. SELECT key displays a list of programs EDIT key displays the current program DATA key displays a list of the weld procedures, weave schedules, other schedules
Function keys: Use these keys to take specific action depending on the screen displayed. F1 key F2 key F3 key F4 key F5 key
NEXT key: Use this key to display more function keys when available. This key is used when a ">" appears on the lower right corner of the display.
Cursor keys: Use these keys to move the cursor to enable navigation around the screen.
Numeric keys: These keys are used to enter numeric values: 0, 1, 2, 3, 4, 5, 6, 7, 8, 9, minus sign (-), decimal point (.), and comma (,).
ENTER key: Use this key to enter a numeric value or to select an item from the menu.
STEP key: When in T1 or T2 Mode, use this key to switch between: STEP (running one program line at a time) and CYCLE (running a program continuously). Status Indicator showing STEP ON:
FWD (forward) key: In STEP, use this key to execute the next program statement. In continuous operation, use this key to commence programmed robot movement.
BWD (backward) key: Use this key to execute the previous program statement.
TEACH PENDANT FUNCTIONS PART 2
WELD ENBL key: This key enables or disables the welding process while running a program. Press SHIFT and this key to toggle between ARC Enable and ARC Off. Status Indicator showing Weld Enabled:
WIRE Jog keys: Wire Jog “+” feeds the welding wire out of the torch. Wire Jog “–” retracts the welding wire back into the torch.
ITEM key: Use this key to select a line in a program using its Program Line Number. Examples: To select a line in a TP program, press ITEM key, type the line number and press ENTER To select a line in a list a System Variables, press ITEM key, type the line number and press ENTER
BACK SPACE key: Use this key to delete the character or number immediately before the cursor.
PREV key: Use this key to display the previous screen.
MENU key: Use this key to display the menu screen.
HOLD key: Use this key to stop the robot.
FCTN key: Use this key to display the supplementary commands: ABORT (ALL) Disable FWD/BWD CHANGE GROUP RELEASE WAIT TOGGLE COORD JOG TOGGLE COOR ORNT QUICK/FULL MENUS SAVE PRINT SCREEN PRINT UNSIM ALL I/O CYCLE POWER ENABLE HMI MENU REFRESH PANE Diagnostic log
GROUP key: Toggles the i-Pendant between the different Motion Groups: G1, G2, G3, etc.
Aux Axis Jog keys: These four new keys enable the jogging of additional aux axes, and are customizable.
Hold Weld Estab D-Run Status Indicators: display system status.
Local USB port USB port for application backup USB memory USB dongle Capable of wireless keyboard & mouse navigation
TEACH PENDANT FUNCTIONS PART 3
Diag/Help key: Use the HELP key to get information on how to use the current screen. Use the DIAGnostics key to display information: error message descriptions, cause, and remedy.
Display key: Use this key along with the SHIFT key, to change the screen view from single frame, double frame, triple frame, or single frame with extended status. Also enables operation toggling to the different frames.
COORD (coordinate) key: Use this key to select the jog coordinate system: X-Y-Z (World, Jog Frame, User Frame) Joint Coordinate System Tool Coordinate System
STATUS key: Press this key to display welding & robot status. • 1. WELD - commanded and real time actual weld voltages and wire feed speeds • 2. ARC Chart - provides charts tracking weld voltage, wire feed speeds, welding current, etc. • 3. AXIS - shows the status of each axis in bits • 4. Version ID – system software versions • 5. SAFETY SIGNAL - shows 10 safety signals • 6. EXEC-HIST - status 200 programs executed • 7. MEMORY - shows memory allocation • 8. PRG TIMER - shows program timer values • 9. SYS TIMER - shows the hour meter values • 10.REMOTE DIAG - status of the remote diagnostics and the device supporting it. • 11. VISION – displays the Vision Runtime screen
OTF key: Use this key for on-the-fly welding parameter adjustment.
I/O key: This key displays the various Inputs and Outputs of the robot controller.
POSN (position) key: Using this key displays the current numeric position of each of the axes of the robot arm.
STATUS BAR INFORMATION
D-Run Speed Override Indicator The speed override is a percentage of the maximum speed at which the robot will move. A speed override of 100% indicates that the robot will move with the maximum possible speed.
D-Run Alarm Status Line The Alarm Status line displays the current alarm.
D-Run Program Status Line Status: Paused, Running, etc. Mode AUTO, T1, or T2. Current line number Name of the currently executing program
G1 S JOINT D-Run Motion Information Motion information can included: jogging coordinate system: joint, world, tool, etc. motion group: G1, G2, G3, etc. subgroup: G1 S would indicate a subgroup of G1 if a robot was on a track, for example.
The key, Touch Screen, 4D Graphics tips
Touch the at the blue status bar, at sub menu, touch Weld Procedure, 3 screen display will now appear, as shown below. Touching on another weld procedure number in the program screen will reveal that procedures details at the right. Upper, right screen displays detail view of Weld Procedure. Lower, right screen displays detail view of Weld Schedule.
Blue Status Bar Touch Shortcuts Touch here and Menu key menu will appear. Touch here and Display menu will appear. Touch here and Function menu will appear.